Colorful Coconut Cream Curry

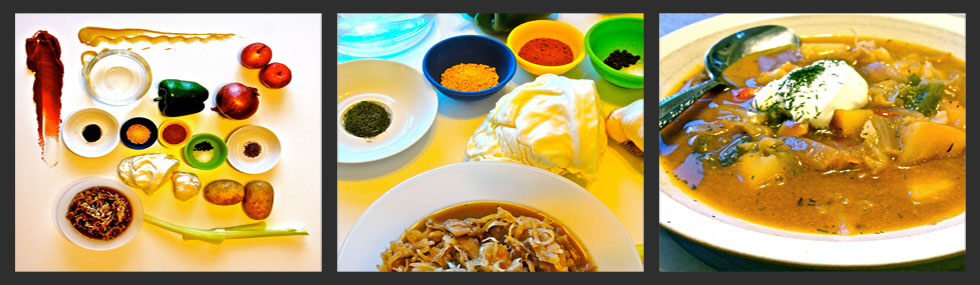
Colorful curry with carrot, red potato, broccoli, and coconut cream served with jasmine rice and raita

It’s been a few weeks since my last post, mostly because I’ve been making some old favorites that I’ve already posted and otherwise enjoying the nice weather and summertime.

Today’s post is a new off-the-top-of-my-head vegetable curry with a lot of color. I’ve done a number of indian and thai curries, but this one may be something of a haphazard fusion of the two, as I just chose my ingredients by whim.

Ingredients for the rice:

  • jasmine rice
  • cumin seed
  • bay leaves
  • cinnamon stick
  • hot curry powder
  • salt

Ingredients for the raita:

  • yogurt (I was lucky to have been given some homemade, from cow’s milk)
  • garlic, minced
  • carrot, julienned
  • green pepper, finely chopped
  • tomato, cored, seeded, and finely chopped
  • garam masala
  • saffron threads
  • salt

Ingredients for the curry:

  • canola oil
  • water
  • carrot, peeled and sliced
  • red potato, skins intact, small-diced
  • broccoli, bite-sized pieces, steamed
  • red onion, sliced (top to bottom) into thin strips
  • garlic, minced
  • habanero pepper, seeds and veins removed, finely minced
  • cumin seed
  • turmeric
  • garam masala
  • salt and pepper
  • coconut cream/milk
  • cilantro (chopped fresh or crushed dried)
  • thai bird peppers (one per serving)

I chose coconut cream for sweetness; you could substitute coconut milk (or even a yogurt) if you prefer.  Here’s one discussion of Coconut Milk vs. Cream.

Preparation:

First, to prepare the rice, I simply put the ingredients in a rice cooker and let it do its thing; afterwards I removed the cinammon stick and bay leaves and added them to the curry.

While the rice was cooking, I prepared the raita.  (Of course, if you want a vegan dish, you’ll have to skip the yogurt-based raita.)  Simply mix all the ingredients together, and let sit.  (This is also nice to make in advance, and refrigerate, as the flavors mellow and blend together.)

I prepared the curry in a 12 inch cast iron skillet; first toasting the cumin seed, then mixing the spices and oil, garlic, onion, hot peppers, and cooking the potatoes.  I added the sliced carrot later, as it was sliced thinner and would cook faster.  Add water occassionally as necessary to avoid sticking to the pan, and add the (separately steamed) broccoli and the coconut cream after the potatoes and carrot are cooked to suitably tender.

Coconut Cream Curry with raita and spiced jasmine rice.

I served the rice, curry, and raita sprinkled with some crushed dry cilantro leaf and a (cooked) whole red thai bird pepper.  (This hot pepper makes it easy for each diner to spice it up to their own taste.)

A colorful curry with rice and raita

That’s it! I hope this inspires some colorful cooking for you to share to likewise share with the wonderful people that color your life. :)

By the way, WordPress tells me this is my hundredth post!
(Now the money will start rollin’ in, right?)

Sesame Pea Shoot Salad

Sesame Pea Shoot Salad with red pepper and chickpeas

This salad was my veggie offering at two Memorial Day BBQ parties that I attended; it’s a simple salad of basically 3 vegetables and a tangy dressing.

The salad dressing is my homemade version fo Trader Joe’s Goddess dressing.  I simply worked from the ingredient list on my empty bottle: vegetable oil, water, tahini, apple cider vinegar, soy sauce, [lemon juice,] salt, garlic, sesame seeds, [spices, zanthan gum.]

“Goddess” dressing ingredients

I skipped the ingredients shown in brackets (above), used sunflower oil, and I used tamari instead of soy sauce.  (Tamari is basically a gluten-free soy sauce.)

Combine these ingredients in a blender and liquify while adjusting to taste.  To the best of my recollection I used these quantities:

  • ~2 T. sunflower oil
  • ~1/3 cup water
  • ~1- 1 1/2 T. apple cider vinegar
  • ~2 T. tahini
  • ~1 1/2 T. tamari (or soy sauce)
  • 4 cloves garlic, coarsely chopped
  • salt to taste (sparingly, as the tamari or soy sauce is salty)

I deferred the addition of~4 T. sesame seeds to the salad afterward rather than blending into the salad dressing.

If you’ve not had Trader Joe’s Goddess dressing, it’s a smooth dressing that is tan in color (slightly browner than the tahini).

The blended “Goddess” dressing

To prepare the salad, I coarsely chopped 8 oz. of pea shoots, finely diced one red pepper (seeds and veins removed), and drained and rinsed one soup-sized can of chickpeas.

Then I tossed the pea shoots, red pepper, and chickpeas with about 1/4 of the aforementioned prepared dressing (add sparingly, so as not to drown the vegetables in dressing), and a generous amount of sesame seeds.

I don’t know whether or not everyone enjoyed this salad, but I did, and the dish was empty by the time I left the party.

Regardless, whether you buy it from the store or make it yourself, this dressing is a hit.

Yay, I’m all caught up – now just to read all your recipes that I missed! :-)

Blackened Catfish Sandwich

Blackened Catfish Sandwich with tzatziki and pea shoots

Here’s a nice, simple, spicy catfish sandwich.

First spice a catfish filet generously with a mix of: oregano, thyme, granulated (dry) garlic, salt, pepper, and cayenne powder to taste.  (I used a frozen swai filet, thawed in water, then patted dry.)

Pan fry the filet in oil (I used sunflower oil) on medium-high heat, until it is cooked through and possible to flake with a fork.  The hotter the pan, the more likely the spice mix will blacken.

Place the filet atop a nice roll and top as you like.  I smeared the sliced roll with a homemade tzatziki sauce (greek yogurt, dried dill, minced garlic, salt, pepper) and added coarsely chopped fresh pea shoots (these typically being available from asian grocers.)

While I have only recently started using this asian catfish, sold in the U.S. as “swai,” it definitely has a wonderful taste and texture that rivals our american catfish and it cooks similarly, i.e., it is forgiving to pan fry owing to, I assume, it’s relatively high fat/oil content.

I like the combination of the spicy fish with the soothing, garlicky tzatziki sauce, and some sort of fresh greens; give it a try!

Blackened Catfish Sandwich

Scrambled Egg with Tortilla Strips and Portabella Mushroom

Scrambled Egg with Tortilla Strips and Portabella Mushroom

Here’s a typical sort of quick breakfast that I make… especially since plain scrambled egg is *boring*.

First, cut one or two corn tortillas into strips (maximum length about half the diameter of the tortilla) and crisp these in olive oil in a pan, then remove from heat.  Saute sliced baby bella mushroom, perhaps with some garlic, salt and pepper, and place those aside as well.  Prepare one or two scrambled eggs as you like; here I mixed in about 1 T. of kyopoolu sauce; I’ve mentioned this red pepper, eggplant, and garlic-based sauce in a number of earlier posts.  Lastly, mix the ingredients together and top with cheese if you like:
A great way to add taste and texture to boring old scrambled egg!

I learned to add crisp corn tortilla strips to scrambled egg from my Mexican sister-in-law. :-)

Tilapia Tostadas


Wow, I see I haven’t posted in 3 weeks!  I bet you were all worried, “Is Dave still eating?”

I offer this hiatus as evidence that I do have a job… actually, I was doing my research work and also had a nice week visit to San Diego for a workshop and to visit old and new friends.

So, lets catch up with some quick-and-dirty foods.

This one is simply a serving suggestion: tilapia tostadas… mashed black beans, shredded napa cabbage, queso fresco, and a tilapia filet (from frozen, defrosted in water and patted dry) lightly pan-fried in oil with oregano, salt, pepper, and a jalapeno hot sauce, and scallion greens, all atop a crisp corn tortilla.

One tip I have for you is to buy corn tortillas and bake them in the oven to crisp them, rather than using those “hard” deep-fried corn tortillas for tostadas.

Chicken Tinga

Chicken Tinga Tostada topped with ripe avocado, scotch bonnet queso fresco, and cilantro leaf.

I’m a huge fan of Mexican and Tex-Mex food; if pressed, I usually say it’s my favorite. As such, I was surprised that, to the best of my recollection, I’d not heard of this fantastic dish.

In preface, I can say that after making this in my kitchen, I’m pretty sure my house has never smelled so good. Perhaps it did on Thanksgiving Day. :-)

My inspiration was: (a) to make something Mexican in honor of Cinco de Mayo – despite the idiocy that sometimes surrounds its “observance” in the U.S., and (b) to use up my chorizo.

Chicken Tinga ingredients.

I started with this impressive recipe: chicken tinga, apparently by a Kiwi chef now living in the Yucatan. One thing that struck me about this recipe is that many ingredients are used twice: to poach the chicken and also to make the sauce.

Here’s are my modifications:

  • I used well over 2 pounds of chicken breasts; perhaps 5, so approximately doubled the onion and spices to poach the chicken.
  • I used dried thyme and oregano rather than fresh.
  • I used one medium to large red onion (rather than white) in the sauce.
  • I used reconstituted dried ancho chilies (~7 small-medium), rather than using chipotle chilies in adobo sauce.
  • I used the water from the rehydrated chilies both to boil the chicken, and as part of the blended portion of the sauce.
  • I used 1 14.5 ounce can of fire roasted diced tomatoes, instead of fresh tomatoes.
  • I used 1/2 white vinegar and 1/2 apple cider vinegar.
  • I used an additional 1 T. brown sugar, to taste, to balance the vinegar.

First, when rehydrating ancho chilies, I do as Rick Bayless suggested, and cover them with a small plate to keep them submerged, for 30-45 minutes.  Remove the stems and the seeds and rinse them before blending them into the sauce.

Rehydrating ancho chiles

I tasted the chicken before combining it with the sauce, and it was quite flavorful on its own.  (I’ve often prepared chicken breasts for pulled or shredded chicken by boiling it in V8 juice; that’s a nice short-cut, but not nearly as good as with these spices.)

Poaching/boiling chicken breasts

Sautéing red onion strips and browning chorizo.

Preparing the sauce: onions, chorizo, and garlic

Sauce with blended tomatoes, ancho chiles, vinegar, sugar, and spice added

My total prep time was about 1 1/4 hours, including a wait for the chicken to cool so that I could pull or shred it rather finely, finishing by stirring it into the sauce to simmer for 5 minutes.

I took the Chicken Tinga to a friend’s house where we served atop both crisp tostadas and warmed corn tortillas along with shredded iceberg lettuce, ripe avocado, cilanto leaves, and crumbled Scotch Bonnet Queso Fresco.

Chicken Tinga tostada

I’m really happy with how this Chicken Tinga turned out, and, if I’m to believe them, so were the 3 friends, including one child, that have tasted it so far!  I can also suggest the substitution of ancho chilies (that are just a bit spicy); their flavor worked really well in the sauce.

Here’s the recipe that I adapted:

On a subsequent morning, I placed a poached egg atop Chicken Tinga for a nice breakfast from the leftovers… a serving suggestion from the video linked above.

Chicken Tinga with poached egg and queso fresco on spiced bread.

There are some complementary mexican recipes and interesting videos here:

Scotch Bonnet Queso Fresco

Scotch Bonnet Queso Fresco

This is my second foray into cheese-making; my first was making paneer, that I made according to this post: Paneer 101.

As far as I know, Mexican queso fresco is pretty much the same thing as paneer, except usually saltier and is made using vinegar to cause the milk to curdle, instead of lemon juice.  It’s a simple, fresh, crumbly, non-melting cheese that is great for Mexican dishes.

If you’ve followed my blog, you might have noticed I’ve been having a love/hate, hmm no, just a relationship with scotch bonnet peppers. I’ve loved habaneros for both their heat and flavor, but most recently bought about 10 scotch bonnets instead, after seeing their similarity and learning they’re related varieties. Unfortunately, I’m not enjoying them as much. To me, the scotch bonnet has just been a ridiculously hot and a less flavorful, red version of the tasty orange habanero. Oh, well, I only have one scotch bonnet left so I’m determined to use it; I thought, “Why not put it in a cheese, to be soothing from its heat and impart some nice color and spice to this typically mild cheese?”

Preparing to make queso fresco.

Ingredients:

  • milk, 1 gallon; I used 2% just because that’s what I had on hand.
    (Higher fat content means higher yield, so one would typically use whole milk.)
  • vinegar, white or other, ~6 T.
  • salt, 2 T., plus more to taste
  • optional: 1-3 scotch bonnet peppers, finely minced and lightly sautéed

Since the scotch bonnet addition was an experiment, I decided to prepare 2/3 of the cheese as plain queso fresco, and 1/3 with the pepper, hence I used only one pepper.

Preparation:

You know what? I’m not going to describe this. It’s written up well in both of these recipes:

Squeezing the whey from the curd in cheese cloth

Scotch Bonnet Queso Fresco before pressing

Using plates to press moisture from the cheese
(I pressed it with the plates held vertically over the sink.)

Drying queso fresco under weight

I will leave you with these tips from my experience, however:

  • The first time, when I made paneer, I didn’t squeeze enough of the moisture from the cheese.  This time, at a friend’s suggestion, I pressed it between plates, and that did the trick.
  • Still concerned that I hadn’t removed enough moisture, I made the mistake of letting it sit in the refrigerator, in cheese cloth after pressing, for 6-8 hours, intending to dehydrate it;  this was a bit too much.  If it’s squeezed properly, 2 hours on the countertop is probably plenty “drying” time.
  • Queso fresco is typically quite salty.  Even though I added 2 T. of salt to the milk, the result wasn’t very salty, so before squeezing it in cheese cloth, I added some more salt (at the same time as the minced hot pepper); in my opinion it still wasn’t enough salt.  Next time I will add even more salt when squeezing it, before pressing it.

Scotch Bonnet Queso Fresco

This was a good Cinco de Mayo project, and I was left with two varieties of queso fresco ready for my forthcoming Chicken Tinga tostadas and tacos!

Chorizo Buffalo Chicken Sandwich

Chorizo Buffalo Chicken Sandwich

If ever you find yourself having to choose a last meal, and it must be a sandwich, you’d be doing yourself a final favor to request this Chorizo Buffalo Chicken Sandwich.

This is a sort of tribute to Katja’s Kitchen, as it is a variation of Katja’s Oven-Baked Buffalo Chicken Sandwich.

I used her recipe pretty much as-is.  However, I started by browning about 2.5 ounces of mexican chorizo in a pan.  I cooked the chorizo slightly less than I would if eating it immediately; after all, it’s going to bake in the oven with the chicken.

Sliced chicken breast and pan-frying chorizo

I sliced a relatively small chicken breast lengthwise, but not all the way through, so I could fold it open to a nice thickness for a sandwich.  (Hmmm, this may be twice as much chicken per sandwich as Katja’s recipe.)

Next, I pressed most of the fat from the chorizo and mixed it with .5 ounces of lightly crushed Special-K breakfast cereal, then coated the chicken breast as she described in her recipe. Be sure to press the coating to the chicken so that it is still adhered when it finally makes its way to your sandwich.

Dredge the chicken breast in flour, coat with egg, and chorizo/cereal mixture.

I similarly baked it in a 350° F oven for 30 minutes.

I served the chicken on lightly toasted sliced cheese bread, from our Farmer’s Market, topped it with hot sauce (Valentina brand Salsa Picante, which is much hotter than Frank’s Red Hot, thus I used it sparingly), ranch dressing, thinly-sliced celery, and a bit of crumbled queso fresco – not that the sandwich needed it, it’s just that I made the fresh cheese yesterday, so “Why not?” It’s my last meal of the, umm, afternoon. :-)

Chorizo Buffalo Chicken Sandwich

Here are the recipes that inspired this sandwich:

Thanks for this and the other recipes, Katja!

A Shrimpy Lobster Roll

The Grilled Shrimp Roll

Shrimp Week’s dramatic conclusion!

If you’ve ever had a Lobster Roll, then you know it’s approximately the best sandwich in the universe…
Certainly, you’ll agree it’s at least the best sandwich in Maine.
Here’s my twist on that classic, prepared with some left-over grilled shrimp.

Shrimp Roll ingredients

Ingredients (per sandwich):

  • cooked shrimp, I used 5 large grilled shrimp cut to bite-sized pieces
  • 2 napa cabbage leaves
  • 1 celery stalk, diced
  • chives, minced
  • ciabatta or other long sandwich roll
  • Thai Peanut-Lime Dipping Sauce

Preparation:
In a bowl, simply mix shrimp, celery, chives, and (sparingly) the coconut milk-based peanut-lime sauce to prepare a sort of shrimp salad.  Since the sauce is quite thin, be sure not to add too much.
Assemble the sandwich by filling the roll with that mix, atop the napa cabbage leaf; this helps prevent the thin sauce from saturating the roll.

Grilled Shrimp Salad / sandwich filling

I served the Shrimp Roll with a bit more sauce for dipping.

Grilled Shrimp Roll with Thai Peanut-Lime Dipping Sauce

As you can see, this sandwich is so tasty that I didn’t manage to get another photo before taking a few bites. :-)

You can find the recipe for the sauce here: