If you happen to be interested in taking food photos, here are a some tips that I’ve discovered or that friends have taught me:
- Natural light is the best; food photos during the daytime, perhaps at a table near windows, will generally be the most appealing.
- If you can’t use natural light, take the photos in the brightest artificially-lit place near your kitchen; for me, that usually happens to be on the stove top.
- Try some shots with the food backlit by the light source if possible; for reasons unknown, it often just looks better, perhaps due to the foreground shadows that show texture.
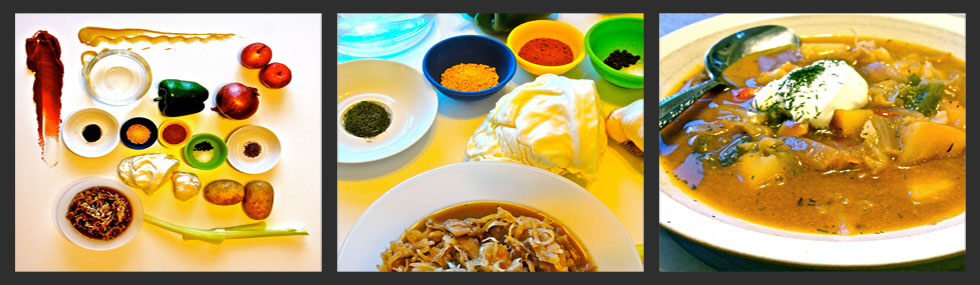
- If you plate the food before photographing, it is often more appealing to put eating utensils in the shot as well. Also, plan ahead for garnishing; often you must set aside a bit of the fresh ingredients when you’re preparing to cook.
- I often like to take food photos from a relatively low angle, having the camera focus on either the nearest part of the dish, or in the middle so that the most distinctive parts of the food are in focus. Of course, the complication is that you must consider the aesthetic appeal of the table and background. Sometimes a shot from straight above is nice, but they’re hard to get without shadows except in an environment that is flooded with light.
- If you want part of the shot to fade out of focus, you can often acheive this by first pointing the camera at a part of the subject that is closer or more distant than what you will ultimately center in the shot, having the camera auto-focus there (usually by partially pressing the shutter button), then re-aiming the camera to frame the shot you desire.
- Use photo software to adjust the levels; this is particularly useful when using normal artificial household light. I use iPhoto on a Mac, and most often I start by using iPhoto’s automatic “Enhance” feature, then return the Saturation and Temperature to normal, and adjust the upper “Levels” tab, Contrast, and Shadows to brighten the shot, but not so far as to wash out or adversely affect the colors. If the photos happen to be poorly lit or out of focus, the Definition and Sharpness adjustments can help as well.
I use inexpensive non-DSLR digital cameras: usually a Sony Cyber-shot DSC-H20, sometimes a Canon PowerShot SD400, and occassionally even my smartphone. Of course bigger lenses collect more light, resulting in better photos.
If you have other tips for me as a amateur photographer, feel free to let me know. :-)

These are good tips. I’m not a photographer, but I do some of these things–natural daylight, low angle, and adding utensils–and I just got a Mac and have started with “Enhance,” but I didn’t know that I could do any more. Thanks for posting!
Sure, I hope they help! With a low-light photo, unfortunately “Enhance” in iPhoto often jacks up the Saturation too much and sometimes moves the Temperature too much, so I usually start by resetting those near to middle (a couple points on the Temperature scale can eliminate the bluish hue sometimes from artificial light), then I move the upper Levels tab down to brighten the shot as much as possible before the brightest areas wash out.
I’m thinking to add some sample photos to this page, when I get a chance, that show the differences for some light conditions and adjustments.
Oh, I see you’re into GF. I should try to be better about choosing my category for those posts; I try to make things that my gluten-intolerant friends can share.
Absolutely stunning photos… now I must go eat something ;)
Thank you, I appreciate it!
Best wishes with your blog; I’ll check back if I need help with allergens. :)
Thank you! Love writing about my experiences and helping others :)