A New Kind of Bacon? Smoked Back Bacon Strips!

“Canadian bacon” or back bacon strips

I’ve not posted many recipes in the past few years, in part, because I’ve largely focused on learning to smoke meats and vegetables. It takes time to develop expertise and there are a plethora of expert smoking sites and YouTube channels that do a great job of sharing techniques and recipes (links below). I felt I had little that’s novel to share.

That changed when a bacon-making friend inspired me to smoke bacon and I had a new idea: Why not make “Canadian bacon” or back bacon in strips like “American” bacon or streaky bacon?

You likely know Canadians typically serve round slices of what’s called “back bacon” that is made from pork loin and Americans serve strips of what’s called “[streaky] bacon” that is made from pork belly. So, the obvious answer to “Why not?” is that a pork loin is roughly cylindrical and easily sliced into rounds once cooked, and a pork belly is flat, easily formed into a rectangle, and sliced into strips once cured.

But bacon isn’t about making something quick and easy – it’s about making something great, e.g., typically with a week-long cure in sugar and salt then a low and slow smoke. Note there are many pork loin preparations other than rounds such as a roulade a.k.a. rollade (Dutch). Why not cut pork loin as if for a roulade, but then cure and smoke it flat and cut into strips? That’s what we’ll do!

Here, I show a typical process of making nitrite/nitrate-free “uncured” bacon, but modified to result in back bacon strips. I say “uncured” because, although a salt/sugar cure is performed, it is my understanding that the U.S. federal government stipulates this be called “uncured” when not prepared using nitrates (nor possibly even nitrites) for meat preservation. What I show, here, is safe preparation method because (a) the bacon is cured in the refrigerator and (b) the resulting bacon fully cooked. If you’d rather use curing salts, e.g., carefully measured Prague powder #1, go for it! If you do, consult some other recipe or instructions since nitrite/nitrate curing salts are poisonous if accidentally used in excess.
Even if you change the cure ingredients, the rest of the process below is the same.

I’ve made this bacon a couple times and think it’s great. Why? Well, back bacon strips are meatier but still have lots of sweet, smoky bacon flavors like from traditional bacon strips. I attribute this largely to the dramatically increased surface area that the flat, rectangular roulade-style pork loin cut offers during curing and smoking leads to more flavor being imparted.

Cut

A whole pork loin cut into three parts, sized for roulade-style cut and bacon strips.

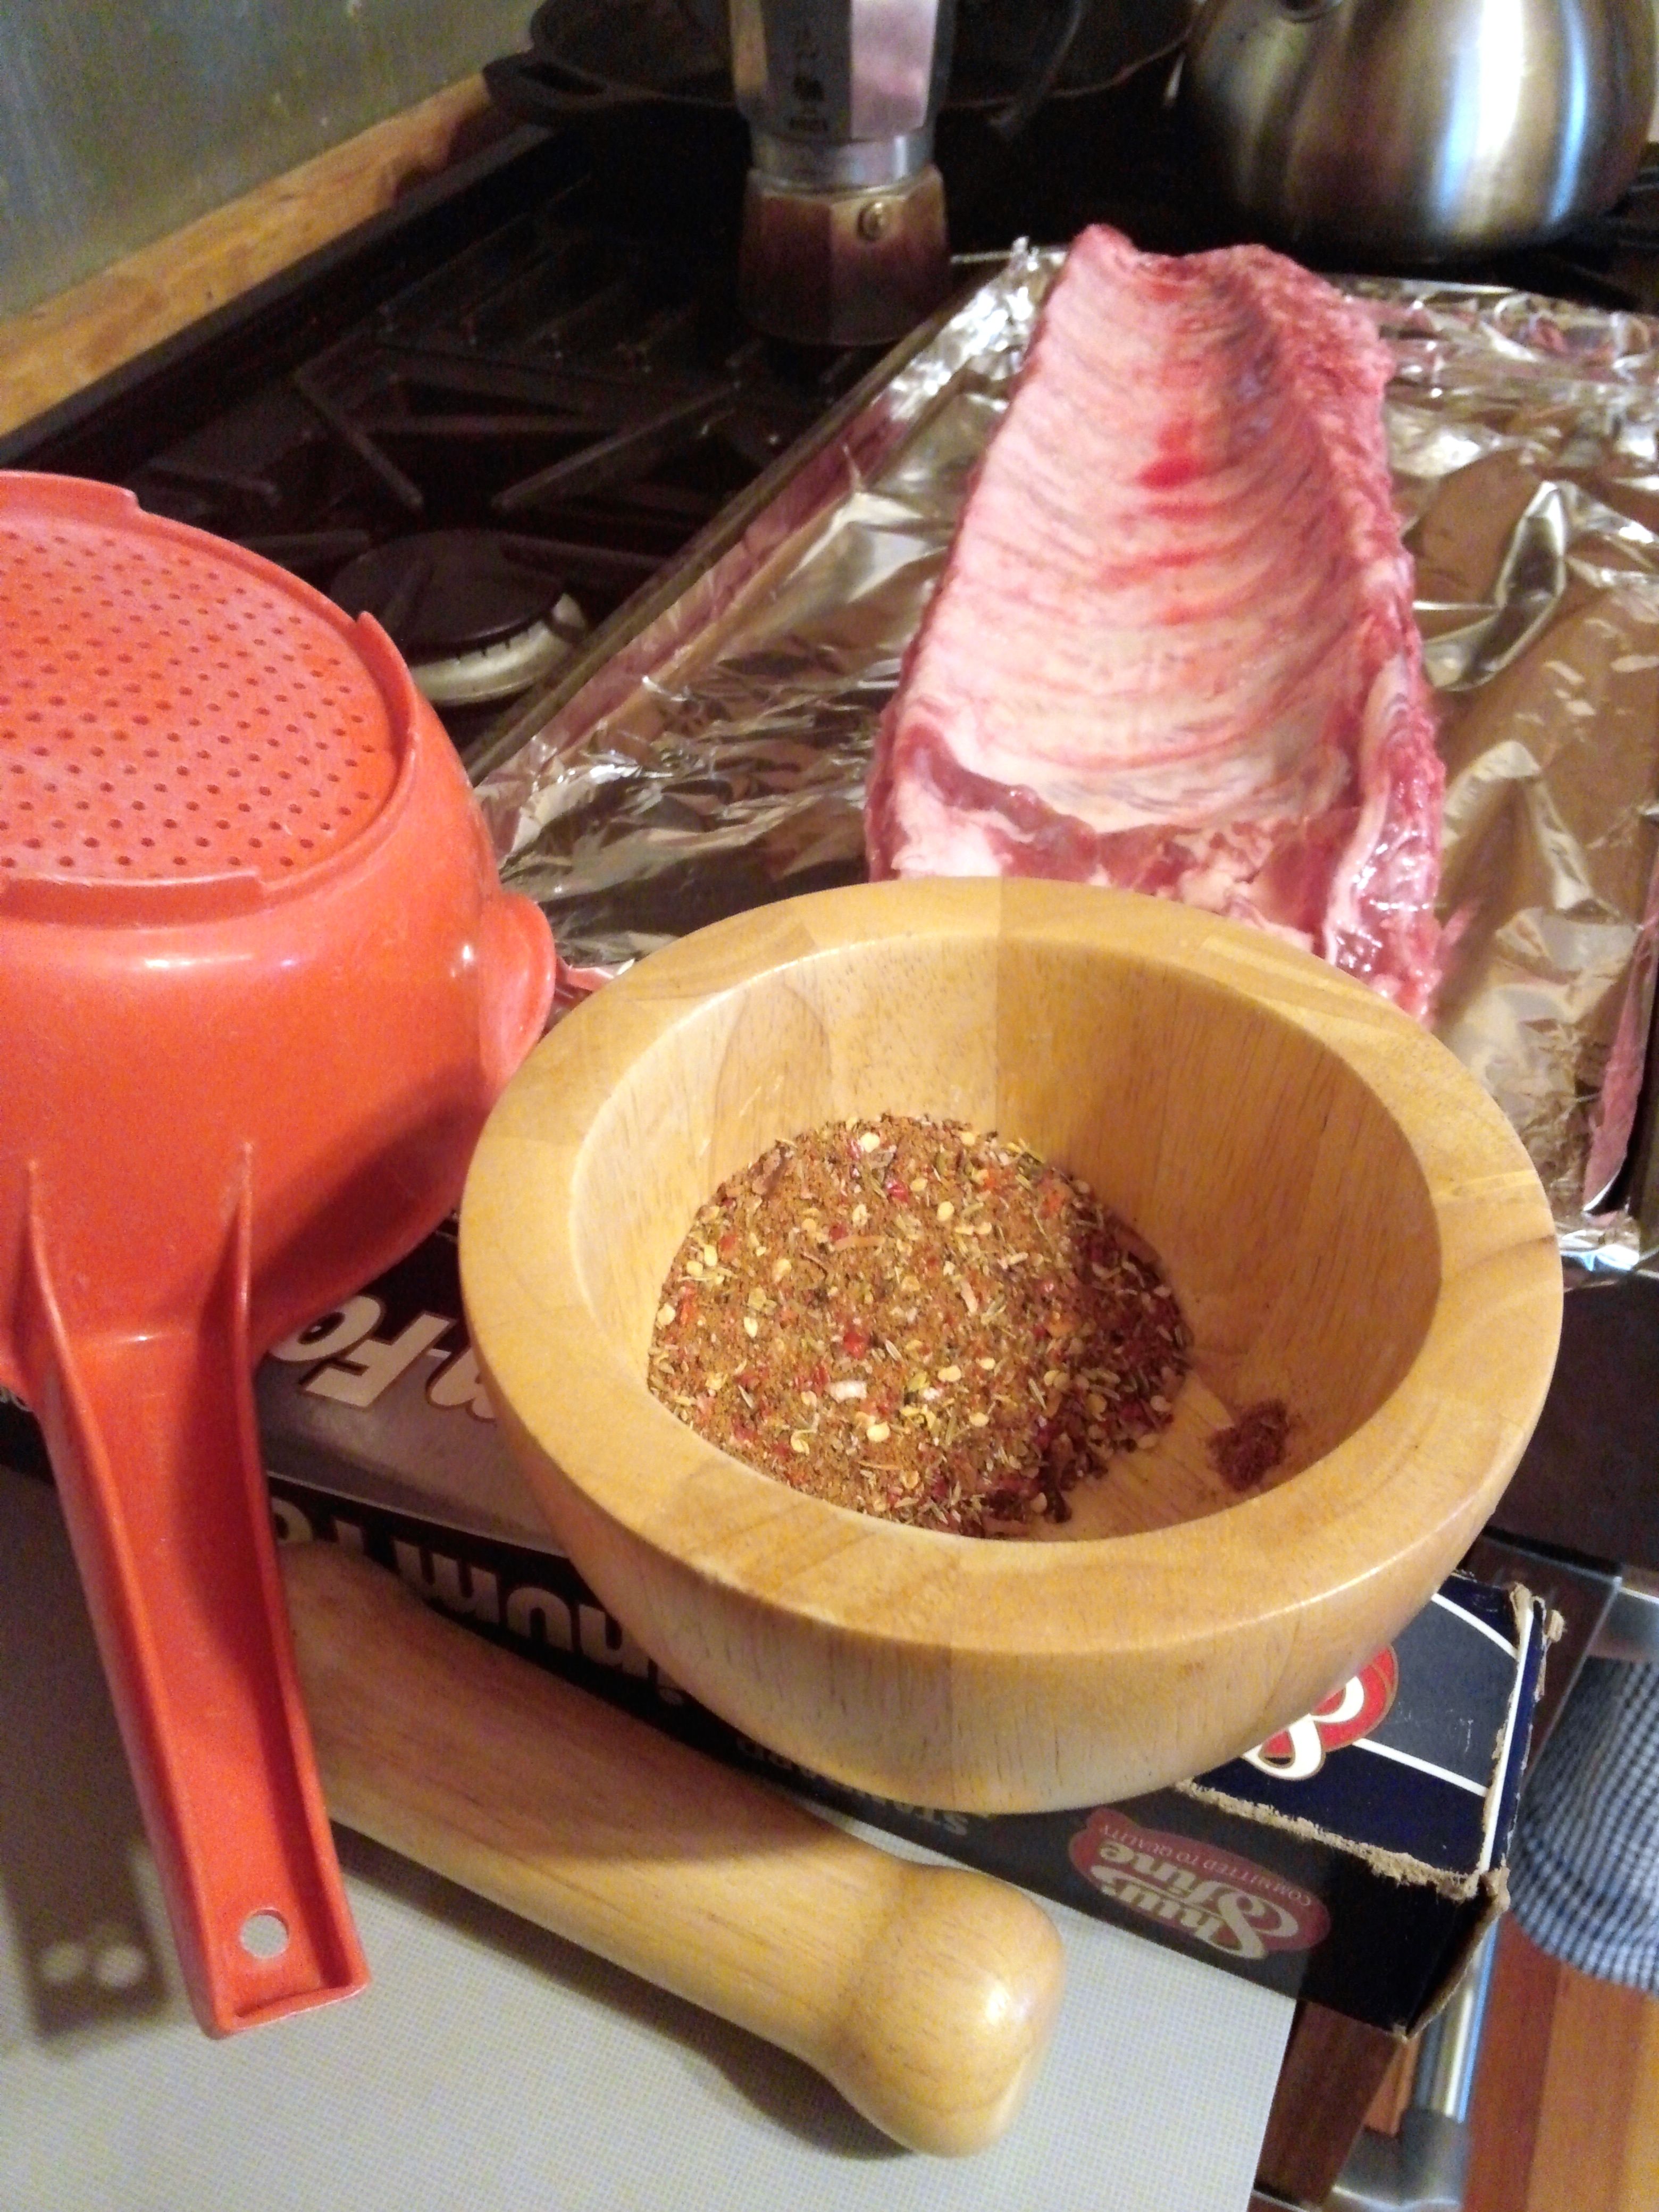
Cut a pork loin into sections and trim the exterior fat as you desire. (You will fully cook the bacon during the smoking step, as in traditional back bacon preparation, so personal preference rather than food safety is your guide in trimming the fat.) The length of each resulting pork loin section determines how many slices you can make from each “flat.”

Next, for each section you will use to make bacon, make a long spiral cut through the section with the knife’s blade aligned lengthwise along the section. The loin’s circumference and the thickness your cutting leaves determines how long your bacon slices will be. This is because you will ultimately slice the bacon strips across the meat’s grain. For the spiral cut, I use a sharp, pointed chef’s knife but you could probably also manage it with a sharp or serrated meat slicing knife as well. Be careful not to leave the resulting flat piece too thin; 1 inch thick is just about right.

If the resulting flat is uneven in thickness, carefully thin it in places by hitting it with a meat mallet until roughly even in thickness. If you’ve not made a roulade before, I suggest watching some YouTube videos showing this cutting method. Don’t worry if the flat isn’t perfectly evenly thick nor exactly square; variety will give the resulting bacon some organic, natural character. Just cut and shape it slowly so you don’t leave divots or holes which will result in short, unevenly cooked bacon strips.

A pork loin section cut roulade-style, and smeared with salt, brown sugar, and maple syrup

Cure

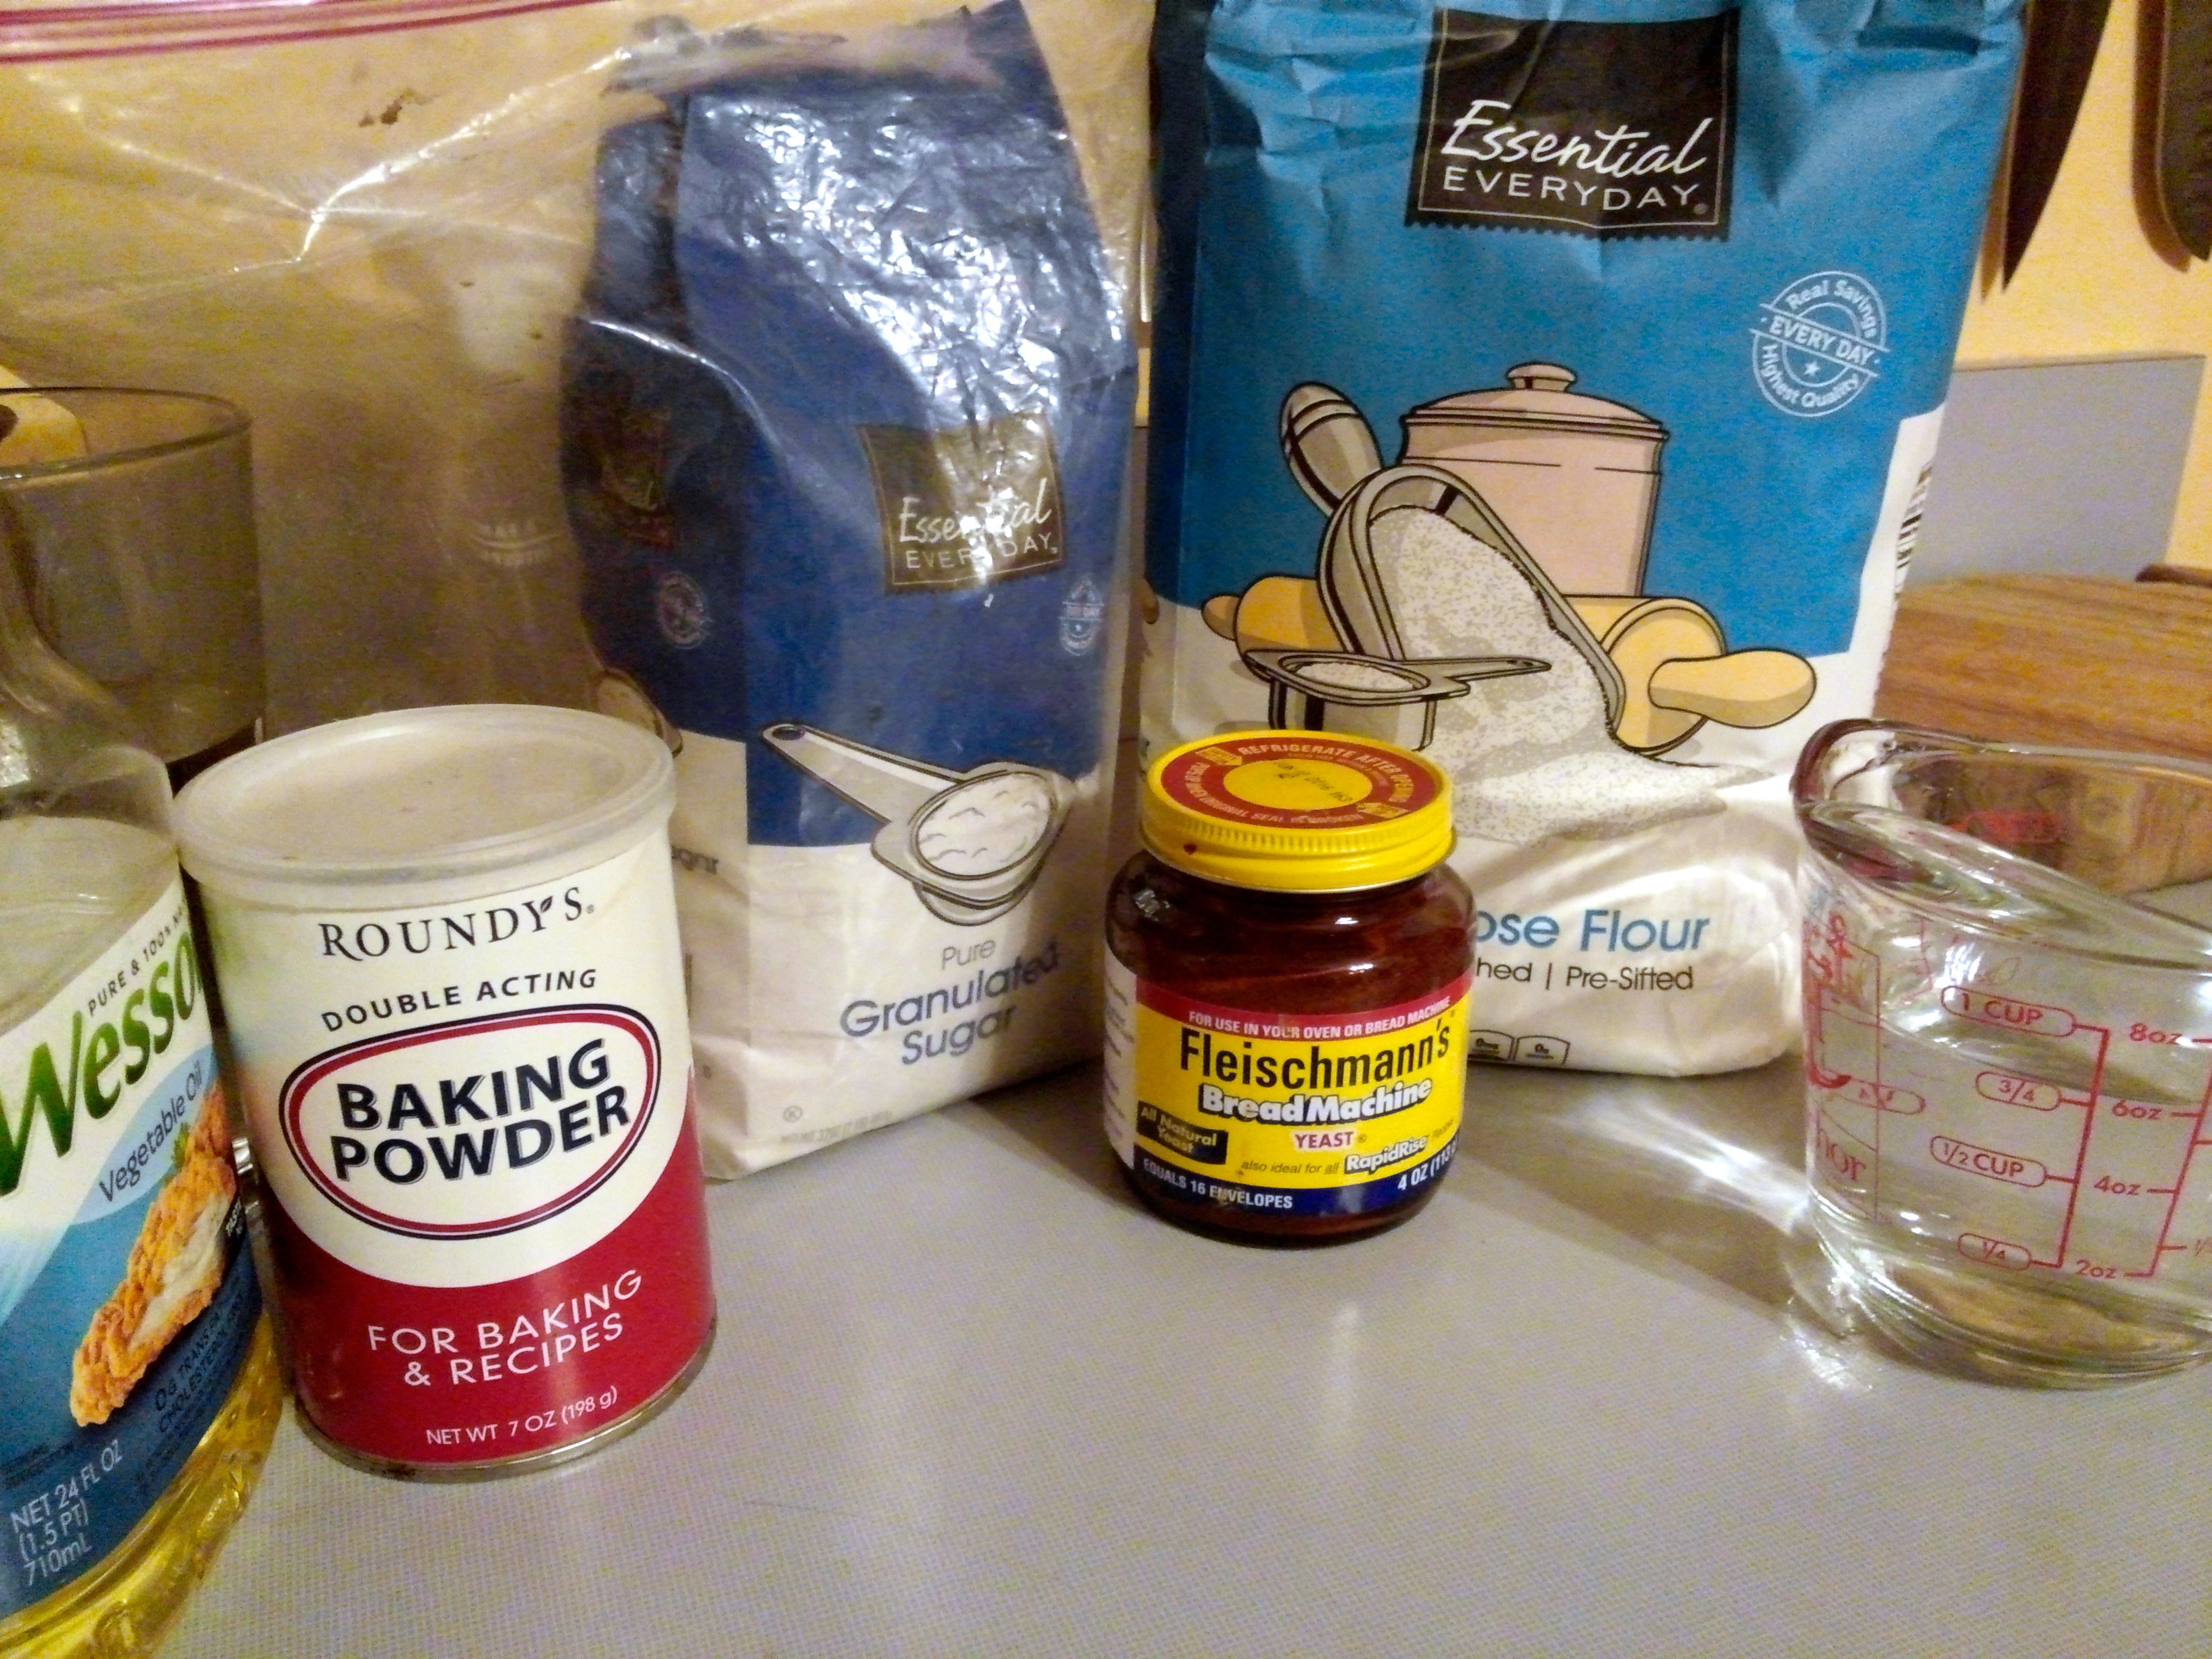
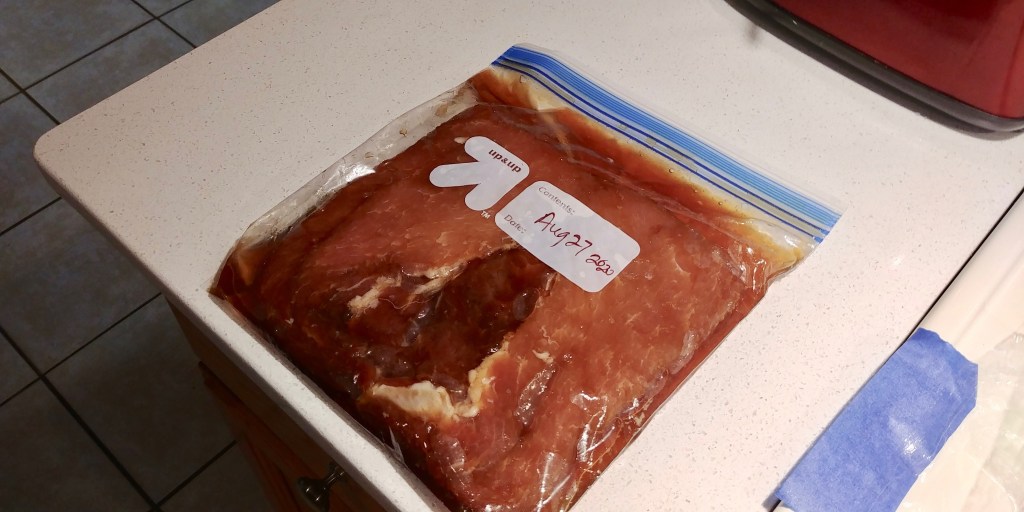
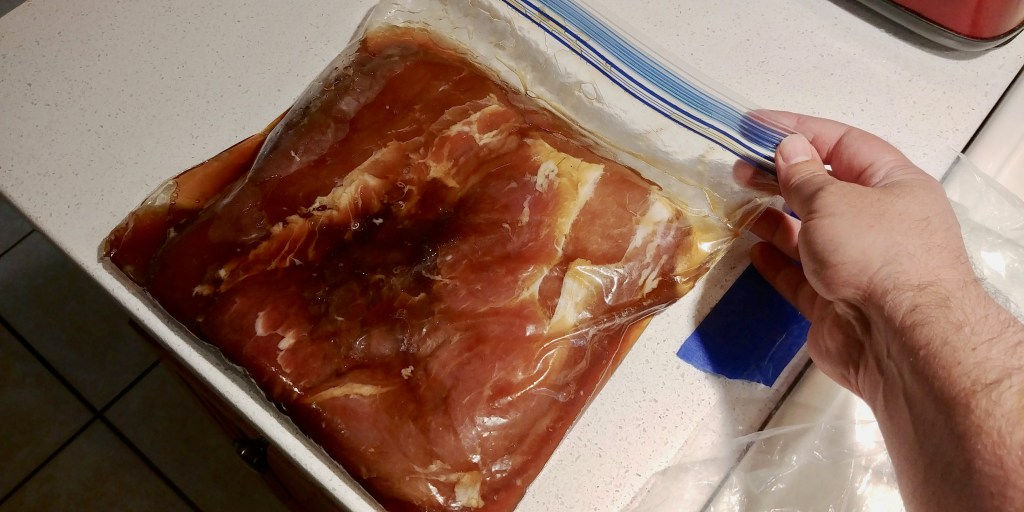
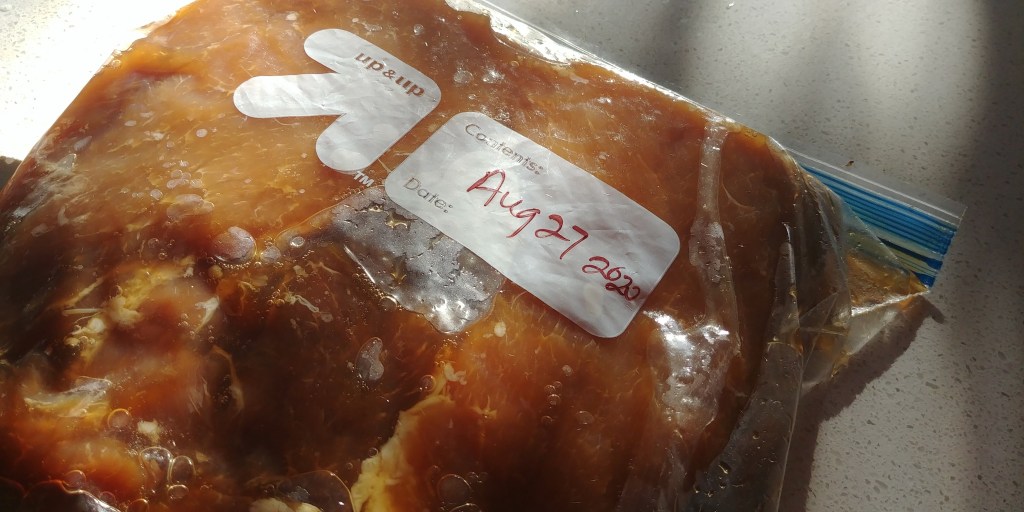
For a flat piece of the size shown (about 10 inches square), prepare a simple paste/mixture consisting of (a) 1/3 cup salt, (b) 1/3 cup brown sugar, and (c) 1/3 cup pure Maple syrup. Smear the mixture on the pork loin flat and place it in a sealed container, such as a gallon-sized Ziplock bag, removing air if possible. Be sure the mixture coats both sides of the flat, and place in the refrigerator for about 1 week.

Once each day while curing, flip the flat over, distributing the cure mixture and liquids to contact all portions of the flat.

Pork loin “flat” dated and curing (in refrigerator)
Flip pork loin “flat” daily while curing (in refrigerator).

Dry

After about 1 week’s time curing, it’s time to prepare the flat(s) for smoking.

Pork loin flat after one week cure

Rinse all the cure mixture from each pork loin flat and pat them dry.

Rinse the flat with water and pat dry, e.g., with paper towel.

Once rinsed and patted dry, place each flat on a wire rack, and return to refrigerator to dry for about one day.

Place the flat on a wire rack to dry in the refrigerator for about 1 day.

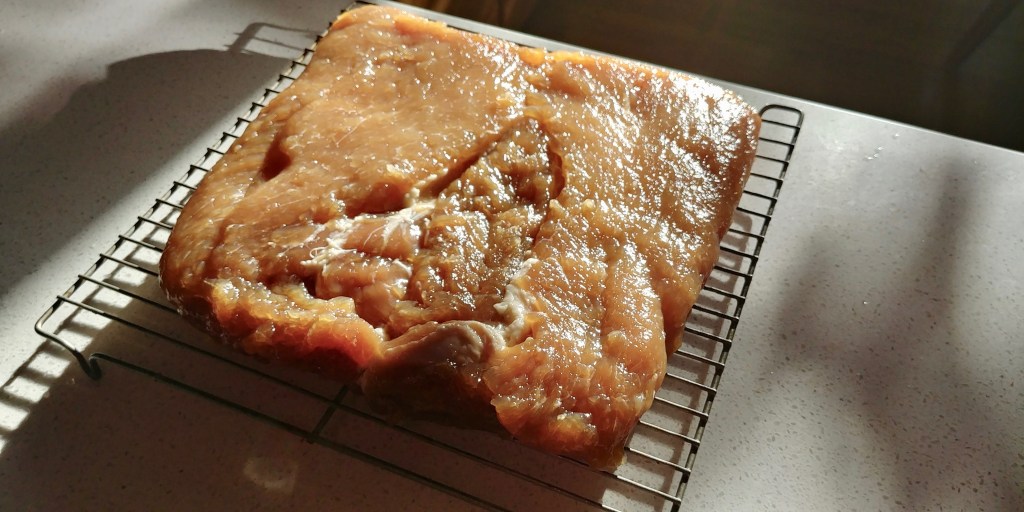
To be honest, I’m not sure this drying step is necessary, but it is a common step in traditional bacon recipes. Instead, it seems to me the flat could be dried in an initial, short cold smoke (to also impart more smoke flavor) or during the hot smoke/cooking process. This might even leave the interior a bit moister, if desired.

Smoke

Once dried, the flats are ready to smoke. If you don’t smoke meats, I suppose you could just cook this low and slow in the oven; I’ve not tried.

I happen to smoke foods in my gas grill using a cold smoke generator and I suggest smoking on Hickory or Maple, here.

Cook fully to an internal temperature of 160°F or more.

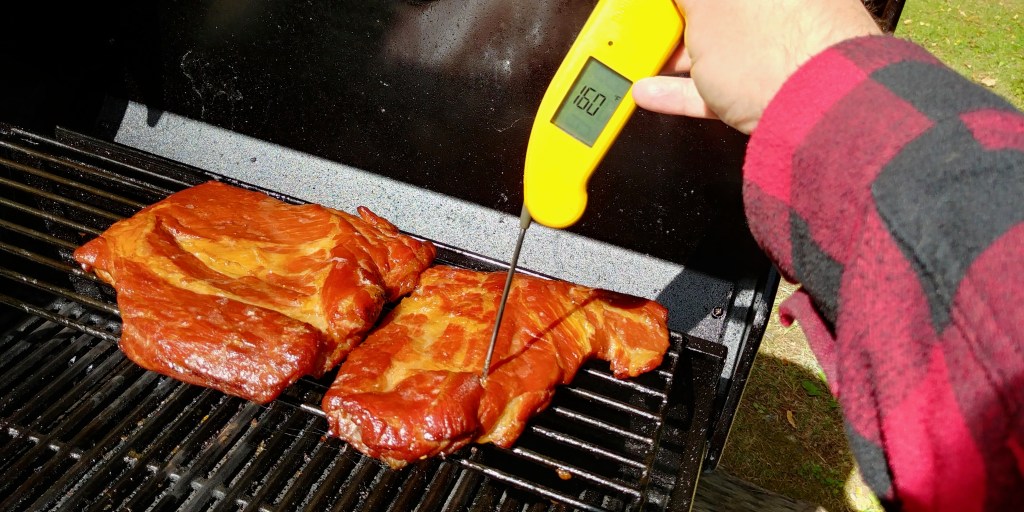
There are lots of time/temperature combinations that would work. The goal is to slowly cook the cold meat to greater than 160°F, internally throughout. For example, smoke at about 225°F for about 2.5 hours. Rotate the flat periodically to cook more evenly.

One way to smoke the cured flats is at 225-250°F for about 2-2.5 hours.
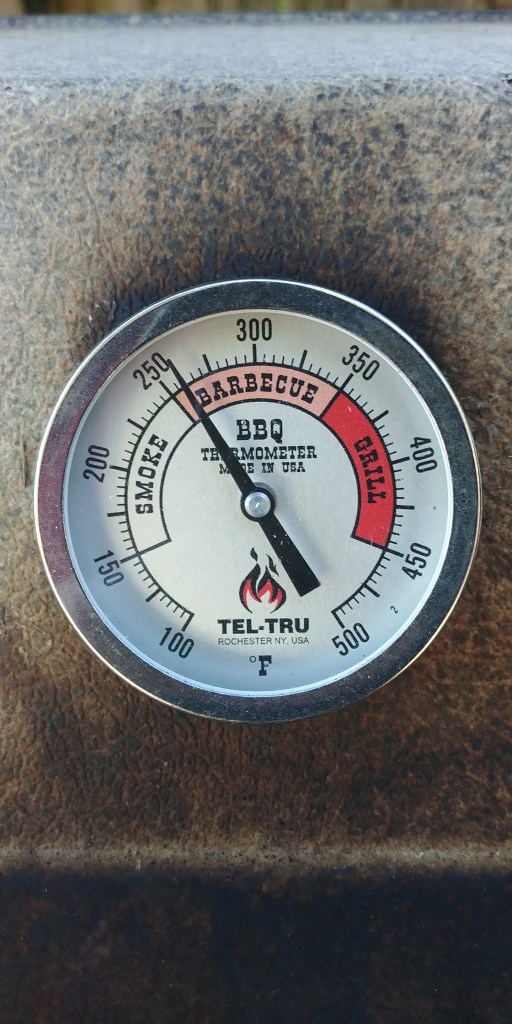
Use an instant read thermometer, probing many locations, to assure 160°F throughout.

Be sure to use a thermometer, preferably instant read, to check the internal temperature throughout the flat, in different places during the cook. Since it is a relatively thin piece of meat, it will reach higher temperatures faster near the heat source and edges if you’re cooking with indirect heat.

Cool the bacon and refrigerate to make firmer for slicing.

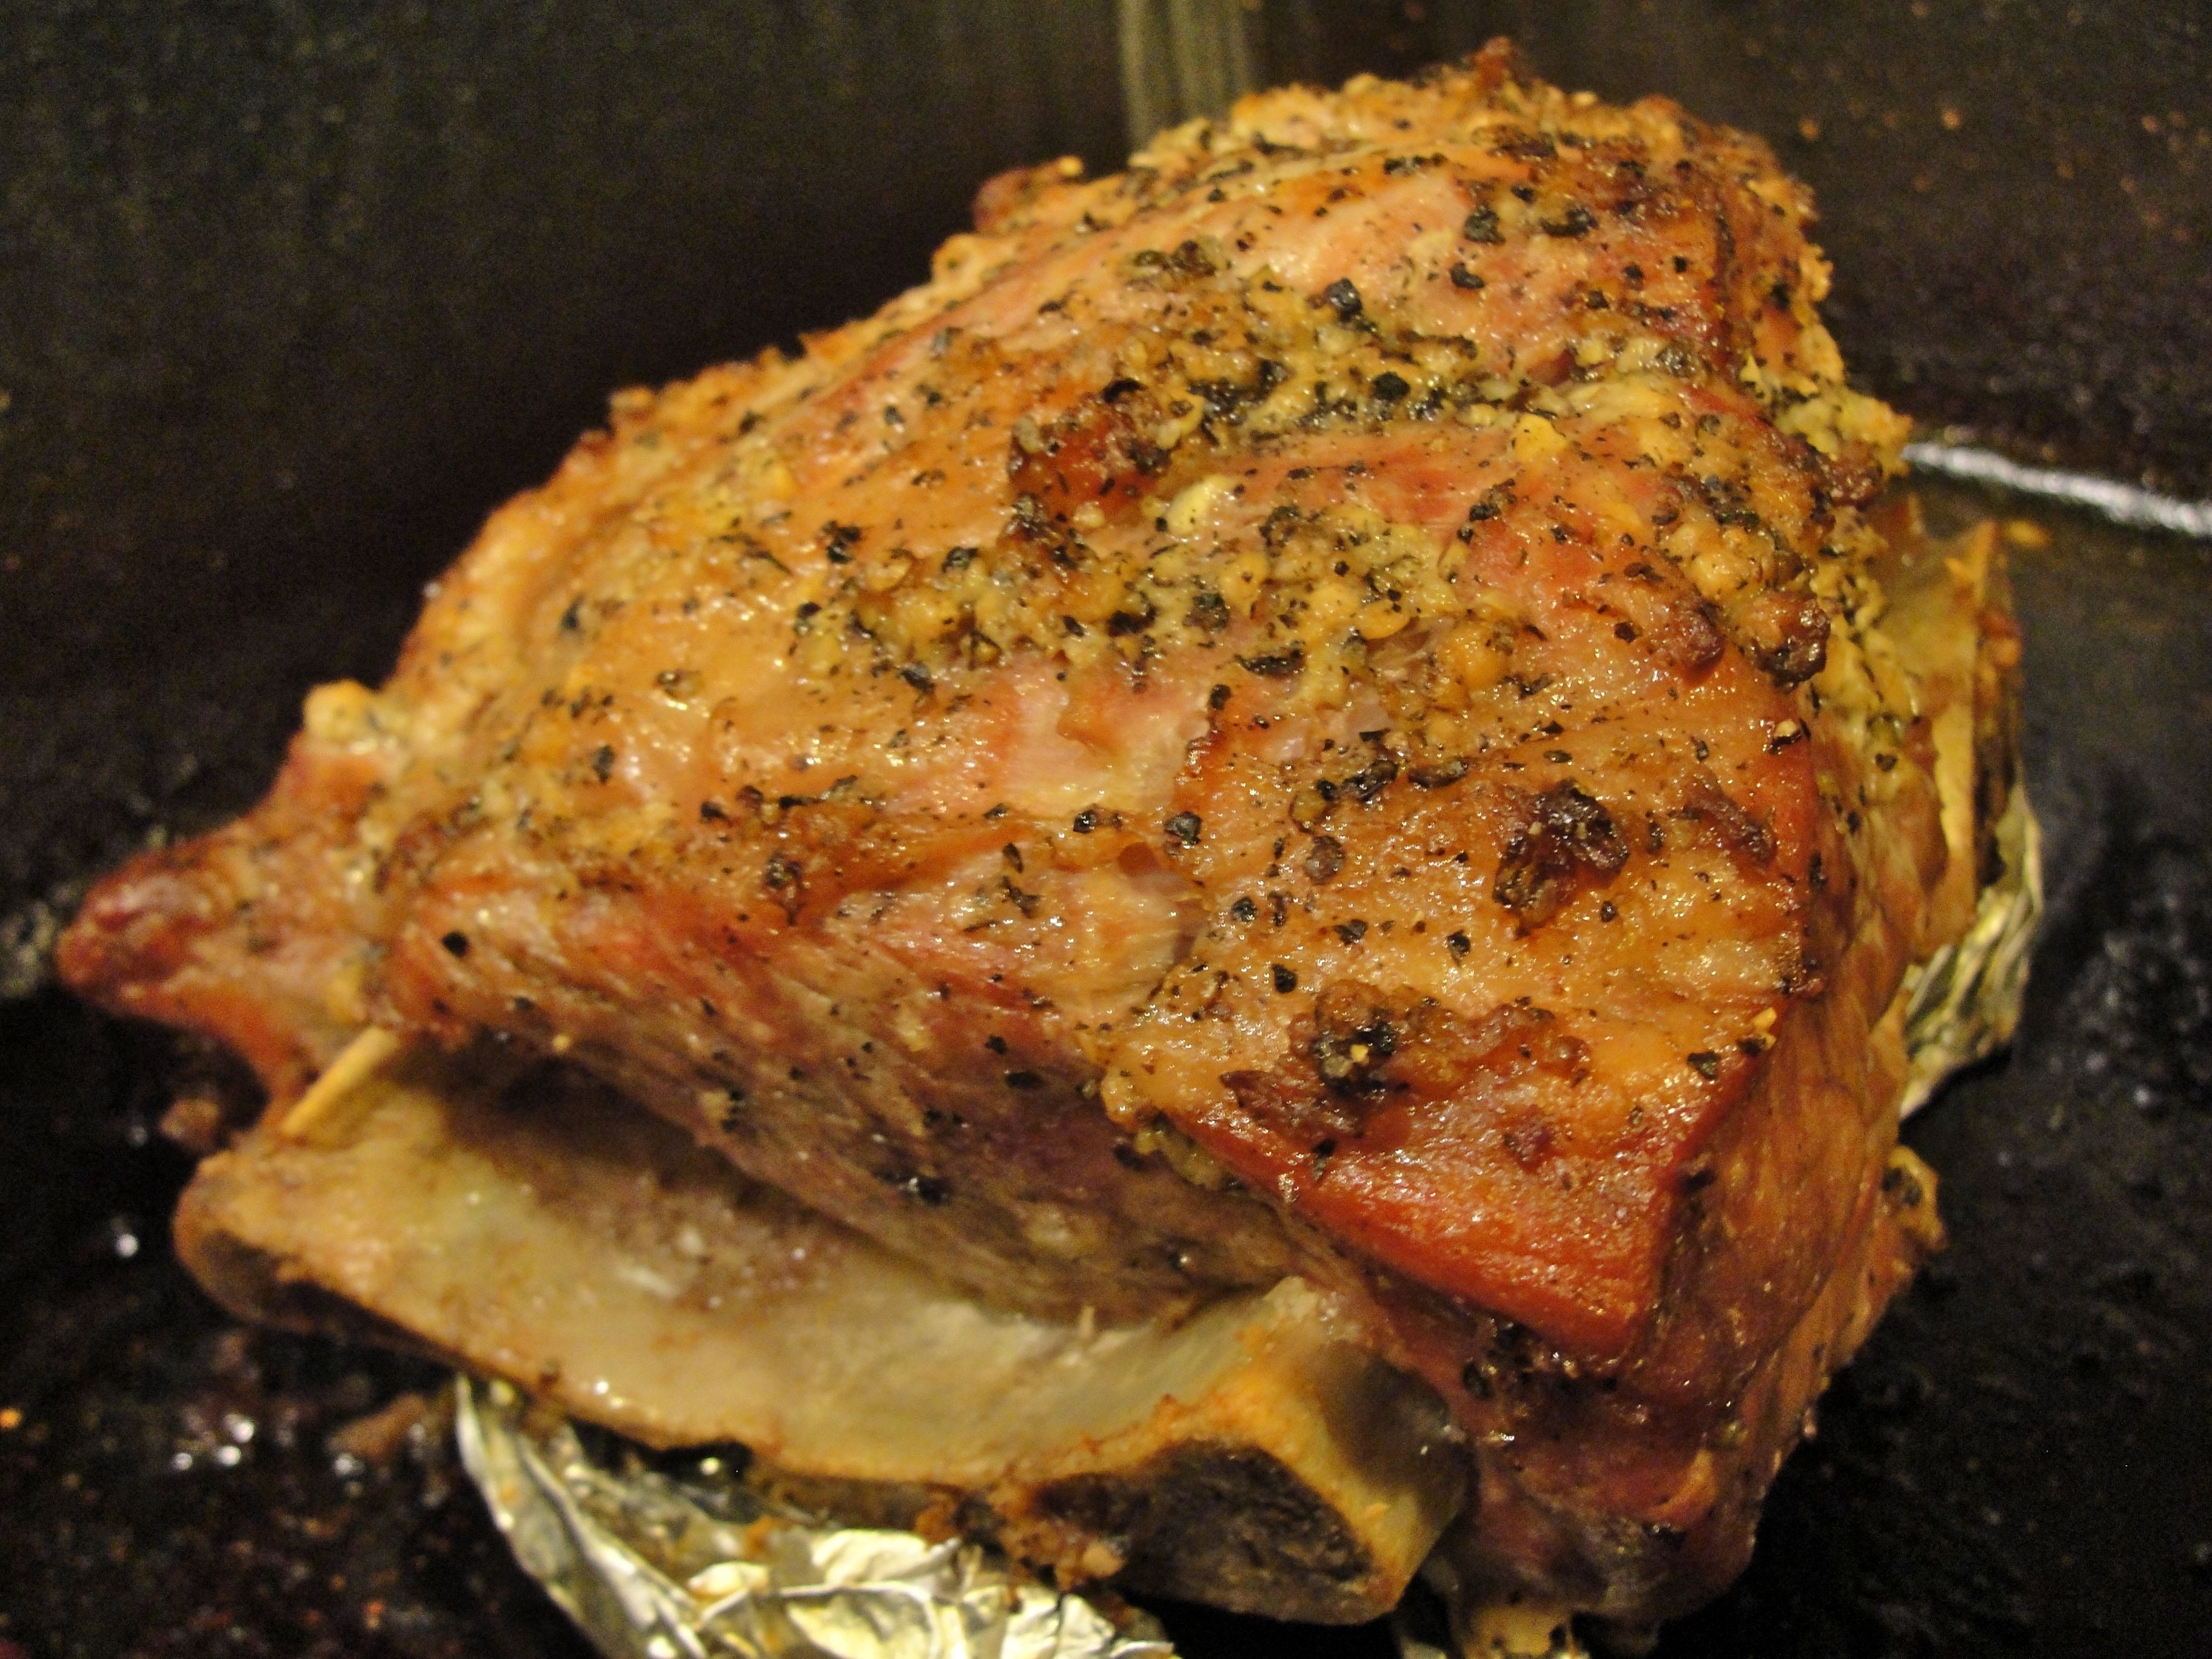
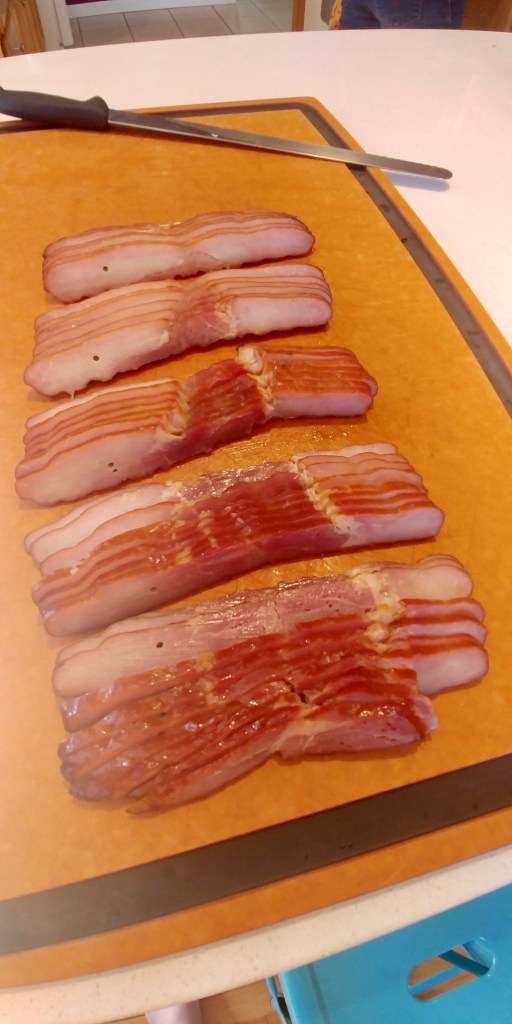
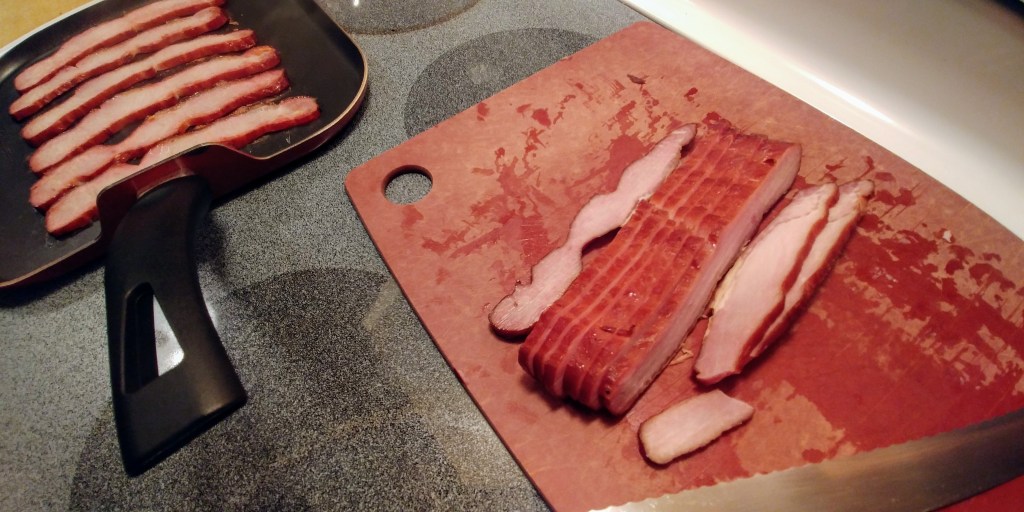
Once smoked, the pork loin flat, now bacon, proper, develops beautiful color. It’s time to let it rest to cool, then place in the refrigerator for slicing. I tightly wrap it in aluminum foil for a few hours in the refrigerator. You can reuse the foil to wrap packs of slices.

Slice

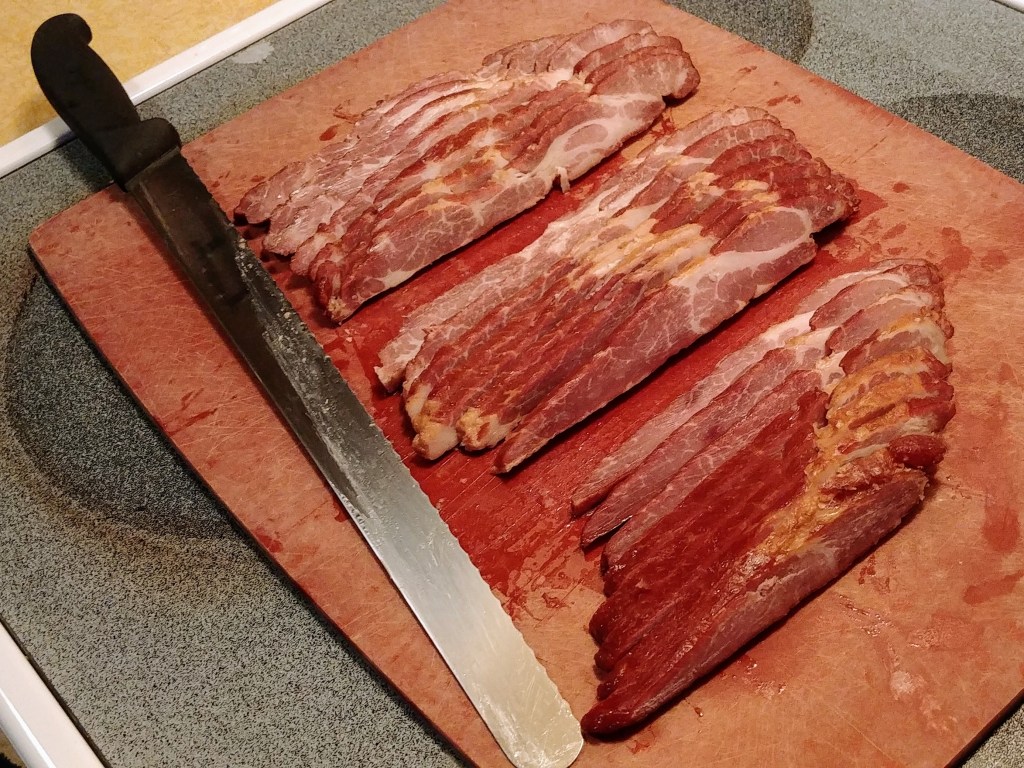
Once refrigerated and firm, it’s time to slice your bacon to desired thickness.

I can get straight, near perfect slices, just like store bought bacon, by using a flexible, sharp, serrated carving knife.

Hold the bacon flat down firmly to a cutting board with your non-knife-holding hand. Then, for each slice, place the blade edge down to the top of the flat, straight and at the desired thickness. Slowly slice straight down with even back-and-forth motion. Go slowly! You just spent a week making this and bacon slice appearance is important!

Refrigerated bacon strips cut using a good slicing knife, e.g., Victorinox.

Serve

Store your back bacon strips tightly-wrapped as you would other bacon. To reduce air contact, I wrap it tightly in aluminum foil, then place in a new Ziplock storage back.

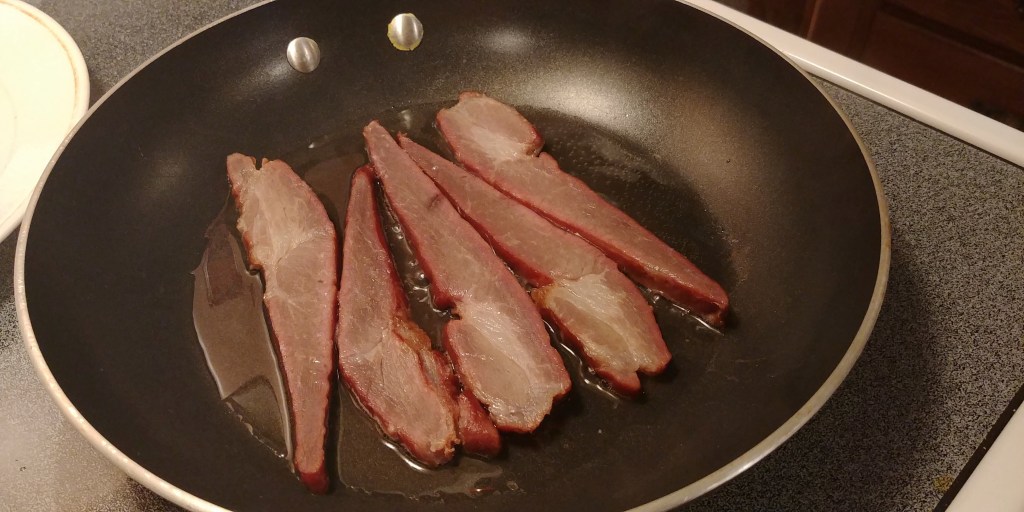
Since it’s fully-cooked, back bacon strips can be eaten as a cold snack. Otherwise, serve it warmed in a fry pan or on a griddle like bacon strips.

Thick-sliced bacon frying on a griddle.

Since back bacon strips are leaner than typical bacon strips, you might like to fry it in a bit of water. This keeps it from sticking to the pan, due to the released sugars while also keeping it moist for serving.

Fry bacon slices with a bit of water in the pan.

Note that frying can make the smoke ring more distinct. Remember, this is uncured bacon, so the pinkness (shown in photos) is not from curing salts but from the wood combustion gases interacting with the meat’s surface while smoking.

Maple cured and smoked back bacon strips.

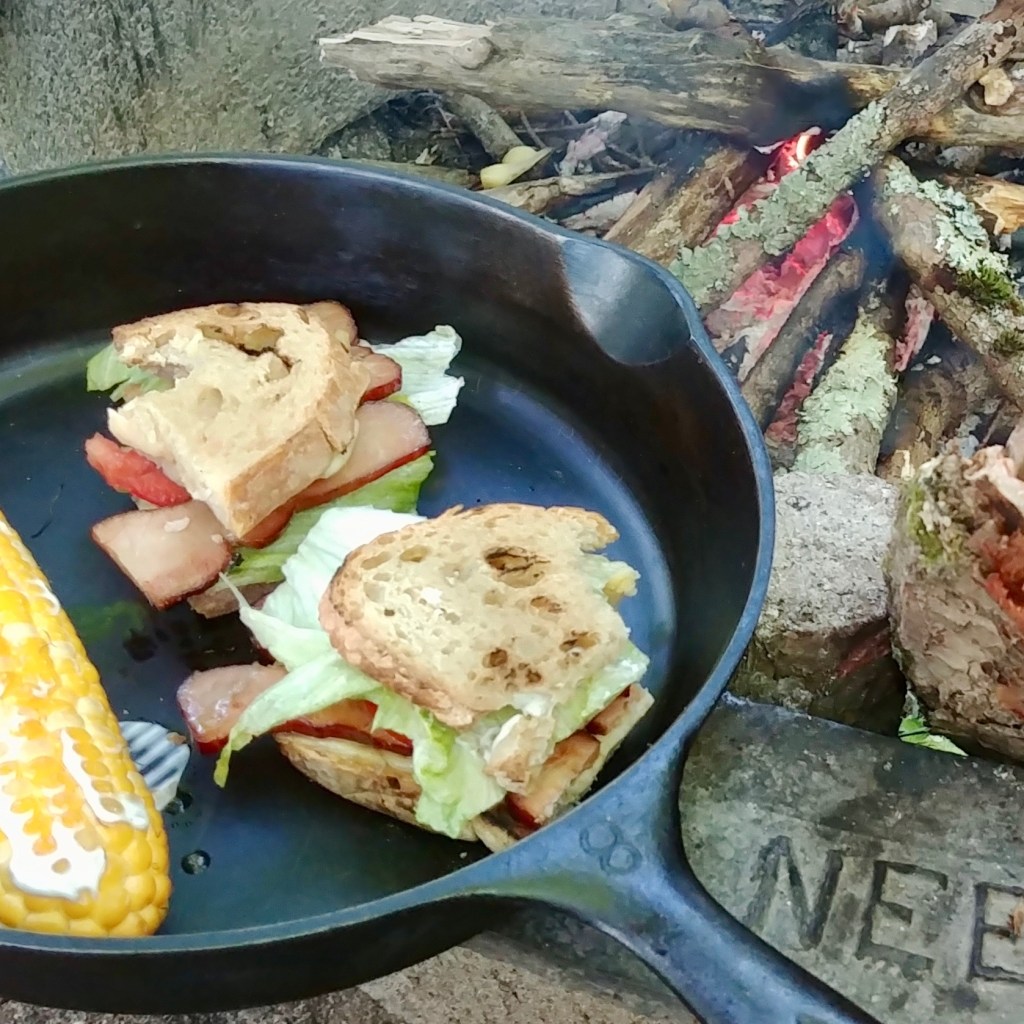
Lastly, it makes a great B.L.T.!

A rustic B.L.T. made with back bacon strips.

Please let me know if you try this and make your own back bacon strips!

Also, do let me know if you’ve heard someone invented and/or sold back bacon strips made from pork loin before. To the best of my knowledge, I invented back bacon strips, but am willing to consider that I may have only reinvented this method! :)

Here’s the video with the curing method on which mine is based; I use ~1/3 cup of each ingredient (for one square flat of pork loin) where they use 1/4 cup (for one seemingly smaller square of pork belly):
Curing and Cold Smoking Bacon the Old Fashioned Way
Note that back bacon, though, is fully-cooked to a higher temperature than pork belly bacon!

Peace,
Dave

P.S. Here’s a recipe for another kind of bacon that may be of interest:
Old Fat Guy Cooking: Maple Buckboard Bacon, You Can Make It

UPDATE (25 Sep 2020): Smoked Buckboard Bacon Strips!

I used the same method above, but this time to make buckboard bacon strips.

From one pork shoulder butt, I was able to make two flats (and the rest was used for country style “ribs”), one more rectangular than the other.

It’s more difficult to make flat, rectangular pieces with a deboned pork shoulder but than it is from pork loin. Also, note that pork shoulder is quite a bit fattier, so the resulting bacon will have about 3:1 meat to fat ratio, whereas bacon from pork loin is nearly all meat. In contrast, American-style belly bacon (“streaky bacon”) often has a 1:3 meat to fat ratio.

Thick-cut buckboard bacon strips.

I found these buckboard bacon strips, prepared exactly the same as my back bacon strips above, to be a bit too salty. This is likely because I did not soak them after curing, to reduce the salt content as The Old Fat Guy suggests. Next time, I won’t skip that soak since pork shoulder seems to absorb more salt than does pork loin.

Buckboard bacon strips frying in a bit of water. Note the smoke ring becomes more distinct.

I also suggest pan-frying these strips in about 1/8″ of water since they are much leaner than belly bacon and also because, if you fully-cook the backboard bacon when smoking, you don’t want to lose moisture during frying; you just want to render some of the fat.

Pork and Pumpkin Stew

Wak Gominda with basmati rice.

Gominda Wak with basmati rice.

Perfect for an autumn meal: this is Gominda Wak (literally: “pumpkin pork,” also sometimes “Wak Gominda”), a hearty traditional stew from the Garo people in northeastern India. It’s a wonderful pork and squash dish that I was introduced to by my Garo friend, who helped prepare it here. It’s surprisingly simple – only 5 ingredients!

Wak Gominda ingredients.

Wak Gominda ingredients.

Ingredients, here for 6-8 generous servings:

  • Boneless pork; here we used about 3 pounds pork loin; a marbled pork roast might be preferred; it need not be this lean.
  • Pumpkin or other squash, a couple pounds; we used about 2/3 in total of the acorn, butternut, and buttercup squashes shown.
  • Chilis, e.g., 8-10 of the thai chilis shown here.
  • Baking soda, about 1/2 teaspoonful.
  • Salt, to taste.
  • Basmati rice, to accompany the stew when serving.

To prepare:

First, rinse, peel, and remove seeds/guts from squash to prepare it for cubing.
I do not endorse my friend’s peeling technique! Use a vegetable peeler if you can. :)

Peel the squash.

Peel the squash.

Cut the pork into large bite-sized pieces, trimming any gristly fat, but leaving some fat for cooking.

Cut the pork into bite-sized pieces.

Cut the pork into bite-sized pieces.

In a large pot, beginning cooking the pork pieces over medium-low heat with fat or oil, as necessary to keep it from sticking.

Begin with the cubed pork, over medium-low heat.

Begin with the cubed pork, over medium-low heat.

Cover the pork, simmering over low heat, stirring occasionally until fat renders and some water is released and cooked until white, i.e., at least mostly cooked through.

Simmer the pork, covered.

Simmer the pork, covered.

While pork is cooking, remove the chili stems and cut the chilis lengthwise, just once so that their seeds can be released and they will disintegrate while cooking.  Also, cube the squash.

Baking soda and sliced chilis.

Baking soda and sliced chilis.

Once the pork is cooked, add the soda and chilis, then stir.

Add baking soda and chilis to cooked, stewing pork.

Add baking soda and chilis to cooked, stewing pork.

Next, add the squash and a bit of salt, and then stir, so that meat is no longer on the bottom (to prevent burning).
Increase heat to medium or medium-low, then cover and stir occasionally.

Add cubed squash to pork mixture.

Add cubed squash to pork mixture.

When lightly boiling in the water released from pork and squash, reduce to low heat and simmer slowly, perhaps 1/2 hour, until squash is soft enough to disintegrate.
If necessary, add water sparingly, so that it boils but remains somewhat thick in consistency.

Pork and pumpkin stewing.

Pork and pumpkin stewing.

Stir and use a spoon to squash any whole squash cubes. Taste for spiciness (it will likely be quite spicy with 8-10 thai chilis) and salt, and adjust as you like.

You’re done!  Serve over basmati rice and enjoy!

Pork and Pumpkin Stew served over basmati rice.

Pork and Pumpkin Stew over basmati rice.

Gua Bao with Five Spice Pork Ribs

Gua bau with five spice ribs and pickled vegetables.

Gua bau with five spice ribs and pickled vegetables.

One of my long-time favorite Chinese treats is cha siu bau: the tasty steamed buns filled with delicious char siu-barbecued pork that is common at dim sum meals.

The Taiwanese gua bao is a similar street food in which the ingredients are inserted in a folded bao after the flat bun is steamed; gua bao have become popular restaurant items in North America lately; for instance, I ordered them at Bahn Mi Boys in Toronto, where they offer a variety of fusion bao fillings.

For our version, we decided to prepare the steamed bao from scratch and dry-rubbed pork ribs and Chinese pickled vegetables for fillings.  As one friend said, ribs in the oven are pretty much “set it and forget it.” Along with the requisite time for pickled vegetables to take on the pickling flavors, there’s plenty of time to dabble in making steamed buns from scratch.

Dry rub ingredients.

Dry rub ingredients (salt and black pepper not shown).

Our sweet and spicy dry rub, inspired by Chinese five spice powder, consisted of: ground clove, cinnamon, whole star anise, fennel seed, dried chili peppers, along with dry rub staples: brown sugar, freshly ground pepper, and kosher salt to taste.  All these ingredients were ground together with a mortar and pestle until most of the ingredients were crushed finely, yielding about 1/3 cup of dry rub seasoning.

Dry rub ready to apply to ribs.

Dry rub ready to apply to ribs.

I used a colander to apply the dry rub evenly (and without large pieces that might be left from the dried chili peppers or star anise), half to each side of a rack of pork ribs, and placed it concave-side down on a foil-covered baking sheet in a 225° F oven for 2 hours, then lowered to 200° F for another 2 hours, (4 hours total) checking and turning occasionally.  (If need be, satisfactory results can be gotten in about 3 hours at 250-275° F.)

Ribs in the oven.

Ribs in the oven.

Next we prepared some Chinese pickled vegetables: matchstick carrot, sliced red onion, sliced cucumber, along with a sliced fresh serrano pepper and some pieces fresh ginger. These were soaked in a brine consisting of approximately half rice vinegar and half water, further flavored with some soy sauce, star anise, sugar, whole black peppercorns and a bit of sake.

Vegetables for pickling.

Vegetables for pickling.

The pickled vegetables where refrigerated for a few hours before use.

Pickled vegetables prepared as a condiment for gua bao.

Pickled vegetables: a condiment for gua bao.

Next, we prepared the dough for the steamed bao.  (My partner is the bread maker; see the sample recipes she provided linked below for details.)

Dough ingredients for steamed bao.

Dough ingredients for steamed bao.

Prepare dough for steamed bao.

Prepare dough for steamed bao.

Preparing bao for steaming.

Preparing bao for steaming.

Rolling out dough for steamed bao.

Rolling out dough for steamed bao.

Once rolled-out, the dough pieces were steamed atop cabbage leaves (to prevent sticking), some flat and some folded over, with a bit of oil on the top to prevent the folded ones from sticking closed.  We found steaming them (covered) about 10 minutes to be sufficient.

Steaming bao.

Steaming bao.

Once the rib rack was cooked, it was cut into individual ribs, with some served as-is and some having the meat stripped from the bone to top or fill the steamed bao with a bit of hoisin sauce and accompanied by a condiment of pickled vegetables.

Slicing ribs.

Slicing ribs.

Gua bao with five spice pork ribs and pickled vegetables.

Gua bao with five spice pork ribs, a dab of hoisin sauce, and a variety of pickled vegetables.

Both the five spice ribs and gua bao were delicious and we enjoyed making this asian treat from scratch.
The ribs and steamed bao reheat well in the microwave for some quick and easy subsequent meals.

Here are some related recipes that you might helpful if you decide to make gua bao yourself!
Enjoy!

Chipotle Pork with Peach Habanero Salsa

Chipotle Pork Tenderloin with Peach Salsa and Sautéed Kale.

Chipotle Pork Tenderloin with Peach Salsa and sautéed kale greens.

While planning dinner for two, my partner and I realized we had a few too many ripe fresh peaches, so decided to make a spicy fruit salsa for meat, resulting in this nice summertime meal: chipotle pork tenderloin with peach salsa.

Preparing the salsa: fresh habanero, red onion, and cilantro.

Preparing the salsa: fresh habanero, red onion, and cilantro.

She prepared the salsa to generously serve two; the salsa consisted of three ripe peaches, pitted, and diced (medium, with skin intact), diced red onion, and finely chopped fresh cilantro, about 1/2 finely chopped fresh habanero pepper (seeds and veins removed), a touch of sugar and apple cider vinegar, and finally salt and a touch of powdered cumin and chipotle pepper, to taste.

Fresh Peach Salsa with Habanero.

Fresh Peach Salsa with Habanero.

I slathered a fairly small pork tenderloin with olive oil and finely chopped chipotle chile en adobo (from a can), browned it in a hot skillet, seasoned it with salt pepper and a bit of adobo seasoning, then placed the loin (whole) in a lightly-oiled glass baking dish and cooked in a 350° F oven for 30 minutes.  This typically yields a spectrum of doneness: from medium on the narrow end to medium rare on the thicker end, so plan accordingly with a few more minutes baking time, if you prefer it more well done.  We let the pork rest for about five minutes, then sliced it into medallions.

Our kale greens were simply sautéed in olive oil in a skillet (first covered, stirring occasionally, then uncovered for the final minutes to desired doneness) over medium low heat, and seasoned with salt and pepper.

We plated each serving with five or six pork medallions, a generous amount of the salsa, and garnished with a cilantro sprig.

Chipotle Pork Tenderloin with Fresh Peach Salsa and sautéed kale greens.

Chipotle Pork Tenderloin with Fresh Peach Salsa and sautéed kale greens.

There are a lot of variations on this pork tenderloin dinner for two that you might like to experiment with as well, such this nice Mustard and Black Pepper Pork Tenderloin.

Roasted Pork Shoulder

Roasted Pork Shoulder

Roasted Pork Shoulder

I’ve been working a lot lately, finishing up my research work for my Ph.D., and not finding time to post anything new and, instead, making many old favorites: fish tacos, fried rice, pizzas, and sandwiches.

However, I have been experimenting with various cuts of pork, most recently pork shoulder that was a bargain, on sale for just $1 per pound.

I originally bought and 8 pound bone-in pork shoulder roast, but I used about 60% of it to make carnitas for a group of friends. That left the rest, with the bone still in, for this recipe.

This is a really simple recipe; season the pork shoulder with just olive oil (~4 T.), fresh ground pepper (~1 T.), coarse salt (~1 1/2 t.), and minced garlic (8 cloves).

Ingredients

Ingredients

Mix those ingredients together in a bowl and slather it on all sides of the pork shoulder.

Next, I used a trick I learned from Alton Brown’s Perfect Roast Turkey Recipe. If you don’t have a suitable rack for a roasting pan, you can substitute a coil of crunched-up aluminum foil.

Foil stand-in for a rack in the roasting pan

Foil stand-in for a rack in the roasting pan

Place the seasoned pork atop that rack in a roasting pan, and place, uncovered, in a 425° F oven for 20 minutes.

Pork shoulder, ready for the oven

Pork shoulder, ready for the oven

After that, cover the roasting pan, pour some water in the bottom to keep the fat drippings from burning to the bottom, and cook for approximately 2 hours at 325° F and check the temperature with a meat thermometer; remove it when it has reached 180° F.

This time (2 hours) was for an approx. 3 pound roast. I found that mine was more than done in that time given that a thermometer read 195° F. I decided to cover it, even though some recipes don’t, since some follow-up comments in a recipe (linked below) said the garlic burned… mine didn’t.

After letting it rest on a cutting board for about 15 minutes, I sliced it and served it on a kaiser roll and topped it with a simple spicy mustard BBQ sauce: a mix of Grey Poupon Country Dijon mustard with a bit of sweet BBQ sauce and some chili garlic sauce.

Sliced Roasted Pork Shoulder Sandwich with Chili Garlic Mustard Sauce

Sliced Roasted Pork Shoulder Sandwich with Chili Garlic Mustard Sauce

Here are the recipes that I consulted, pretty much relying on the first:

Truth be told, I actually considered six or more other recipes, but they either required marinating or brining, or called for either a large pressure cooker or slow roaster, neither of which I have.

Chipotle Carnitas

Chipotle carnitas and avocado taco

Chipotle carnitas and avocado taco

First off, if you landed here expecting an approximation of the carnitas from Chipotle Mexican Grill restaurant, you’re in the wrong place. Instead, it’s my slight twist on traditonal carnitas, the mexican pulled-pork staple.

Carnitas is one of my favorite taco and burrito fillings, but I’d not made this delicious meat at home.
I decided to start with Rick Bayless’ recipe that employs a two-phase cooking method: first moist, then dry[ing]. My variant uses chipotle peppers for flavor, rather than other spices or smoke flavoring.

Truth be told, my newfound inspiration to  actually make carnitas was that I found a lean 2 pound pork rib end roast in my freezer; I’d bought it some time ago on sale for less than $3 per pound. Also, I happened to have a broiler pan with rendered bacon fat from yesterday’s breakfast. Bacon fat is typically quite salty (compared to lard), but I had accidentally purchased low-sodium bacon, so I decided to experiment with using the bacon fat in place of salt and lard, or oil, that you typically find in carnitas recipes.

Soaking dried chipotle peppers

Soaking dried chipotle peppers

First, I soaked two large dried chipotle peppers, rinsed them, removed the veins, seeds, and stems, and then liquified them with some of the soaking water (~1 cup) in a blender.

Blended chipotles and soaking water

Blended chipotles and soaking water

Next, I cut the pork into approximately 2″ cubes and placed them in a baking dish. Because the rib end roast was quite lean, I added the warm rendered pork fat (~1/3 cup) from cooking 1 pound of low-sodium bacon (left from yesterday’s breakfast).

Boneless pork end rib roast, cubed and topped with rendered pork fat.

Boneless pork end rib roast, cubed and topped with rendered pork fat.

I poured the chipotle and water mixture over the pork, covered the dish, and put in a preheated 375° F oven for 1 hour.

Cover the pork with fat, and water mixture, in a covered dish in preparation for moist cooking phase.

Cover the pork with fat, and water mixture, in a covered dish in preparation for moist cooking phase.

After this, I uncovered the pork, placed the baking dish on a foil-covered pan (in case of spatter), and “dry cooked” until the water mostly evaporated, leaving just the rendered fat. During this phase, be sure to turn the pieces regularly, e.g., progressively more frequently to every 7-15 minutes, both to keep the pieces moist and to prevent burning on top.

Beginning dry cooking phase, uncovered.

Beginning dry cooking phase (uncovered)

Total cooking times was 2 hours 15 minutes: 1 hour moist cooking (covered) at 375° F and 1 hour 15 minutes dry cooking (uncovered, turning occassionally) at 450° F. Afterwards, I used two forks to pull the pork into small pieces.

Finished carnitas, pulled into small pieces with two forks.

Finished carnitas, pulled into small pieces with two forks.

I served the carnitas in tacos, on warmed tortillas, topped with a homemade chipotle garlic salsa and slices of fresh, ripe avocado.

Chipotle carnitas and avocado taco

Chipotle carnitas and avocado taco

This was a satisfying first effort at carnitas, having mild smokiness both from the bacon and from the chipotles. I’ll definitely make it again. I’ll caution you about using bacon fat here, though… it definitely had a generous amount of salt, so don’t add any more. A less-lean cut of pork would be a better option, obviating the need for added fat to get the moist consistency that one expects from carnitas.

Here are the recipes I consulted for preparation ideas:

UPDATE (March, 2013):

I made this again, this time with pork shoulder roast ($1.99/lb.), just its natural fat and a bit of salt, but with many more rehydrated chipotles and an ancho chile.  This was great too, and less salty than the prior experiment with rendered bacon fat.

Carnitas taco with white onion, cilantro, and hot sauce.

Carnitas taco with white onion, cilantro, and hot sauce.

UPDATE (March, 2014):

I tried this same preparation with beef shoulder roast. Unfortunately, this isn’t a great technique for beef; it just wasn’t tender. Once cooked, I had to chop the meat into tiny pieces. It tasted good, and is not unlike the texture of the finely chopped steak some mexican kitchens serve, but isn’t tender the way pot roast or barbacoa would be. For that, you’ll have to slow cook for longer time.

Beef shoulder roast prepared by this wet, then dry method; it's not the same.

Beef shoulder roast prepared by this wet, then dry method; it’s not the same.

Boneless Asian-Style Country Ribs

Boneless Asian-Style Country Ribs with Spicy Cashew Basil Coconut Curry

Boneless Asian-Style Country Ribs with Spicy Cashew Basil Coconut Curry

I am happy to say I’ve just acquired a new vegetarian housemate. Oh, I was quite happy with my previous housemate/friend – also a vegetarian – but he moved back to India a couple weeks ago. In hindsight, it’s obvious that I’d been focusing much more on vegetarian dishes in the blog in past months, in part due to the fact that I wanted to be able to share my meals.

However, last night, I also had some carnivorous friends as dinner guests, so I made a “segregated” meal that it could be enjoyed by the carnivore or vegetarian: boneless asian-style ribs accpompanied by a thai-inspired spicy coconut curry with cashews and whole basil leaves.

The curry is nearly identical to my previous Spicy Cashew and Basil Curry, except that I used coconut cream instead of tahini in the sauce, substituted carrot for red pepper and black mushrooms for baby bellas. (Trader Joe’s was selling quite large containers of whole basil leaves for only $3. That’s quite a treat in the middle of winter!)

The ribs are similar to what might be served in American Chinese restaurants. They’re both convenient to make and to eat, because they bake for just a short time and are boneless.

Country, or “country-style,” ribs aren’t really ribs at all. They’re a leaner cut near the shoulder. (More info here.) But they’re an inexpensive and fair approximation and their awkward shape causes them to often be served similarly to small pieces of rib meat. (I bought 2 pounds for just $4, on a half-price special.)

Ingredients:

  • boneless country ribs, ~2 pounds, cut into strips or pieces of desired size
  • garlic, ~6 cloves, minced
  • hoisin sauce, ~1/2 cup
  • brown sugar, ~1/2 cup, packed
  • soy sauce, ~1/3 cup
  • chili garlic sauce and/or Sriracha hot sauce (optional – I used both), ~1-2 T.

Directions: Prepare a marinade from these ingredients in a bowl large enough to also accommodate the rib pieces, and place the rib meat into the marinade, coating well. If time allows, optionally marinate for 4 hours (refrigerated), as I did here. Lay the rib pieces out on a foil-lined jelly-roll pan or baking dish, and cover with remaining marinade. Cook 20-35 minutes in a 400° F oven, turning occassionally and covering again with marinade. Time varies based on size of pieces and thickness; the ribs should reach 140° F internally. I baked the ribs pieces (~1 inch thick max.) for about 35 minutes total.

These sweet country ribs were delicious and a nice option to accompany a vegetable curry. It might have been luck that the country ribs I bought were quite tender, since I baked them for so short a time, in contrast to the slow-cooker ribs recipes you often see.

So, with the current housemate, expect lots more vegetarian recipes from me… but a subset will still be reserved for us carnivores. :)

Here are the recipes on which this meal was based:

Twice-Cooked Pork

Twice-Cooked Pork

Szechuan Twice-Cooked Pork, a.k.a. Double-Cooked Pork, is one of my favorites and thankfully available at most every Chinese restaurant where I live. It almost always consists of sliced pork, cabbage, black mushroom, scallions, and a brown sauce that is a blend of sweet and spicy.
I added a bit more color with red pepper and carrot in this preparation of about 4 servings.

I’ve learned that twice-cooked pork is traditionally made with pork belly (but I’ve not seen that in american restaurants). I decided to use inexpensive, lean chops instead.

First, I boiled three whole pork chops in water with salt and pepper, cooled them (with ice cubes in the water), then thinly sliced them diagonally so that cuts are across the grain and so the slices can be wider than the thickness of the chop.

To prepare the sauce: start with about a cup of stock (I made the stock with some granulated chicken-flavor instant bouillon and the water used to boil the pork), add minced fresh ginger and garlic (4 cloves), coarse ground black pepper, sugar or honey (1-2 T.), soy sauce (2-3 T.), oyster sauce (4 T.), rice vinegar (1-2 T.), a dry red wine (1 T.), black bean paste (1 T.), chili garlic sauce (1-3 T.), and a couple teaspoons of corn starch. Be sure to taste-test the sauce for the right balance of sweet, sharp (vinegar), and spicy. There’s plenty of salt in soy sauce and bean paste, so don’t add salt!
This resulted in about 2 cups sauce before reduction, which worked well, since I like my pork saucy, like my … oh you know the joke.

To fry: in canola oil, stir-fry the pork slices to brown edges, coat with some sauce, then remove. Next stir-fry the vegetables, occasionally adding sauce slowly (to coat and reduce): carrot, green and red bell pepper, scallions, then sliced black mushroom (fresh or reconstituted), and then chopped cabbage and scallion greens. Return the pork to the pan, add remaining sauce and reduce to your liking.

Serve with sticky rice and enjoy!

I read a lot of recipes and watched videos while researching this one. Here are some of the most useful:

“Chinese Twice Cooked Pork”
http://www.youtube.com/watch?v=07L92tgRVfY
– I really like this guy’s amateur video… he seems like a kindred spirit. :-) He would have been fine if he’d just stir-fried the pork before putting in the vegetables that release moisture.

“Twice-cooked pork”
http://www.youtube.com/watch?v=rDhnq0v7ck8
– This chef shows an interesting stir-fry technique and a minimal recipe.

“Double Cooked Pork Slices”
http://www.tastehongkong.com/recipes/

UPDATE (March 2013):

I’ve made this dish many times, most recently with pork shoulder roast ($1.99/lb.) and skipped the mushroom and substituted white onion for scallions, simply because I didn’t have them on hand. It always comes out great.

Twice-cooked pork.

Twice-Cooked pork

Pork Tenderloin with Clementine Marmalade over Rice and Wine-simmered Vegetables

Pork Tenderloin with Clementine Marmalade over Rice and Wine-simmered Vegetables

I marinated this pork tendorloin in olive and sesame oils, red pepper flakes, and minced fresh garlic and ginger and cooked separately. The wine sauce with vegetables was made similarly to that in the recipe below.

This was inspired by recipies on the television program Simply Ming. Personally, I found the combination of both the sweet simmer sauce and the sweet marmalade to be too sweet overall, so I’d use one or the other instead of both.

“Braised Lamb Shank with Clementine Marmalade”
http://ming.com/foodandwine/recipes/simply-ming-season-4/braised-lamb-shank-with-clementine-marmalade.htm

“Clementine Marmalade”
http://ming.com/foodandwine/recipes/simply-ming-season-4/clementine-marmalade.htm
(I halved the amount of most of the marmalade ingredients, thus essentially doubling the ginger and thai bird peppers)

Baked Pork Chops with Sauerkraut & Apple

Baked Pork Chops with Sauerkraut and Apple

This Bohemian dinner is based on the tender pork chops that my mom makes, but with a bit more flavor.

Listen to “Sauerkraut Polka” repeatedly while preparing or consuming:
http://www.youtube.com/watch?v=kX1nJVvaSZ4

Select end or center cut pork chops with bone (e.g., one chop per serving, 1/2″-3/4″ thick), brown chops lightly in a frying pan on medium-high heat and place them in a single layer in a baking dish then season them with salt, pepper, thyme, oregano. In the frying pan, lightly sauté sauerkraut combined with thin slices of apple (I used 2 cans of Frank’s brand sweet sauerkraut with caraway seed and 1 Braeburn apple for 5 chops); season kraut with some ground cinnamon, allspice, a tablespoon or two of brown sugar, and minced cloves of garlic while sautéing. In the baking dish, cover the chops completely with kraut and apple mixture and ensure that there is enough moisture in the dish. (The liquid from canned sauerkraut was sufficient; otherwise add water or balanced lager beer so that there is at least 1/4″ of liquid in the pan.) Cover the dish and bake for one hour at 300°F. Uncover and splash a few ounces of red wine over the top, then continue to bake, uncovered, for another half hour or more at 325°F; occasionally spoon liquid over top as necessary to keep moist. Serve with garlic mashed red potatoes as a side.