Oak Display Spice Racks
After years of having spice jars inconveniently located in cabinets, slide-out drawers, or shelves that were too small, I inquired with the salesperson at the Penzeys store if they knew of a good source for large wooden spice racks that fit their jars well. Unfortunately they didn’t, so I decided to make some myself.
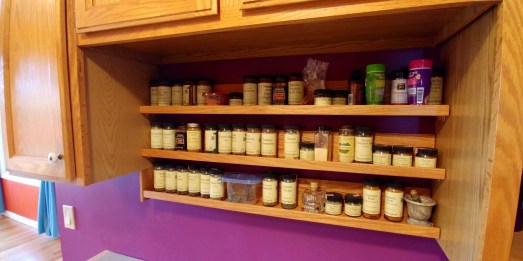
Our kitchen happens to have a bridge cabinet installed over a countertop workspace opposite the range that seemed to be the perfect place for spice racks. For this location, I built these removable oak spice shelves, totaling 9 linear feet of visible and accessible “spice space.”
This woodworking project used just two sorts of prepared wood procured from a local home improvement store: pre-cut planks, and outside corner trim.


The (3) shelves were assembled as follows:
- Use a mitre box and saw to cut the wood planks (2) and trim pieces (1) to length (e.g., 36 inches), for each shelf. Before continuing with assembly, examine each plank’s surfaces to select which side you’d like to be displayed.
- Clamp each pair of 4 inch x 1/2 inch planks together, forming an “L”-shaped shelf with the back piece atop the bottom piece. This will form a shelf with a back slightly taller than the shelf bottom is deep.
Using tiny brass wood screws, in holes you’ve drilled perhaps every 6-12 inches.
Once installed, this yields a shelf back of the appropriate thickness to prevent the spice jars or their lids from touching the (painted) wall when the spice jars are removed or replaced. - Using construction adhesive and clamps, glue the oak outside corner to the front edge of each shelf, with the rounded edge upward (toward the top and front of shelf).
This, of course, forms a channel in which the spice jars sit, so they won’t easily fall off the shelves. - As shown in the close-up below, cut a short piece of outside corner trim and use construction adhesive to glue them at the back edges at the end of each shelf.
This will act as a stand-off to keep the shelf a bit away from the wall, yet allowing some “play,” which is especially necessary when either the shelf back board or the wall (or both :) ) is not perfectly straight, flat, and true. - Once the adhesive is completely dry, sand shelves as necessary and finish them as you wish. Here, a combination stain and polyurethane satin finish was applied to match the existing cabinets.

oak spice shelf, underneath detail.
Lastly, mount the removable shelves with shelf pins in shallow holes drilled in the cabinets on both ends of each spice rack(s), allowing you to remove the shelves or to reposition them.
Since, it is important that the shelf pin holes are drilled at the same level for both ends of the spice shelves, so the shelves are level, I use a jig built from peg board to select the hole positions to drill.
With multiple shelves, such as the three shown here, a 7-inch separation (above or below) each shelf has proved to work well for our spice jars and containers. Loaded up with a set of (mostly) Penzys jars, we have a handsome, utilitarian display of spices!

Oak Display Spice Racks – close up
