I halved the recipe, leaving more than enough for two people, substituted garlic salt for salt (and skipped the garlic powder), and used Hofbräu Original beer.
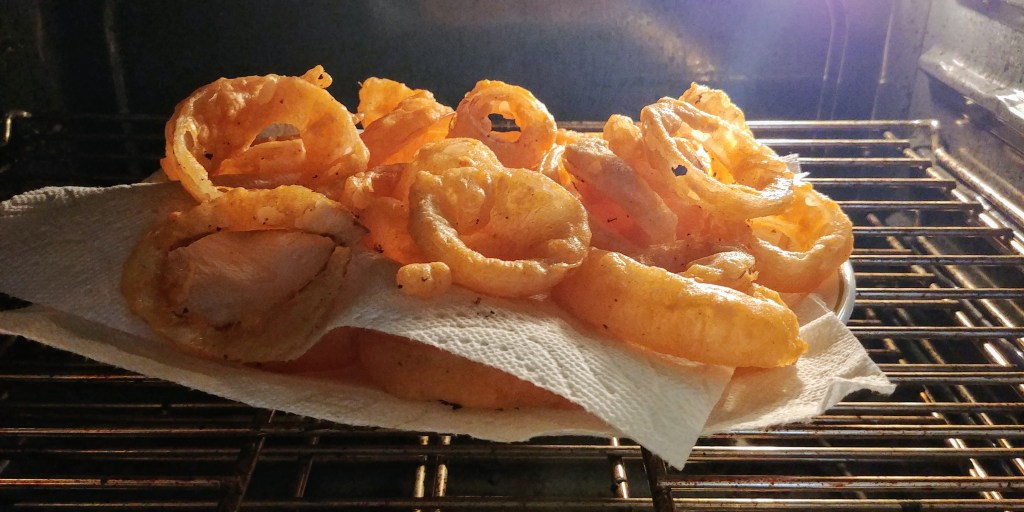
Deep-frying beer-battered onion rings
Since both the battering and deep-frying can be a messy process, I prepared these in cast iron pan on a gas grill burner with canola oil at ~375°F, and kept batches warm in the oven until finished.
I’ve not posted many recipes in the past few years, in part, because I’ve largely focused on learning to smoke meats and vegetables. It takes time to develop expertise and there are a plethora of expert smoking sites and YouTube channels that do a great job of sharing techniques and recipes (links below). I felt I had little that’s novel to share.
That changed when a bacon-making friend inspired me to smoke bacon and I had a new idea: Why not make “Canadian bacon” or back bacon in strips like “American” bacon or streaky bacon?
You likely know Canadians typically serve round slices of what’s called “back bacon” that is made from pork loin and Americans serve strips of what’s called “[streaky] bacon” that is made from pork belly. So, the obvious answer to “Why not?” is that a pork loin is roughly cylindrical and easily sliced into rounds once cooked, and a pork belly is flat, easily formed into a rectangle, and sliced into strips once cured.
But bacon isn’t about making something quick and easy – it’s about making something great, e.g., typically with a week-long cure in sugar and salt then a low and slow smoke. Note there are many pork loin preparations other than rounds such as a roulade a.k.a. rollade (Dutch). Why not cut pork loin as if for a roulade, but then cure and smoke it flat and cut into strips? That’s what we’ll do!
Here, I show a typical process of making nitrite/nitrate-free “uncured” bacon, but modified to result in back bacon strips. I say “uncured” because, although a salt/sugar cure is performed, it is my understanding that the U.S. federal government stipulates this be called “uncured” when not prepared using nitrates (nor possibly even nitrites) for meat preservation. What I show, here, is safe preparation method because (a) the bacon is cured in the refrigerator and (b) the resulting bacon fully cooked. If you’d rather use curing salts, e.g., carefully measured Prague powder #1, go for it! If you do, consult some other recipe or instructions since nitrite/nitrate curing salts are poisonous if accidentally used in excess. Even if you change the cure ingredients, the rest of the process below is the same.
I’ve made this bacon a couple times and think it’s great. Why? Well, back bacon strips are meatier but still have lots of sweet, smoky bacon flavors like from traditional bacon strips. I attribute this largely to the dramatically increased surface area that the flat, rectangular roulade-style pork loin cut offers during curing and smoking leads to more flavor being imparted.
Cut
A whole pork loin cut into three parts, sized for roulade-style cut and bacon strips.
Cut a pork loin into sections and trim the exterior fat as you desire. (You will fully cook the bacon during the smoking step, as in traditional back bacon preparation, so personal preference rather than food safety is your guide in trimming the fat.) The length of each resulting pork loin section determines how many slices you can make from each “flat.”
Next, for each section you will use to make bacon, make a long spiral cut through the section with the knife’s blade aligned lengthwise along the section. The loin’s circumference and the thickness your cutting leaves determines how long your bacon slices will be. This is because you will ultimately slice the bacon strips across the meat’s grain. For the spiral cut, I use a sharp, pointed chef’s knife but you could probably also manage it with a sharp or serrated meat slicing knife as well. Be careful not to leave the resulting flat piece too thin; 1 inch thick is just about right.
If the resulting flat is uneven in thickness, carefully thin it in places by hitting it with a meat mallet until roughly even in thickness. If you’ve not made a roulade before, I suggest watching some YouTube videos showing this cutting method. Don’t worry if the flat isn’t perfectly evenly thick nor exactly square; variety will give the resulting bacon some organic, natural character. Just cut and shape it slowly so you don’t leave divots or holes which will result in short, unevenly cooked bacon strips.
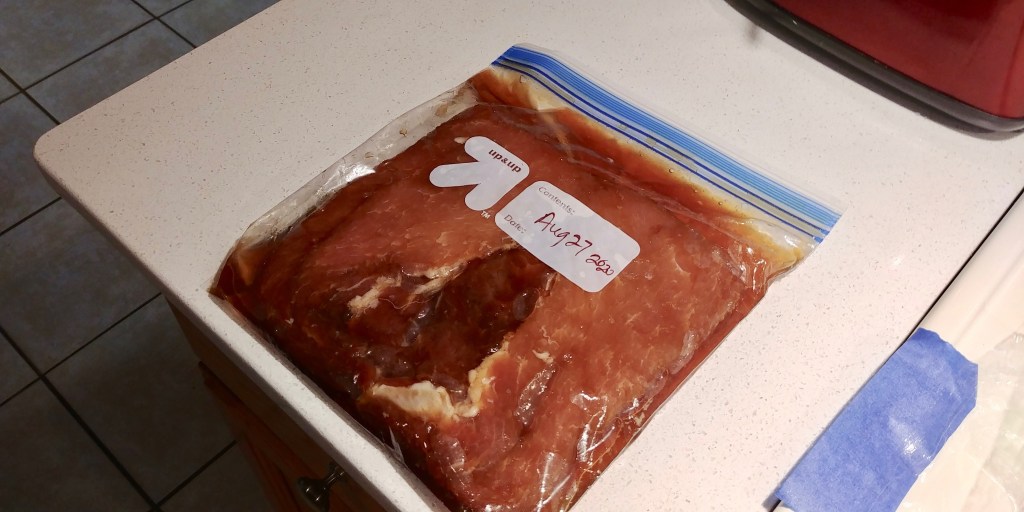
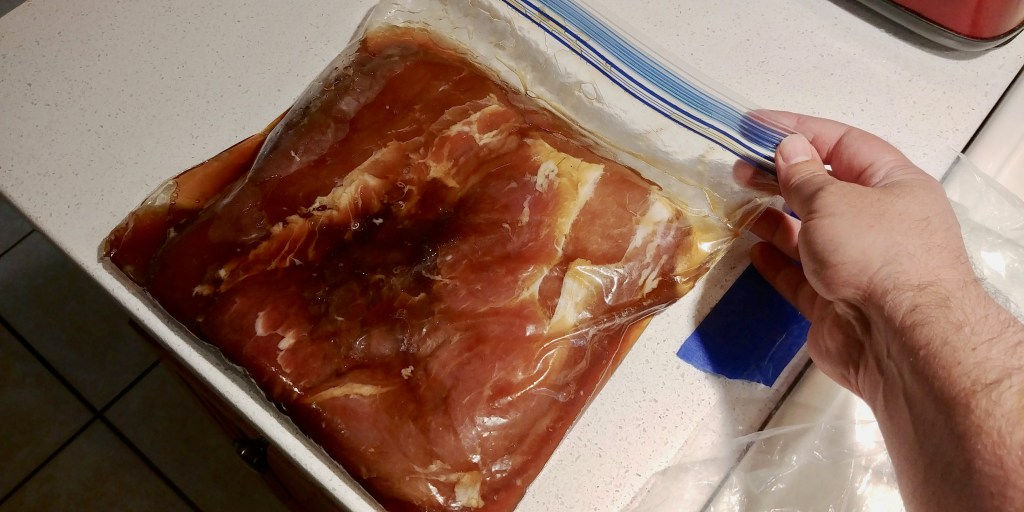
A pork loin section cut roulade-style, and smeared with salt, brown sugar, and maple syrup
Cure
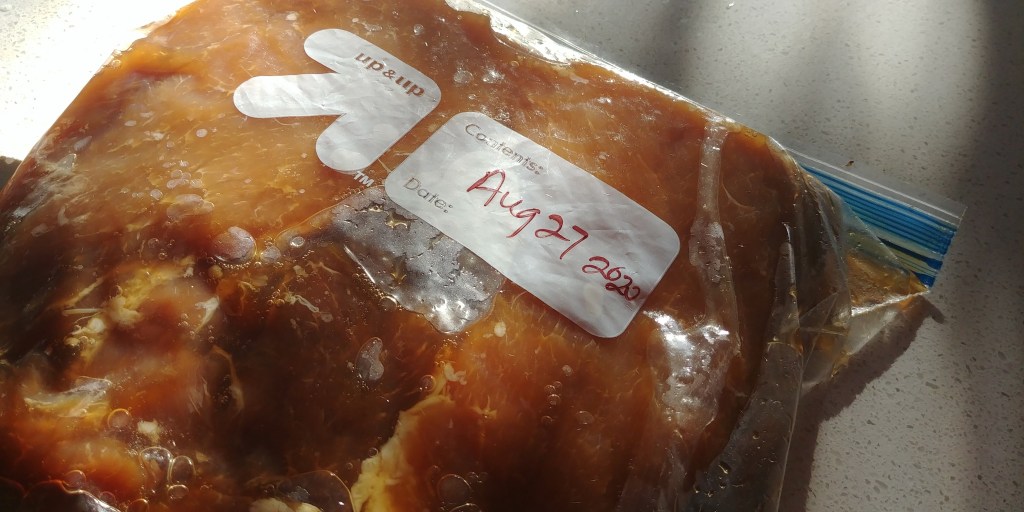
For a flat piece of the size shown (about 10 inches square), prepare a simple paste/mixture consisting of (a) 1/3 cup salt, (b) 1/3 cup brown sugar, and (c) 1/3 cup pure Maple syrup. Smear the mixture on the pork loin flat and place it in a sealed container, such as a gallon-sized Ziplock bag, removing air if possible. Be sure the mixture coats both sides of the flat, and place in the refrigerator for about 1 week.
Once each day while curing, flip the flat over, distributing the cure mixture and liquids to contact all portions of the flat.
Pork loin “flat” dated and curing (in refrigerator)Flip pork loin “flat” daily while curing (in refrigerator).
Dry
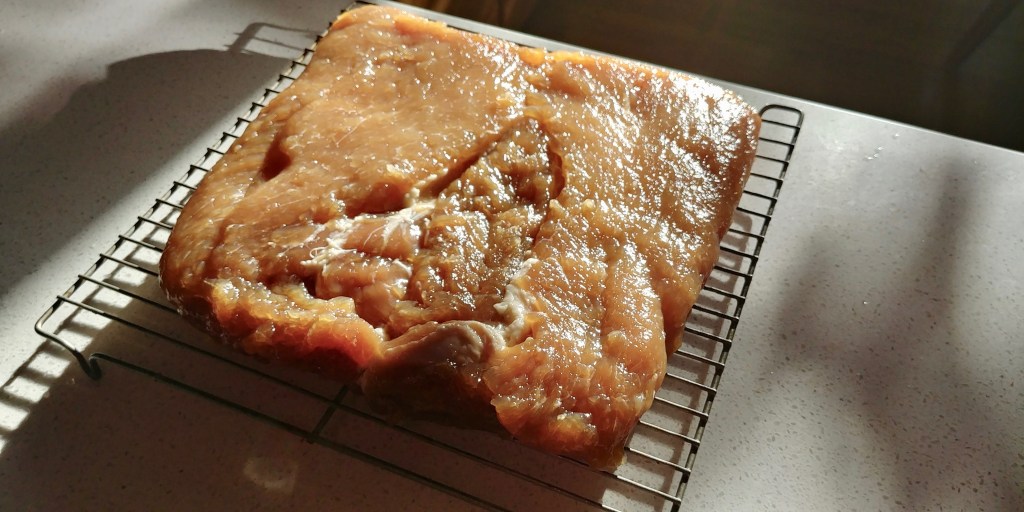
After about 1 week’s time curing, it’s time to prepare the flat(s) for smoking.
Pork loin flat after one week cure
Rinse all the cure mixture from each pork loin flat and pat them dry.
Rinse the flat with water and pat dry, e.g., with paper towel.
Once rinsed and patted dry, place each flat on a wire rack, and return to refrigerator to dry for about one day.
Place the flat on a wire rack to dry in the refrigerator for about 1 day.
To be honest, I’m not sure this drying step is necessary, but it is a common step in traditional bacon recipes. Instead, it seems to me the flat could be dried in an initial, short cold smoke (to also impart more smoke flavor) or during the hot smoke/cooking process. This might even leave the interior a bit moister, if desired.
Smoke
Once dried, the flats are ready to smoke. If you don’t smoke meats, I suppose you could just cook this low and slow in the oven; I’ve not tried.
I happen to smoke foods in my gas grill using a cold smoke generator and I suggest smoking on Hickory or Maple, here.
Cook fully to an internal temperature of 160°F or more.
There are lots of time/temperature combinations that would work. The goal is to slowly cook the cold meat to greater than 160°F, internally throughout. For example, smoke at about 225°F for about 2.5 hours. Rotate the flat periodically to cook more evenly.
One way to smoke the cured flats is at 225-250°F for about 2-2.5 hours. Use an instant read thermometer, probing many locations, to assure 160°F throughout.
Be sure to use a thermometer, preferably instant read, to check the internal temperature throughout the flat, in different places during the cook. Since it is a relatively thin piece of meat, it will reach higher temperatures faster near the heat source and edges if you’re cooking with indirect heat.
Cool the bacon and refrigerate to make firmer for slicing.
Once smoked, the pork loin flat, now bacon, proper, develops beautiful color. It’s time to let it rest to cool, then place in the refrigerator for slicing. I tightly wrap it in aluminum foil for a few hours in the refrigerator. You can reuse the foil to wrap packs of slices.
Slice
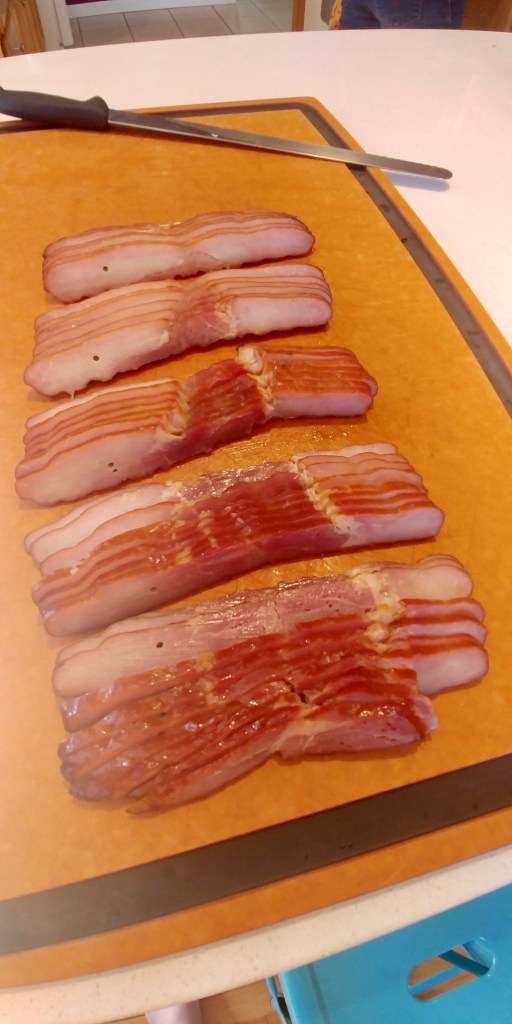
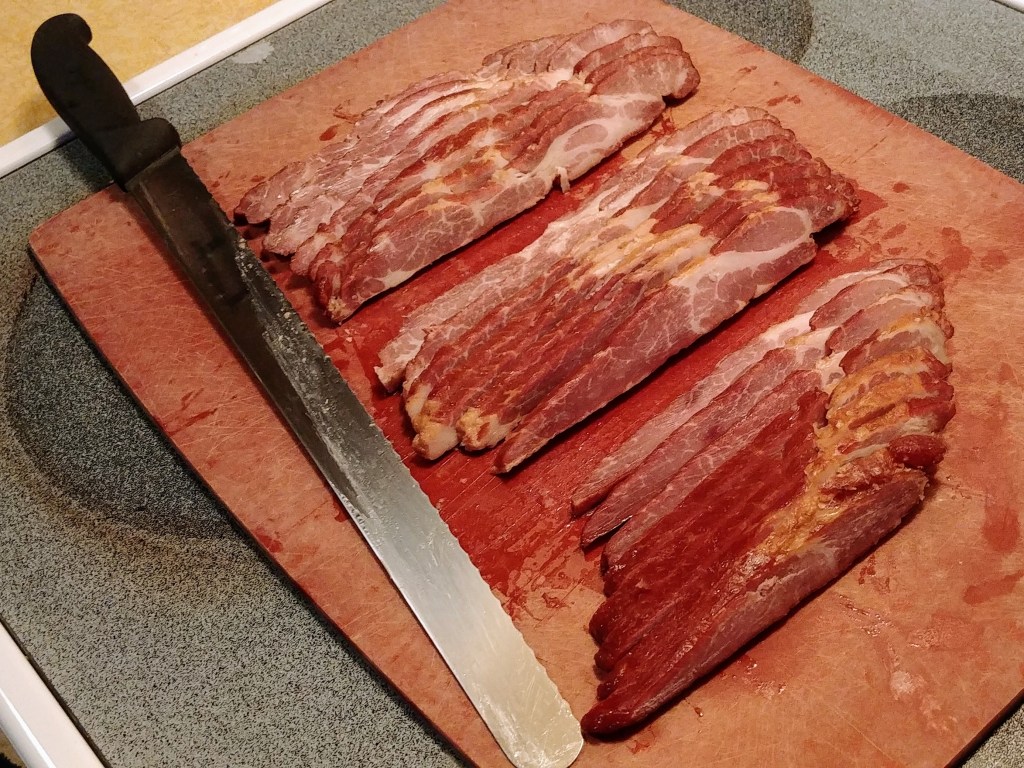
Once refrigerated and firm, it’s time to slice your bacon to desired thickness.
I can get straight, near perfect slices, just like store bought bacon, by using a flexible, sharp, serrated carving knife.
Hold the bacon flat down firmly to a cutting board with your non-knife-holding hand. Then, for each slice, place the blade edge down to the top of the flat, straight and at the desired thickness. Slowly slice straight down with even back-and-forth motion. Go slowly! You just spent a week making this and bacon slice appearance is important!
Refrigerated bacon strips cut using a good slicing knife, e.g., Victorinox.
Serve
Store your back bacon strips tightly-wrapped as you would other bacon. To reduce air contact, I wrap it tightly in aluminum foil, then place in a new Ziplock storage back.
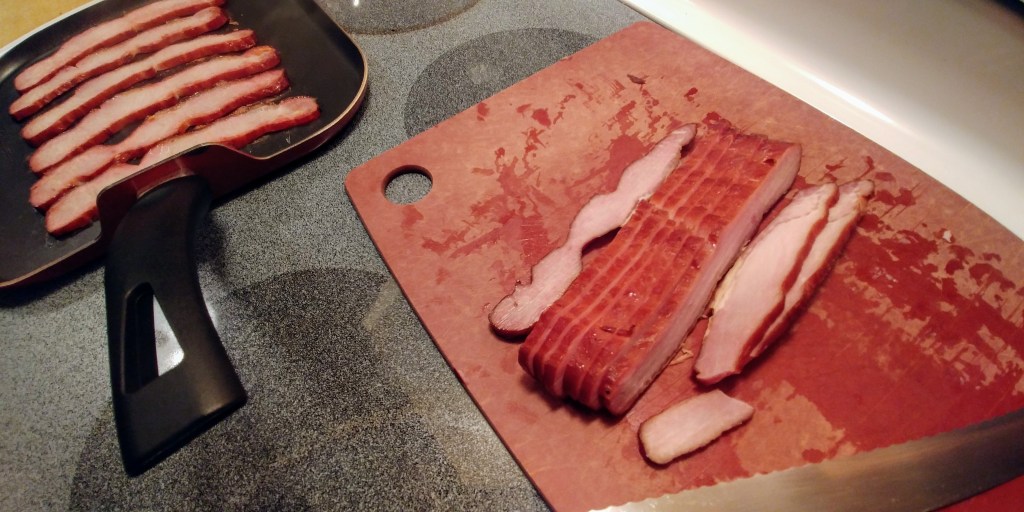
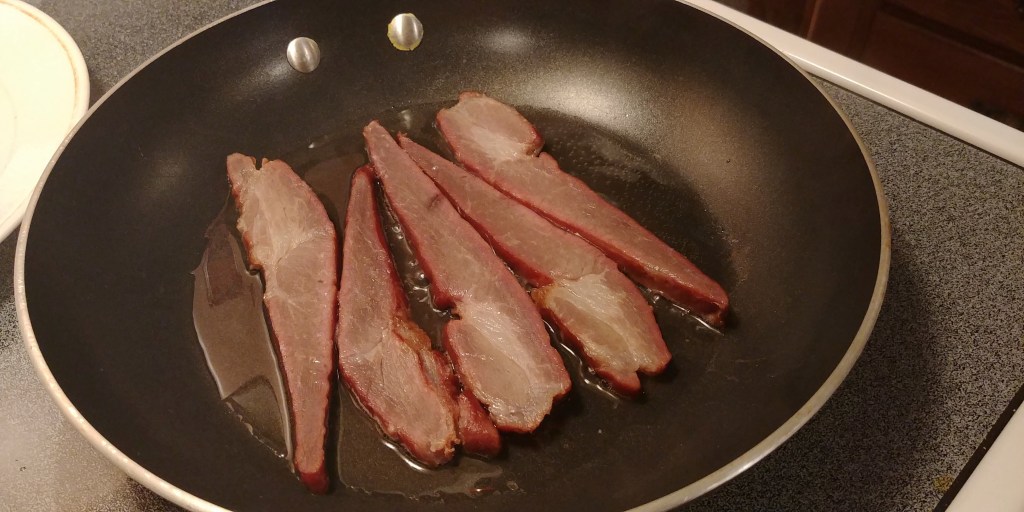
Since it’s fully-cooked, back bacon strips can be eaten as a cold snack. Otherwise, serve it warmed in a fry pan or on a griddle like bacon strips.
Thick-sliced bacon frying on a griddle.
Since back bacon strips are leaner than typical bacon strips, you might like to fry it in a bit of water. This keeps it from sticking to the pan, due to the released sugars while also keeping it moist for serving.
Fry bacon slices with a bit of water in the pan.
Note that frying can make the smoke ring more distinct. Remember, this is uncured bacon, so the pinkness (shown in photos) is not from curing salts but from the wood combustion gases interacting with the meat’s surface while smoking.
Maple cured and smoked back bacon strips.
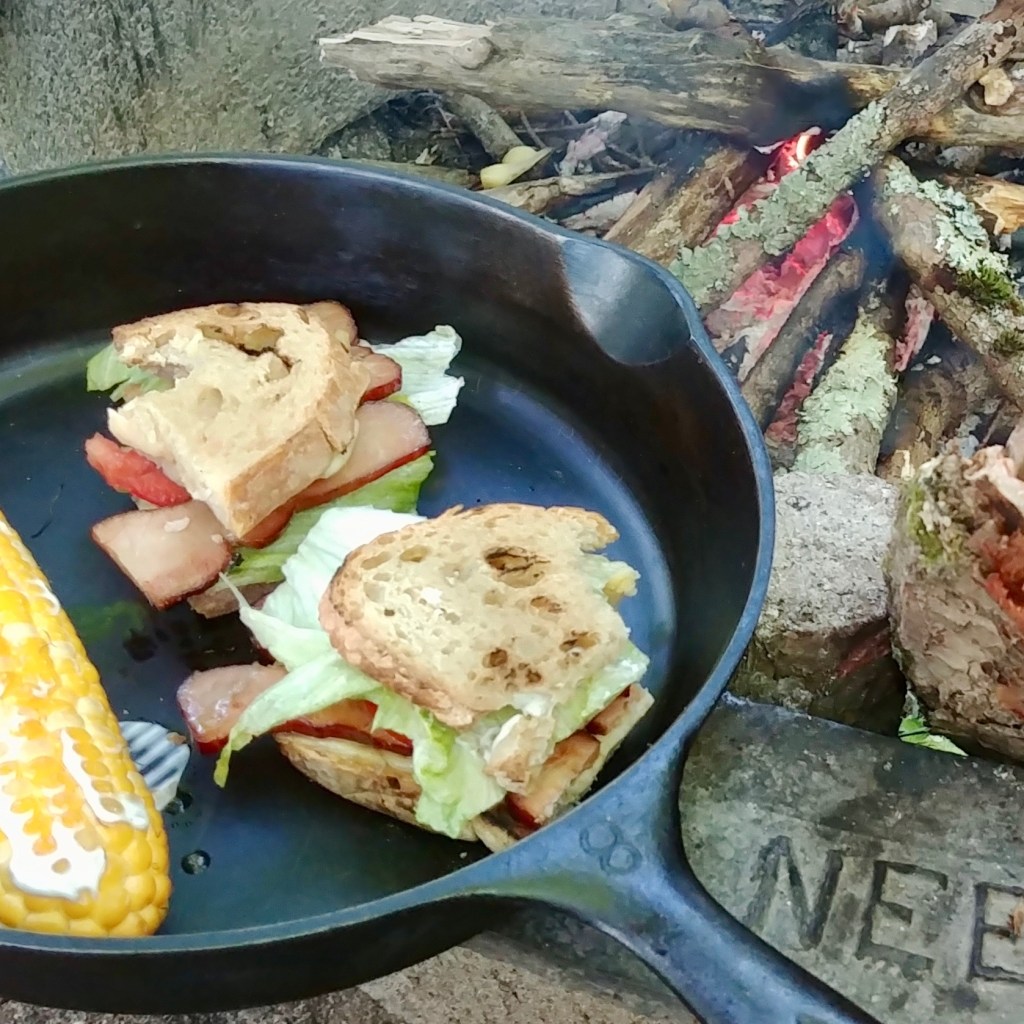
Lastly, it makes a great B.L.T.!
A rustic B.L.T. made with back bacon strips.
Please let me know if you try this and make your own back bacon strips!
Also, do let me know if you’ve heard someone invented and/or sold back bacon strips made from pork loin before. To the best of my knowledge, I invented back bacon strips, but am willing to consider that I may have only reinvented this method! :)
Here’s the video with the curing method on which mine is based; I use ~1/3 cup of each ingredient (for one square flat of pork loin) where they use 1/4 cup (for one seemingly smaller square of pork belly): Curing and Cold Smoking Bacon the Old Fashioned Way Note that back bacon, though, is fully-cooked to a higher temperature than pork belly bacon!
I used the same method above, but this time to make buckboard bacon strips.
From one pork shoulder butt, I was able to make two flats (and the rest was used for country style “ribs”), one more rectangular than the other.
It’s more difficult to make flat, rectangular pieces with a deboned pork shoulder but than it is from pork loin. Also, note that pork shoulder is quite a bit fattier, so the resulting bacon will have about 3:1 meat to fat ratio, whereas bacon from pork loin is nearly all meat. In contrast, American-style belly bacon (“streaky bacon”) often has a 1:3 meat to fat ratio.
Thick-cut buckboard bacon strips.
I found these buckboard bacon strips, prepared exactly the same as my back bacon strips above, to be a bit too salty. This is likely because I did not soak them after curing, to reduce the salt content as The Old Fat Guy suggests. Next time, I won’t skip that soak since pork shoulder seems to absorb more salt than does pork loin.
Buckboard bacon strips frying in a bit of water. Note the smoke ring becomes more distinct.
I also suggest pan-frying these strips in about 1/8″ of water since they are much leaner than belly bacon and also because, if you fully-cook the backboard bacon when smoking, you don’t want to lose moisture during frying; you just want to render some of the fat.
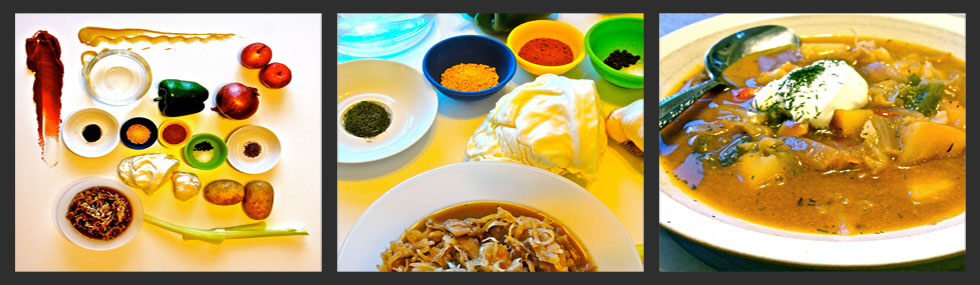
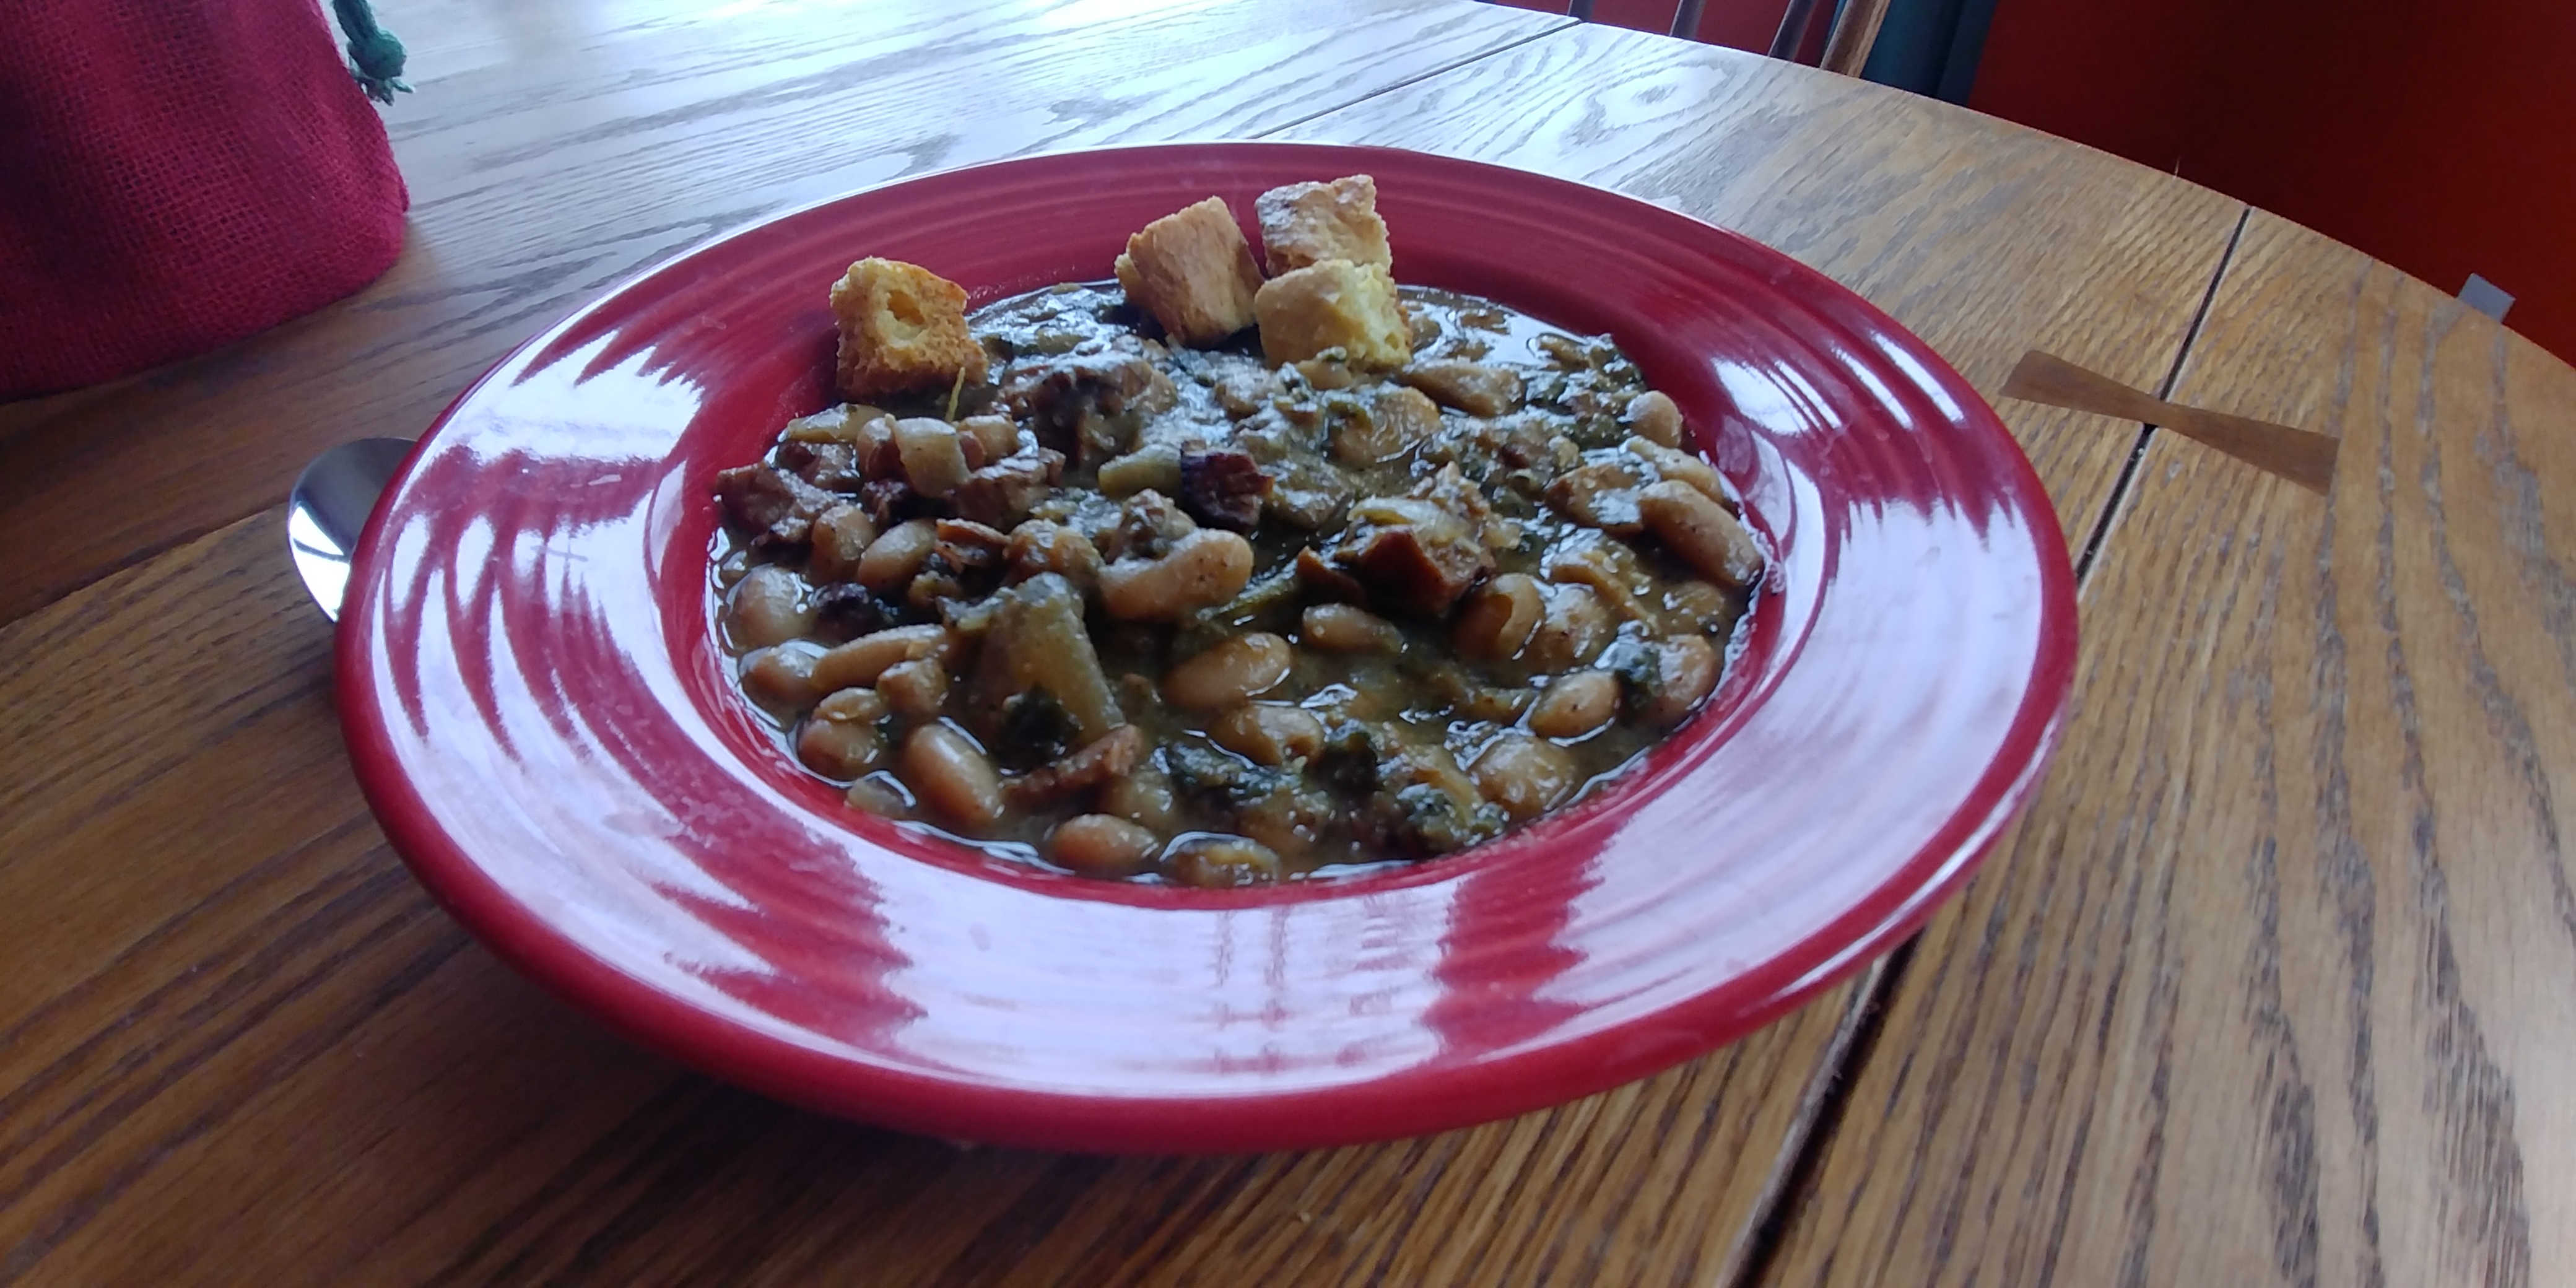
For years I’ve enjoyed sometimes making a white chicken chili, just on the stovetop, with boneless, skinless chicken breast, onion, canned green chilis, and cannellini beans. Since I’ve been smoking meats in my old gas grill for the past year or so, I decided to switch that recipe up; here’s a smoked chicken chili made with those same canned white beans and accompanied by other fresh ingredients.
This sacrifices the unusual, uniform white color of a white chicken chili, for the darker tones one would expect to accompany chicken, onion, and peppers all wood-smoked for hours.
Smoked Chicken Chili with Cornbread Croutons
Here’s what you’ll need, first, for the smoker:
3 boneless, skinless chicken breasts
1 large, sweet onion, halved
3 poblano chili peppers, fresh, core, seeds removed
2-3 cloves fresh garlic
Boneless, skinless chicken breasts, poblano chilis, and sweet onion smoking on Hickory
Here are the remaining ingredients to prepare the chili:
~5 cups low-sodium soup stock (I used homemade turkey stock from Thanksgiving’s turkey carcass)
2-3 tablespoons vegetable oil
3 15-ounce cans of cannellini beans, drained
And flavor the chili with the following, to taste:
salt
ground black pepper
Mexican oregano
ground cumin
ground cayenne pepper (optional)
ground Ancho chili pepper (optional)
garlic powder
Ingredients to flavor the chili
Chicken Chili prior to adding the Cannellini Beans
To prepare:
First, I smoked the chicken breasts (lightly salt-brined overnight), halved onion, and cored poblanos for about 3 hours, total, 160-200°F. Note, the smoking phase should not bring the chicken breasts, inside, to safe temperature to consume. That’s intentional, because it will finish, simmering at a low boil in the chili.
Next, prepare like a typical chili in a stockpot: sauté the onions and peppers, chopped to a fairly fine size, in vegetable oil, add minced garlic cloves and spices.
Dice the smoked chicken breast, add to pot, stir, add the soup stock; bring to a boil, stirring occasionally, then reduce to a simmer.
Add the cannellini beans for about the last half hour. You’ll be less likely to crush them while stirring if you delay adding them.
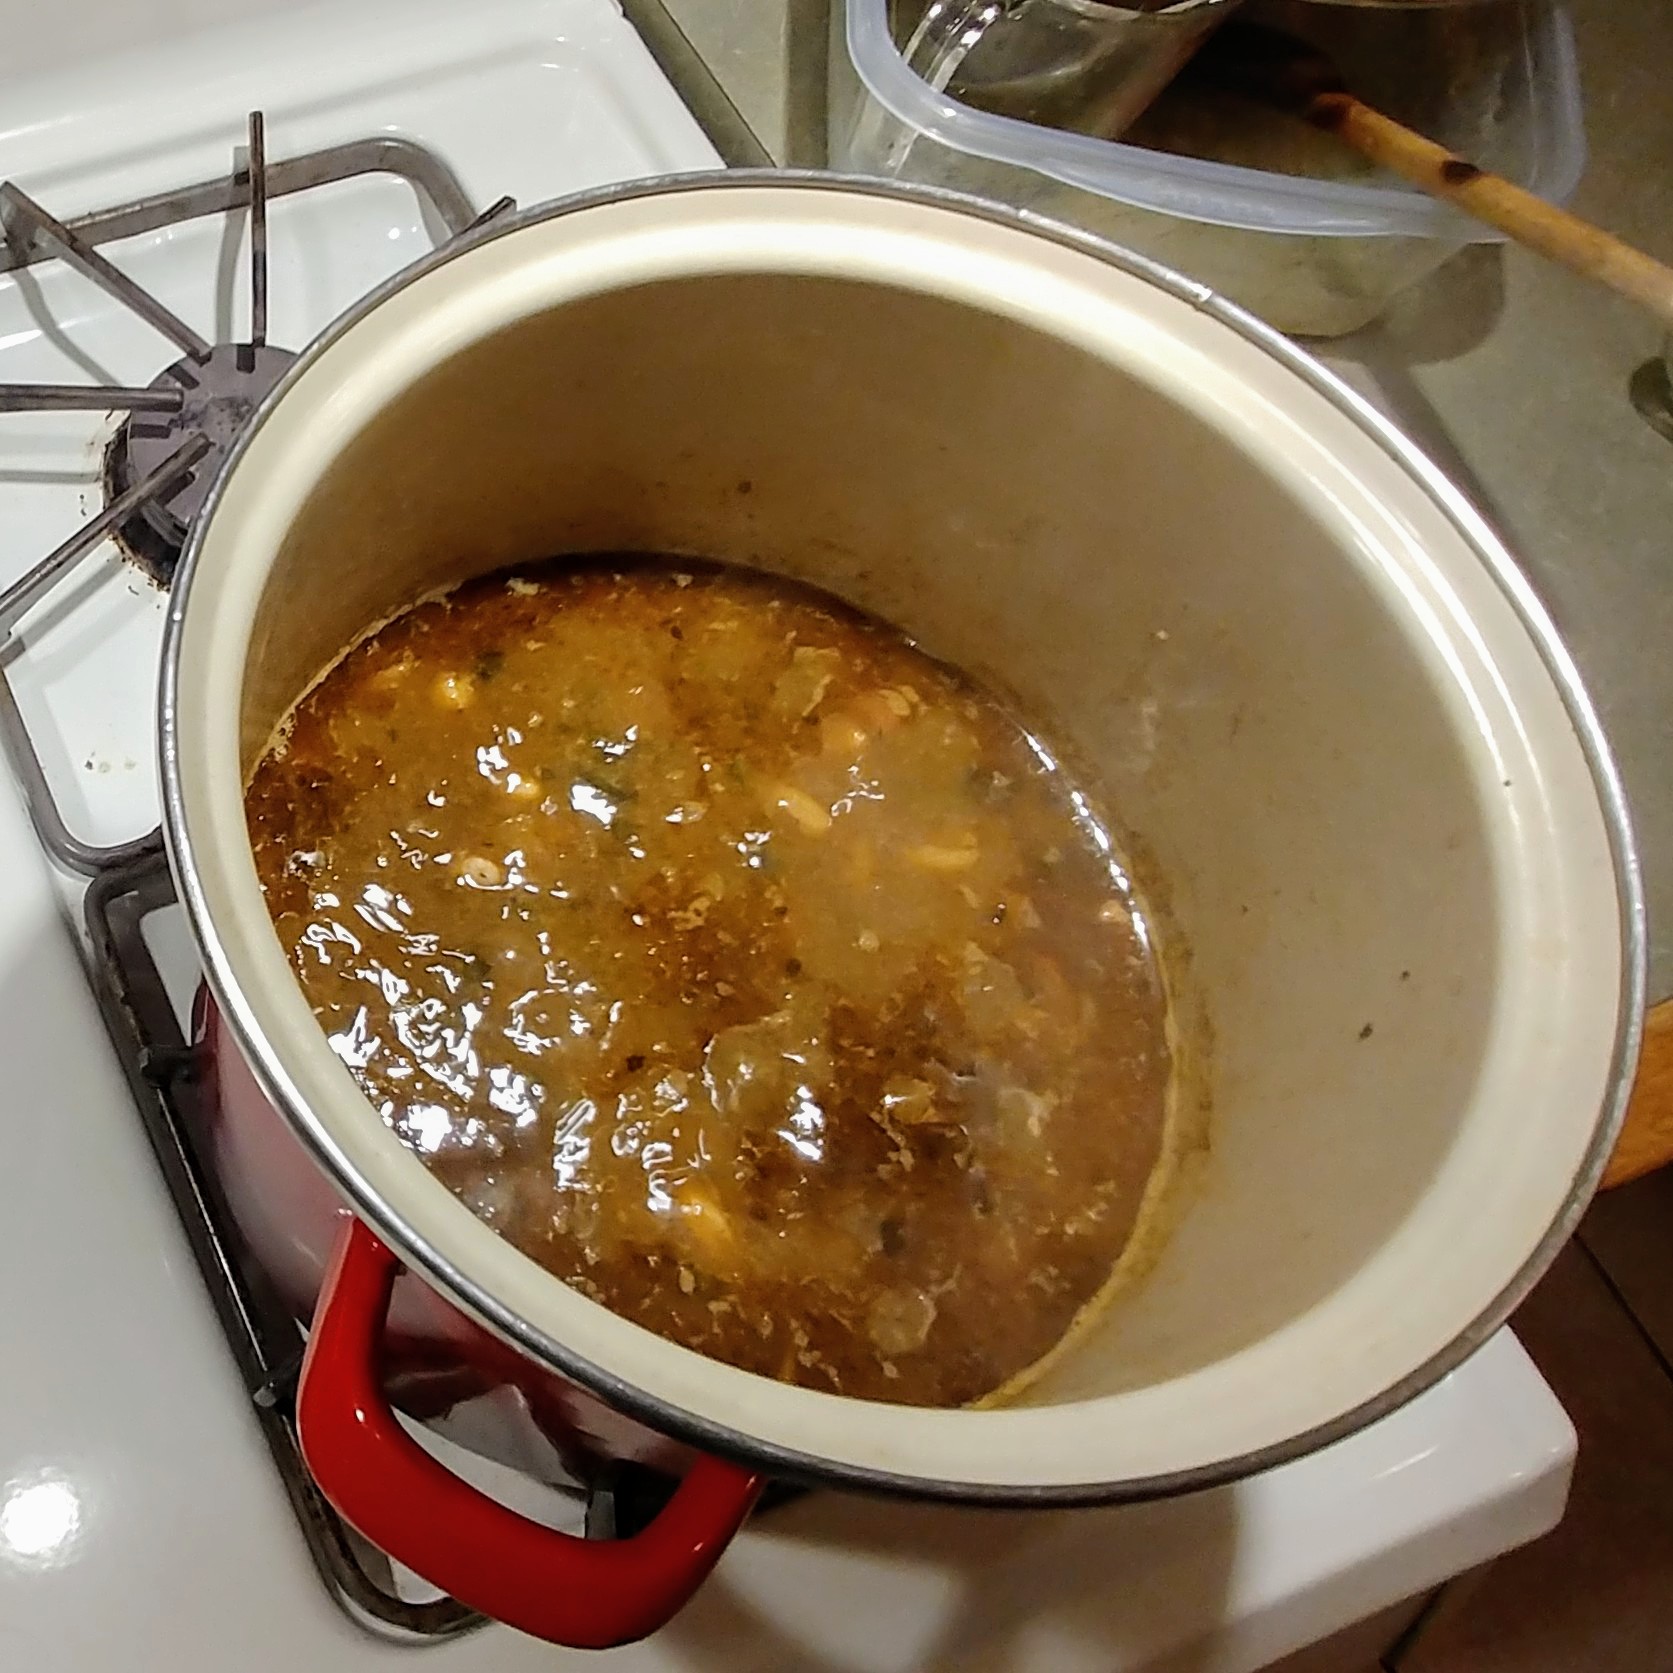
I simmered the chili for about 1.5 hours, total, stirring occasionally, and adjusted the salt and spices to taste, while some water boiled away, concentrating the flavor.
We served this Smoked Chicken Chili as one of three chilis to a gang of guest friends, at home, with choice of many toppings and hot sauces, including homemade cornbread croutons. These substantial croutons work nice in that they soak up a bit of the liquid, but still stay crunchy.
The two other chilis were a Chili Verde, made with pork loin roast and canned tomatillos, and a veggie chili, with corn, a variety of canned beans with the can liquid, and Adobo seasoning.
One guest shared they especially liked the Smoked Chicken Chili for its unique flavor. Having the three chilis allowed each dinner guest to mix them according to their vegetable, poultry, or meat desires. :)
So, if you enjoy smoking meats on the grill and have some time to put your talents toward a great chili, give this one a try!
Here is a solid, popular chicken recipe I’ve used before, and adapted here:
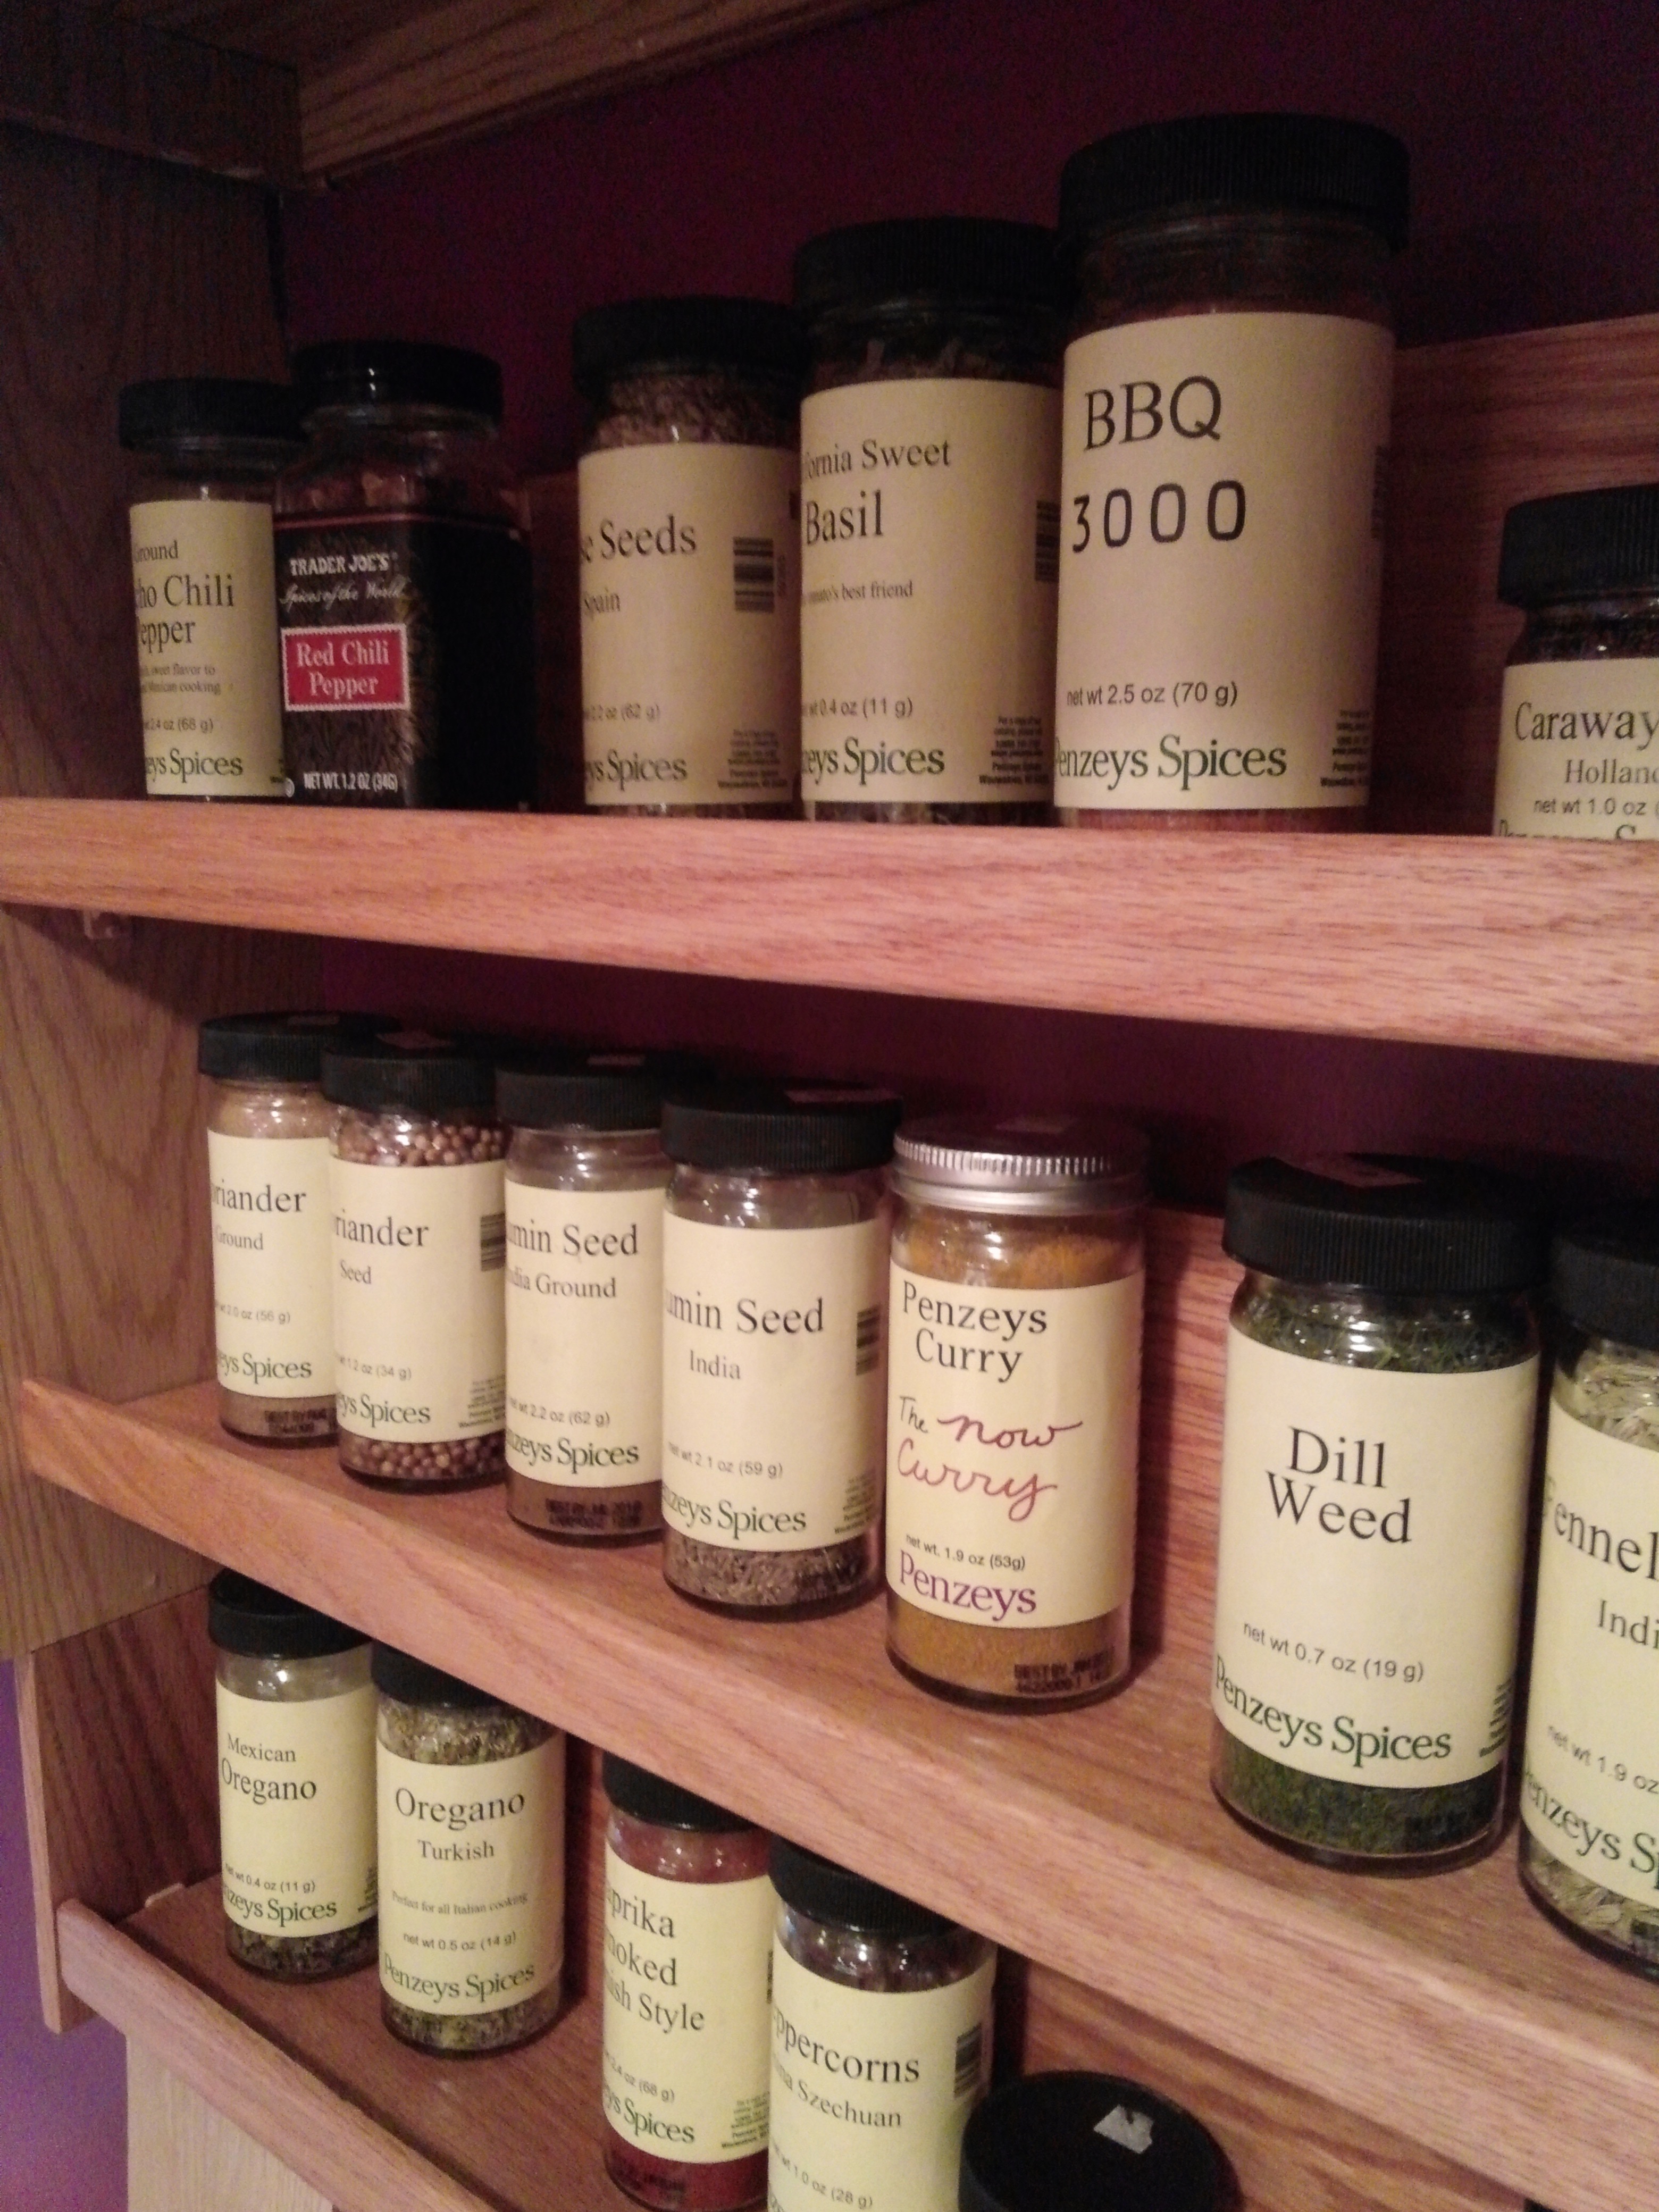
After years of having spice jars inconveniently located in cabinets, slide-out drawers, or shelves that were too small, I inquired with the salesperson at the Penzeys store if they knew of a good source for large wooden spice racks that fit their jars well. Unfortunately they didn’t, so I decided to make some myself.
Our kitchen happens to have a bridge cabinet installed over a countertop workspace opposite the range that seemed to be the perfect place for spice racks. For this location, I built these removable oak spice shelves, totaling 9 linear feet of visible and accessible “spice space.”
This woodworking project used just two sorts of prepared wood procured from a local home improvement store: pre-cut planks, and outside corner trim.
The (3) shelves were assembled as follows:
Use a mitre box and saw to cut the wood planks (2) and trim pieces (1) to length (e.g., 36 inches), for each shelf. Before continuing with assembly, examine each plank’s surfaces to select which side you’d like to be displayed.
Clamp each pair of 4 inch x 1/2 inch planks together, forming an “L”-shaped shelf with the back piece atop the bottom piece. This will form a shelf with a back slightly taller than the shelf bottom is deep.
Using tiny brass wood screws, in holes you’ve drilled perhaps every 6-12 inches.
Once installed, this yields a shelf back of the appropriate thickness to prevent the spice jars or their lids from touching the (painted) wall when the spice jars are removed or replaced.
Using construction adhesive and clamps, glue the oak outside corner to the front edge of each shelf, with the rounded edge upward (toward the top and front of shelf).
This, of course, forms a channel in which the spice jars sit, so they won’t easily fall off the shelves.
As shown in the close-up below, cut a short piece of outside corner trim and use construction adhesive to glue them at the back edges at the end of each shelf.
This will act as a stand-off to keep the shelf a bit away from the wall, yet allowing some “play,” which is especially necessary when either the shelf back board or the wall (or both :) ) is not perfectly straight, flat, and true.
Once the adhesive is completely dry, sand shelves as necessary and finish them as you wish. Here, a combination stain and polyurethane satin finish was applied to match the existing cabinets.
oak spice shelf, underneath detail.
Lastly, mount the removable shelves with shelf pins in shallow holes drilled in the cabinets on both ends of each spice rack(s), allowing you to remove the shelves or to reposition them.
Since, it is important that the shelf pin holes are drilled at the same level for both ends of the spice shelves, so the shelves are level, I use a jig built from peg board to select the hole positions to drill.
With multiple shelves, such as the three shown here, a 7-inch separation (above or below) each shelf has proved to work well for our spice jars and containers. Loaded up with a set of (mostly) Penzys jars, we have a handsome, utilitarian display of spices!
Well, I guess I’ve been away from this blog for a loooong time! Things are going well, I just haven’t been cooking too many new things.
However, making this swordfish dinner reminded me of my last post (last year), and reminded me to come back. :)
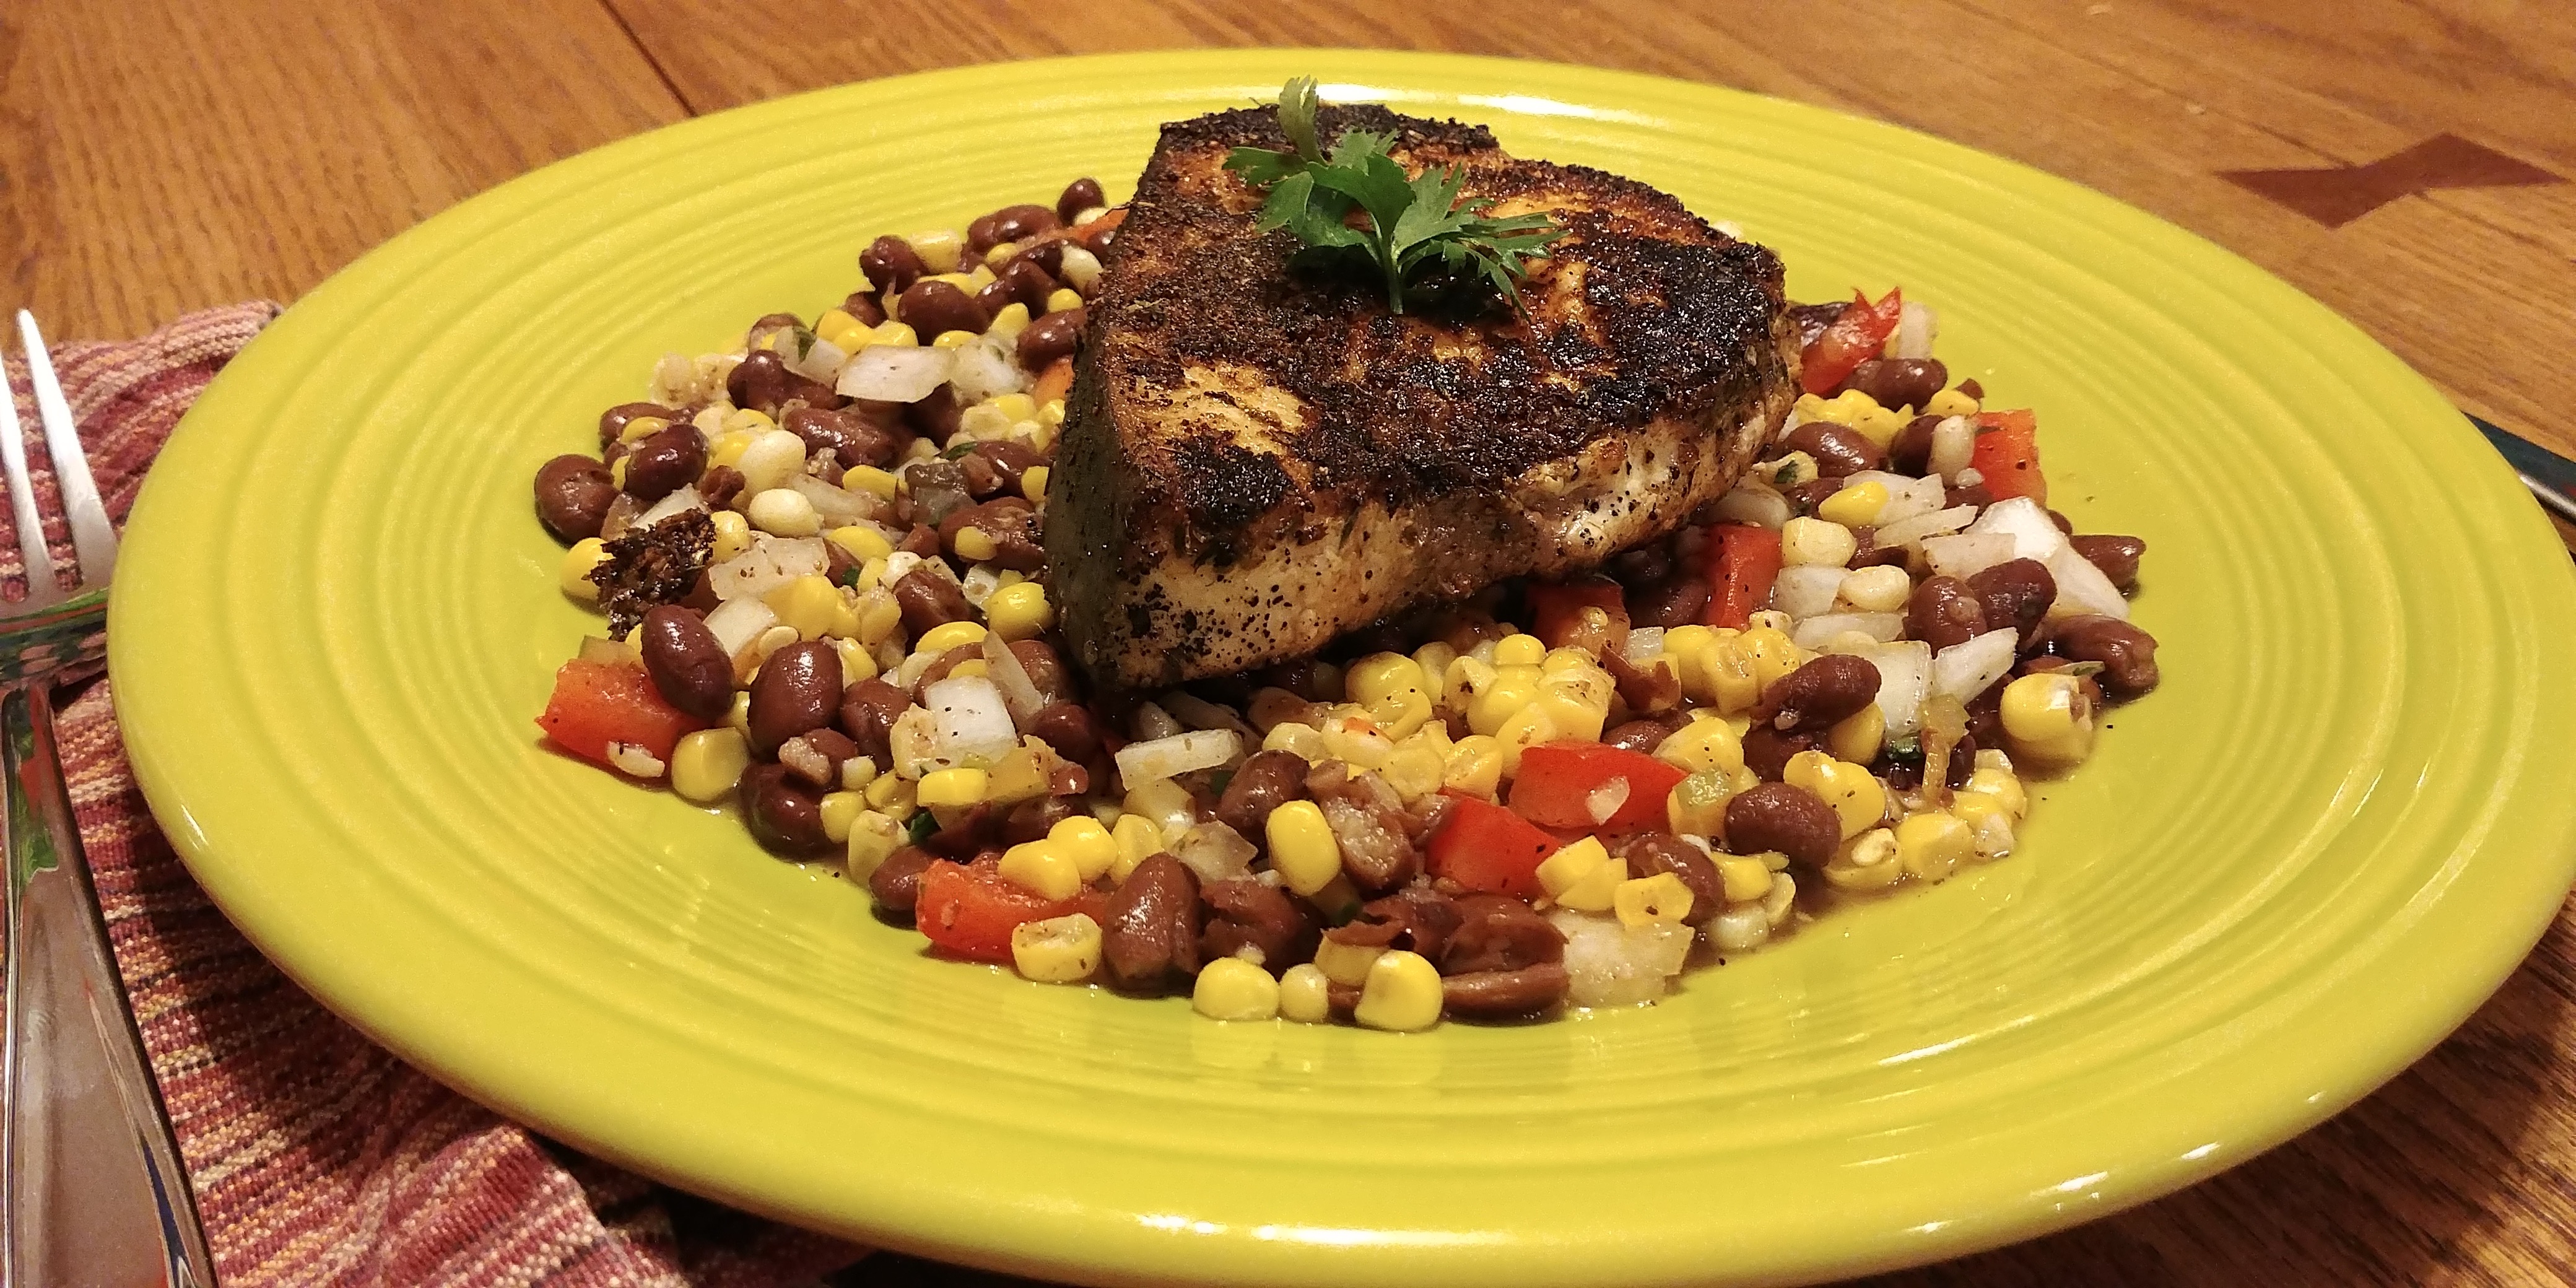
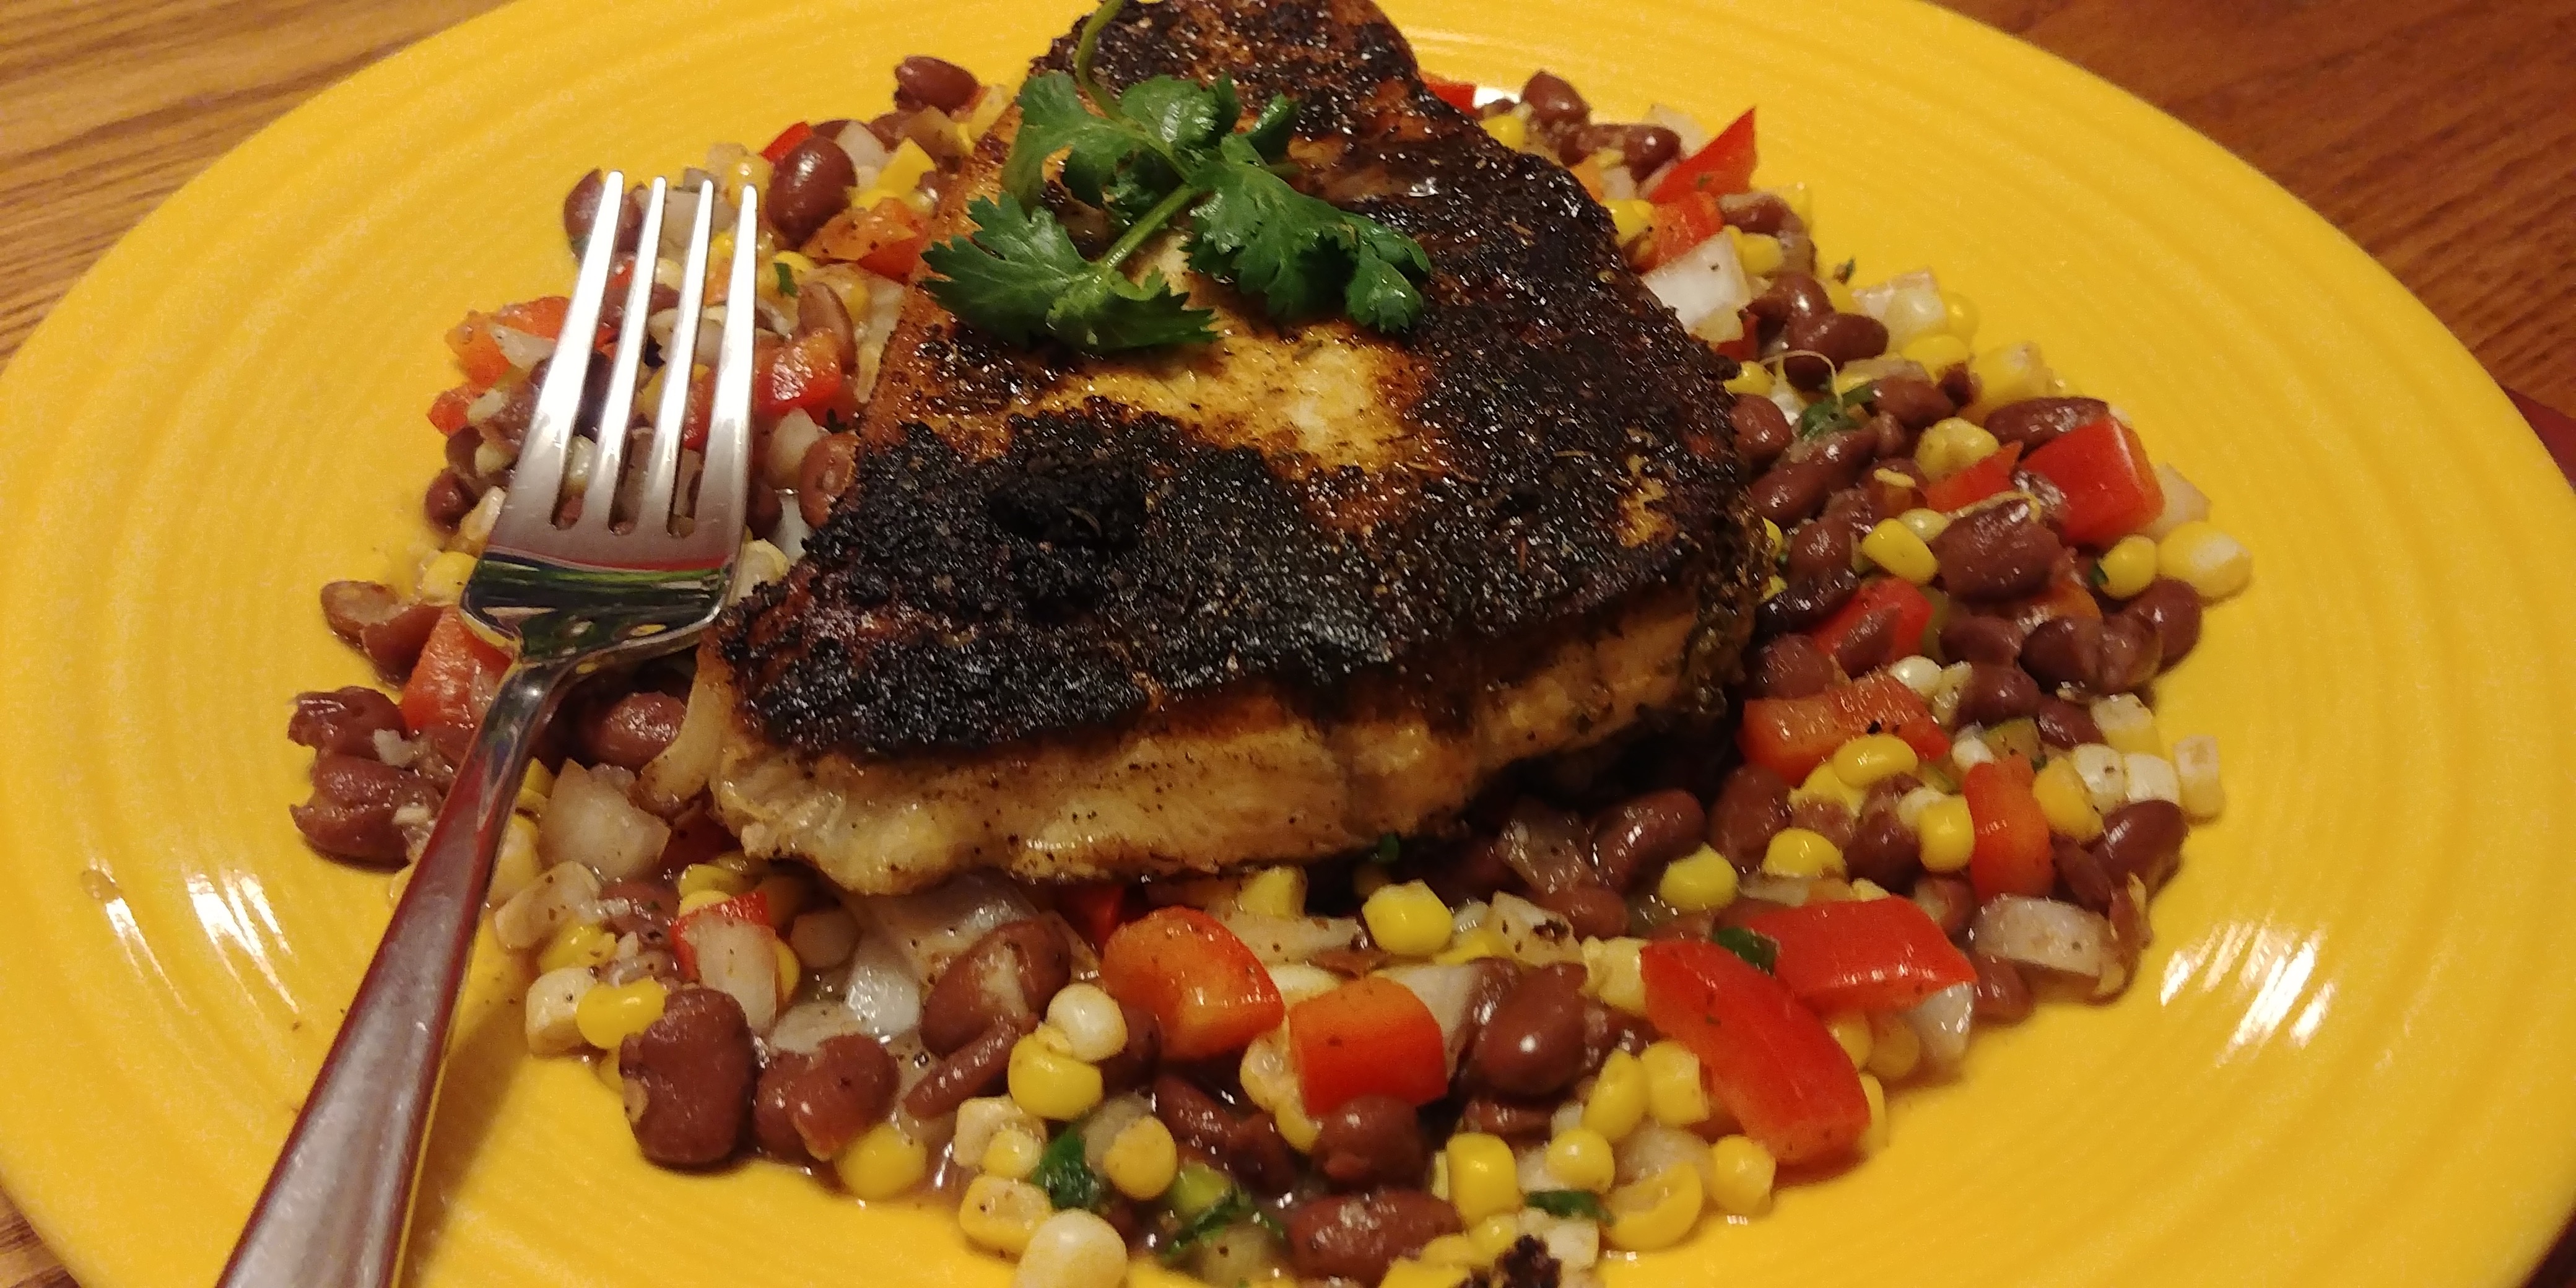
Swordfish a favorite and surprisingly easy, er, quick anyway. I made the salsa the other day with a couple lightly boiled cobs of fresh corn, a can of black beans, a touch of lemon juice, cider vinegar, red pepper, onion, apple cider vinegar and spices.
The thawed swordfish steaks cook in 5 minutes in a hot cast iron pan, 2-2.5 mins per side (from frozen at Trader Joe’s.)
I didn’t measure anything, but I’ve included a recipe below that’s a good basis for the blackening spices.
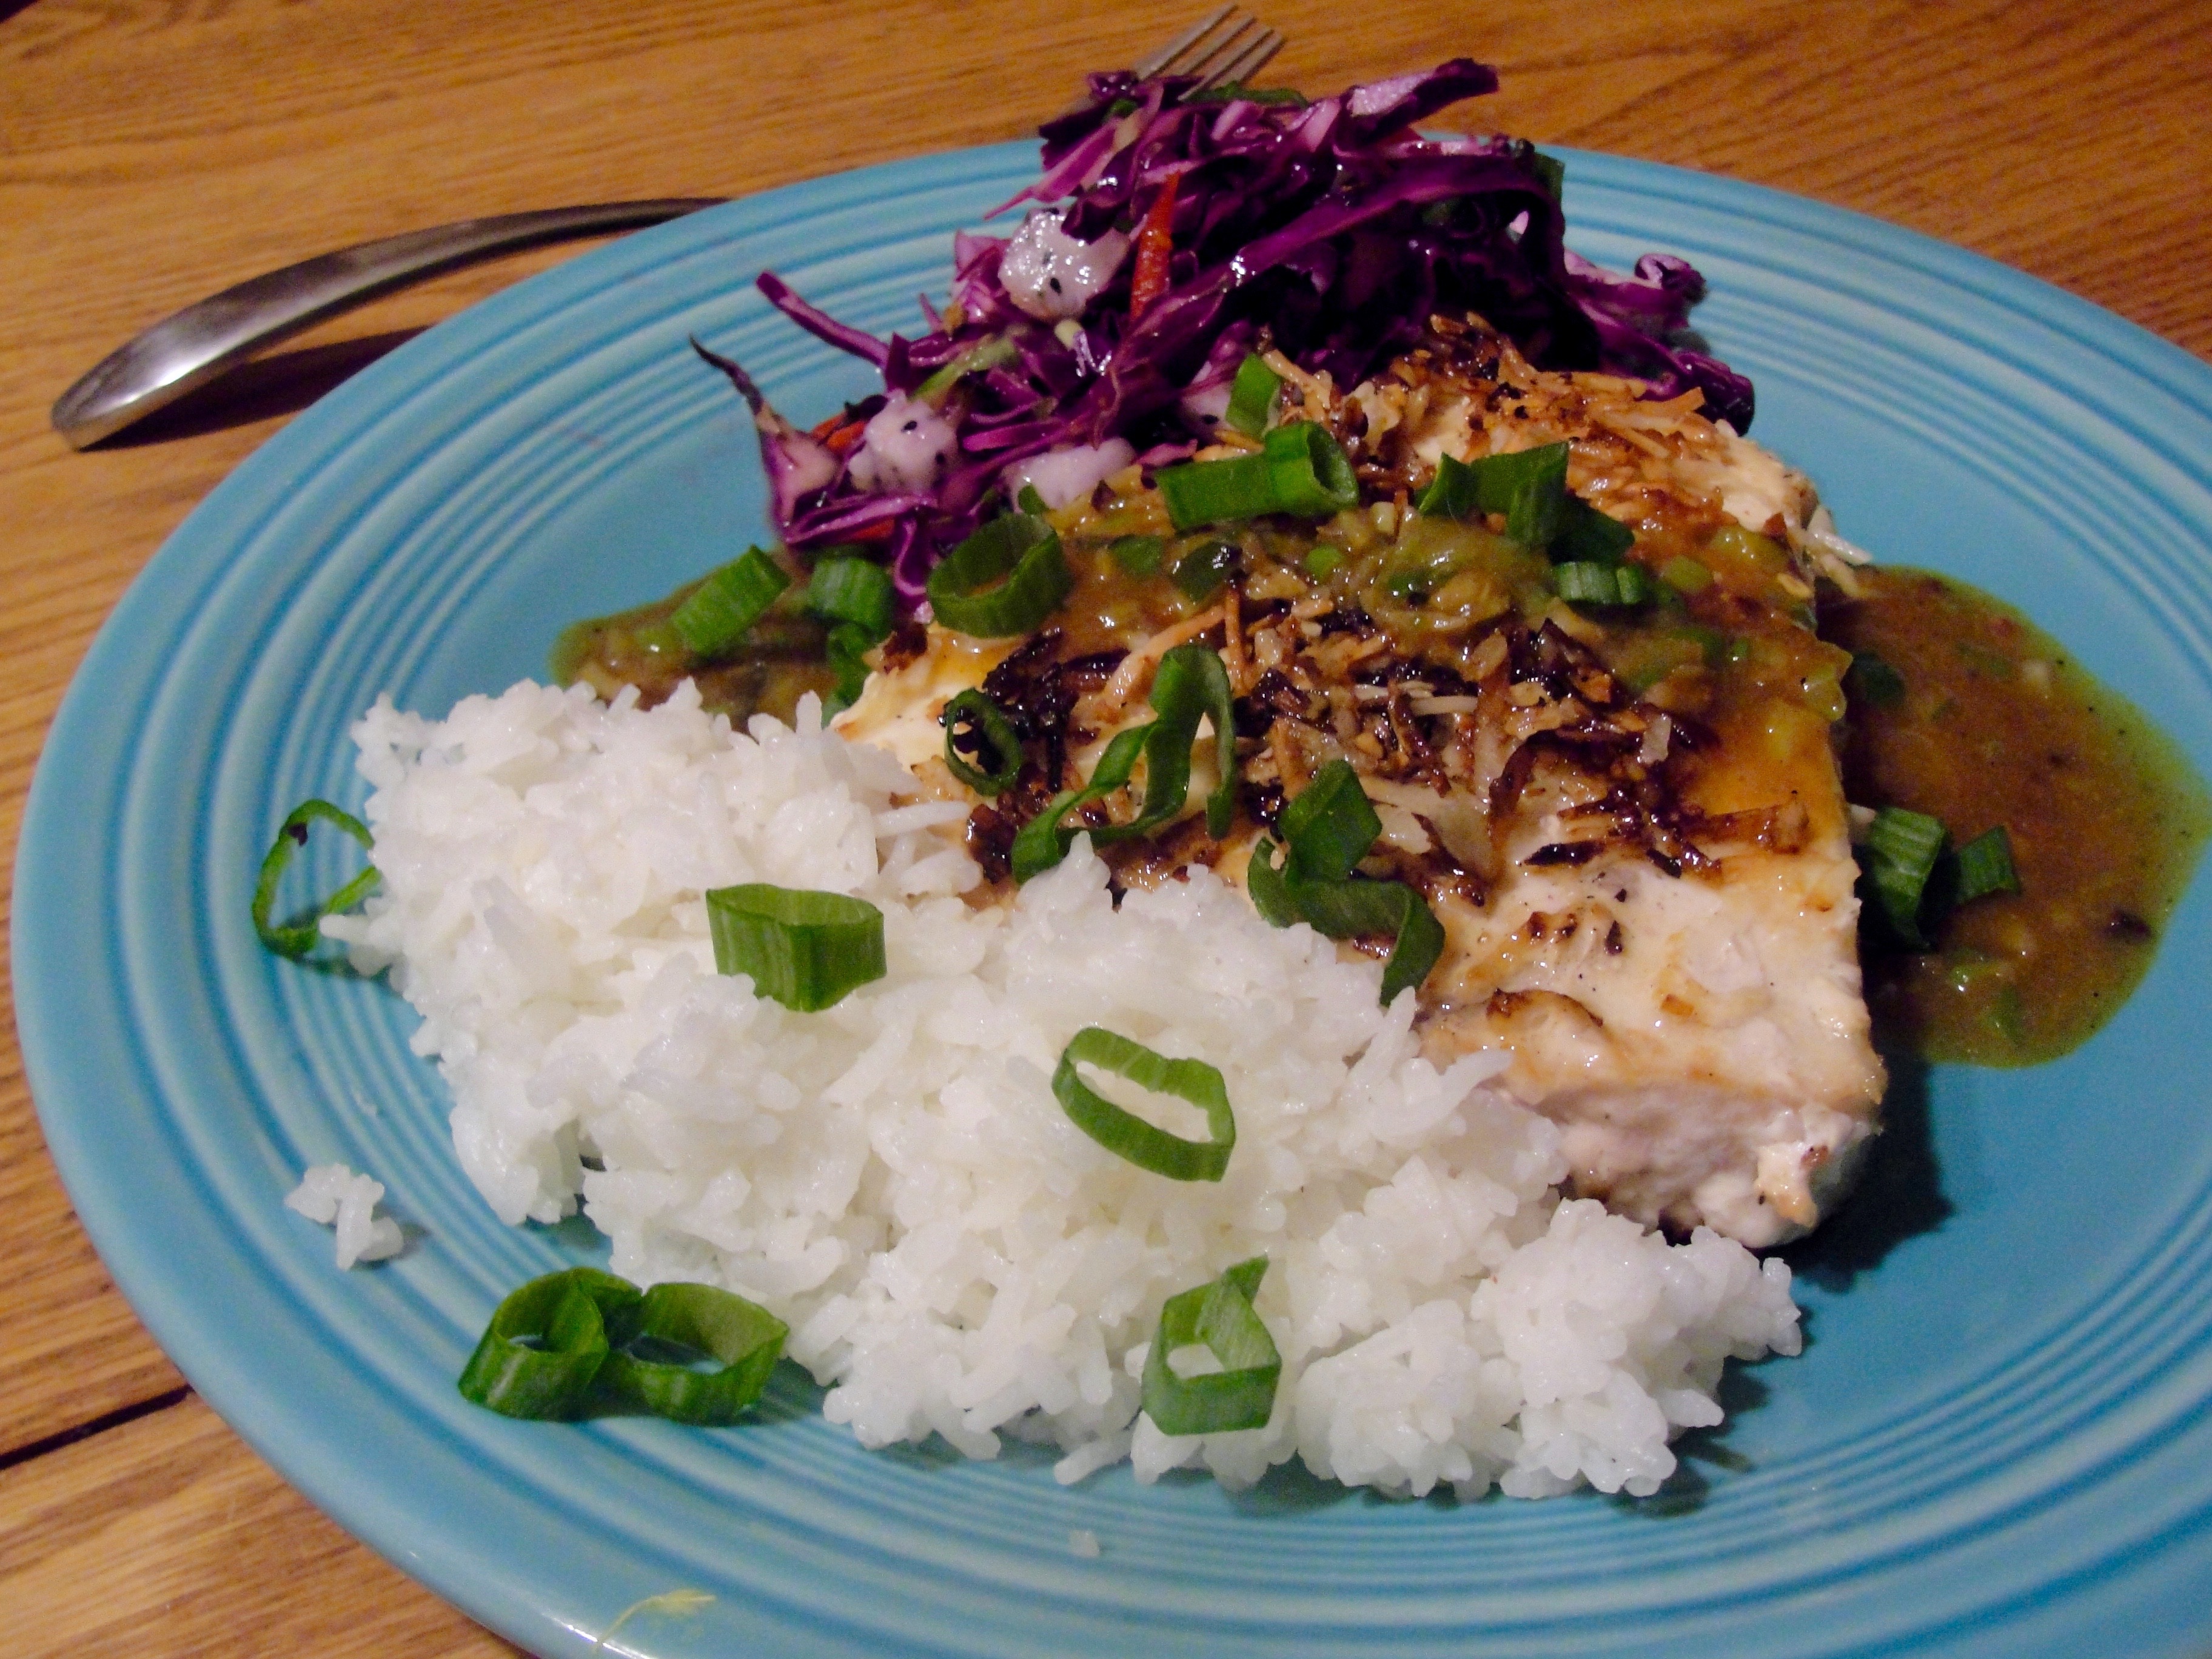
Coconut-crusted swordfish steak with dragon fruit slaw and jasmine rice.
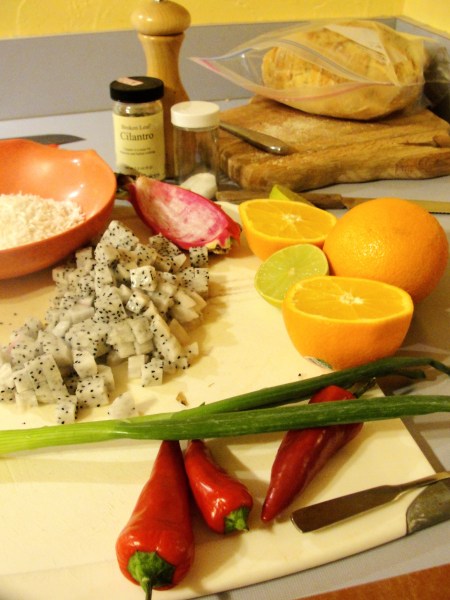
Tonight we made a curiously medieval seeming meal with swords and dragons. We picked up some swordfish steaks and a dragon fruit with the notion of preparing fish with a fruit salsa, but the latter ended up as a cabbage-based slaw instead – looking a bit like dice has been thrown in. :-)
Ingredients, for the slaw:
red cabbage, 1/2 head, thinly sliced
dragon fruit, 1, peeled and cubed
spicy red peppers, e.g., jalapeño, 2-3, seeded
(I think these were Barker’s Hot Pepper, a.k.a. hot Anaheim.)
scallion, 1, chopped
fresh orange juice, about 1/4 cup
fresh lime juice, from 1/2 lime
apple cider vinegar, to taste
chopped cilantro leaf (we used dried)
salt, to taste
Prepare the slaw much as you would any fresh cabbage and vinegar-based coleslaw. Wait until the end, though, to carefully stirring the cubed dragon fruit in, when your slaw has been otherwise prepared to your liking.
Some dragon fruit slaw ingredients.
Ingredients, for the swordfish steaks and sauce:
swordfish steaks, 1 per person, thawed from frozen
unsweetened, flaked coconut, about 1/2 cup
salt
freshly ground black pepper
scallion, 1, white portion chopped, greens sliced for garnish
fresh orange juice, about 1/2 cup
corn starch
While the slaw sits for a while, salt and pepper the swordfish steaks and coat with flaked coconut. For the sauce, simply stir about a teaspoon of corn starch into the orange juice and set aside for after the fish has been cooked.
Coconut-crusted swordfish and sauce ingredients.
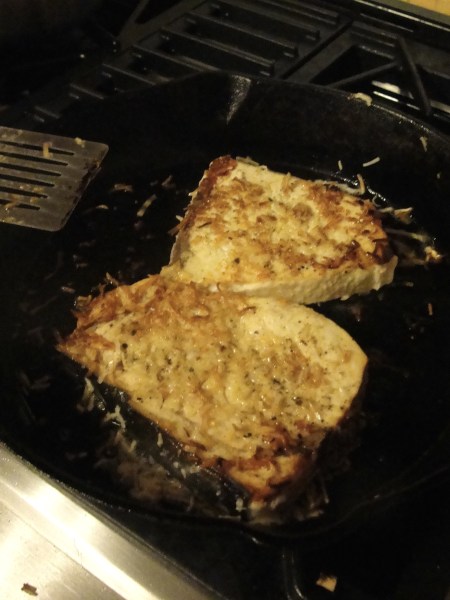
Add a few tablespoons of oil, e.g., canola, to a skillet heated medium to medium-high.
Pan-frying coconut-crusted swordfish steaks.
Pan-fry the swordfish steaks, about 4-5 minutes per side (for these that were about 1 inch thick), flipping them over just once.
Pan-frying coconut-crusted swordfish steaks.
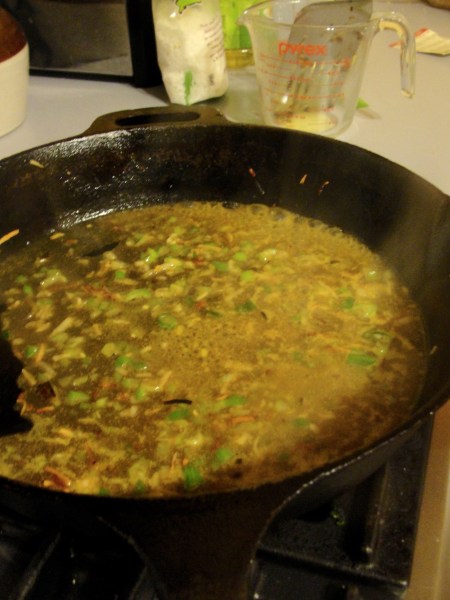
Plate the steaks and keep them warm. Meanwhile, reducing the pan heat to medium-low and quickly sauté the whites of the scallion just lightly, combined with whatever coconut flakes remained in the pan. Next, immediately pour the orange juice and cornstarch mixture into the pan, stirring with the scallion and coconut until the sauce thickens.
Preparing the coconut orange scallion sauce.
Pour sauce over each of the swordfish steaks, top with scallion greens, and serve accompanied by the fruit slaw and perhaps also jasmine rice.
This was a tasty meal. I’ve not prepared swordfish steaks before, but they were quite nice topped with this simple coconut-scallion-orange sauce. Swordfish is substantial in texture and was nicely contrasted by the fresh, crisp, spicy, tart, sweet fruit and cabbage slaw. I bet it would go just as well with a fruit salsa instead.
Coconut-crusted swordfish steak with dragon fruit slaw and jasmine rice.
Update (March 10, 2016):
The leftovers, with some black beans and salsa added, made a great “sad desk lunch!”
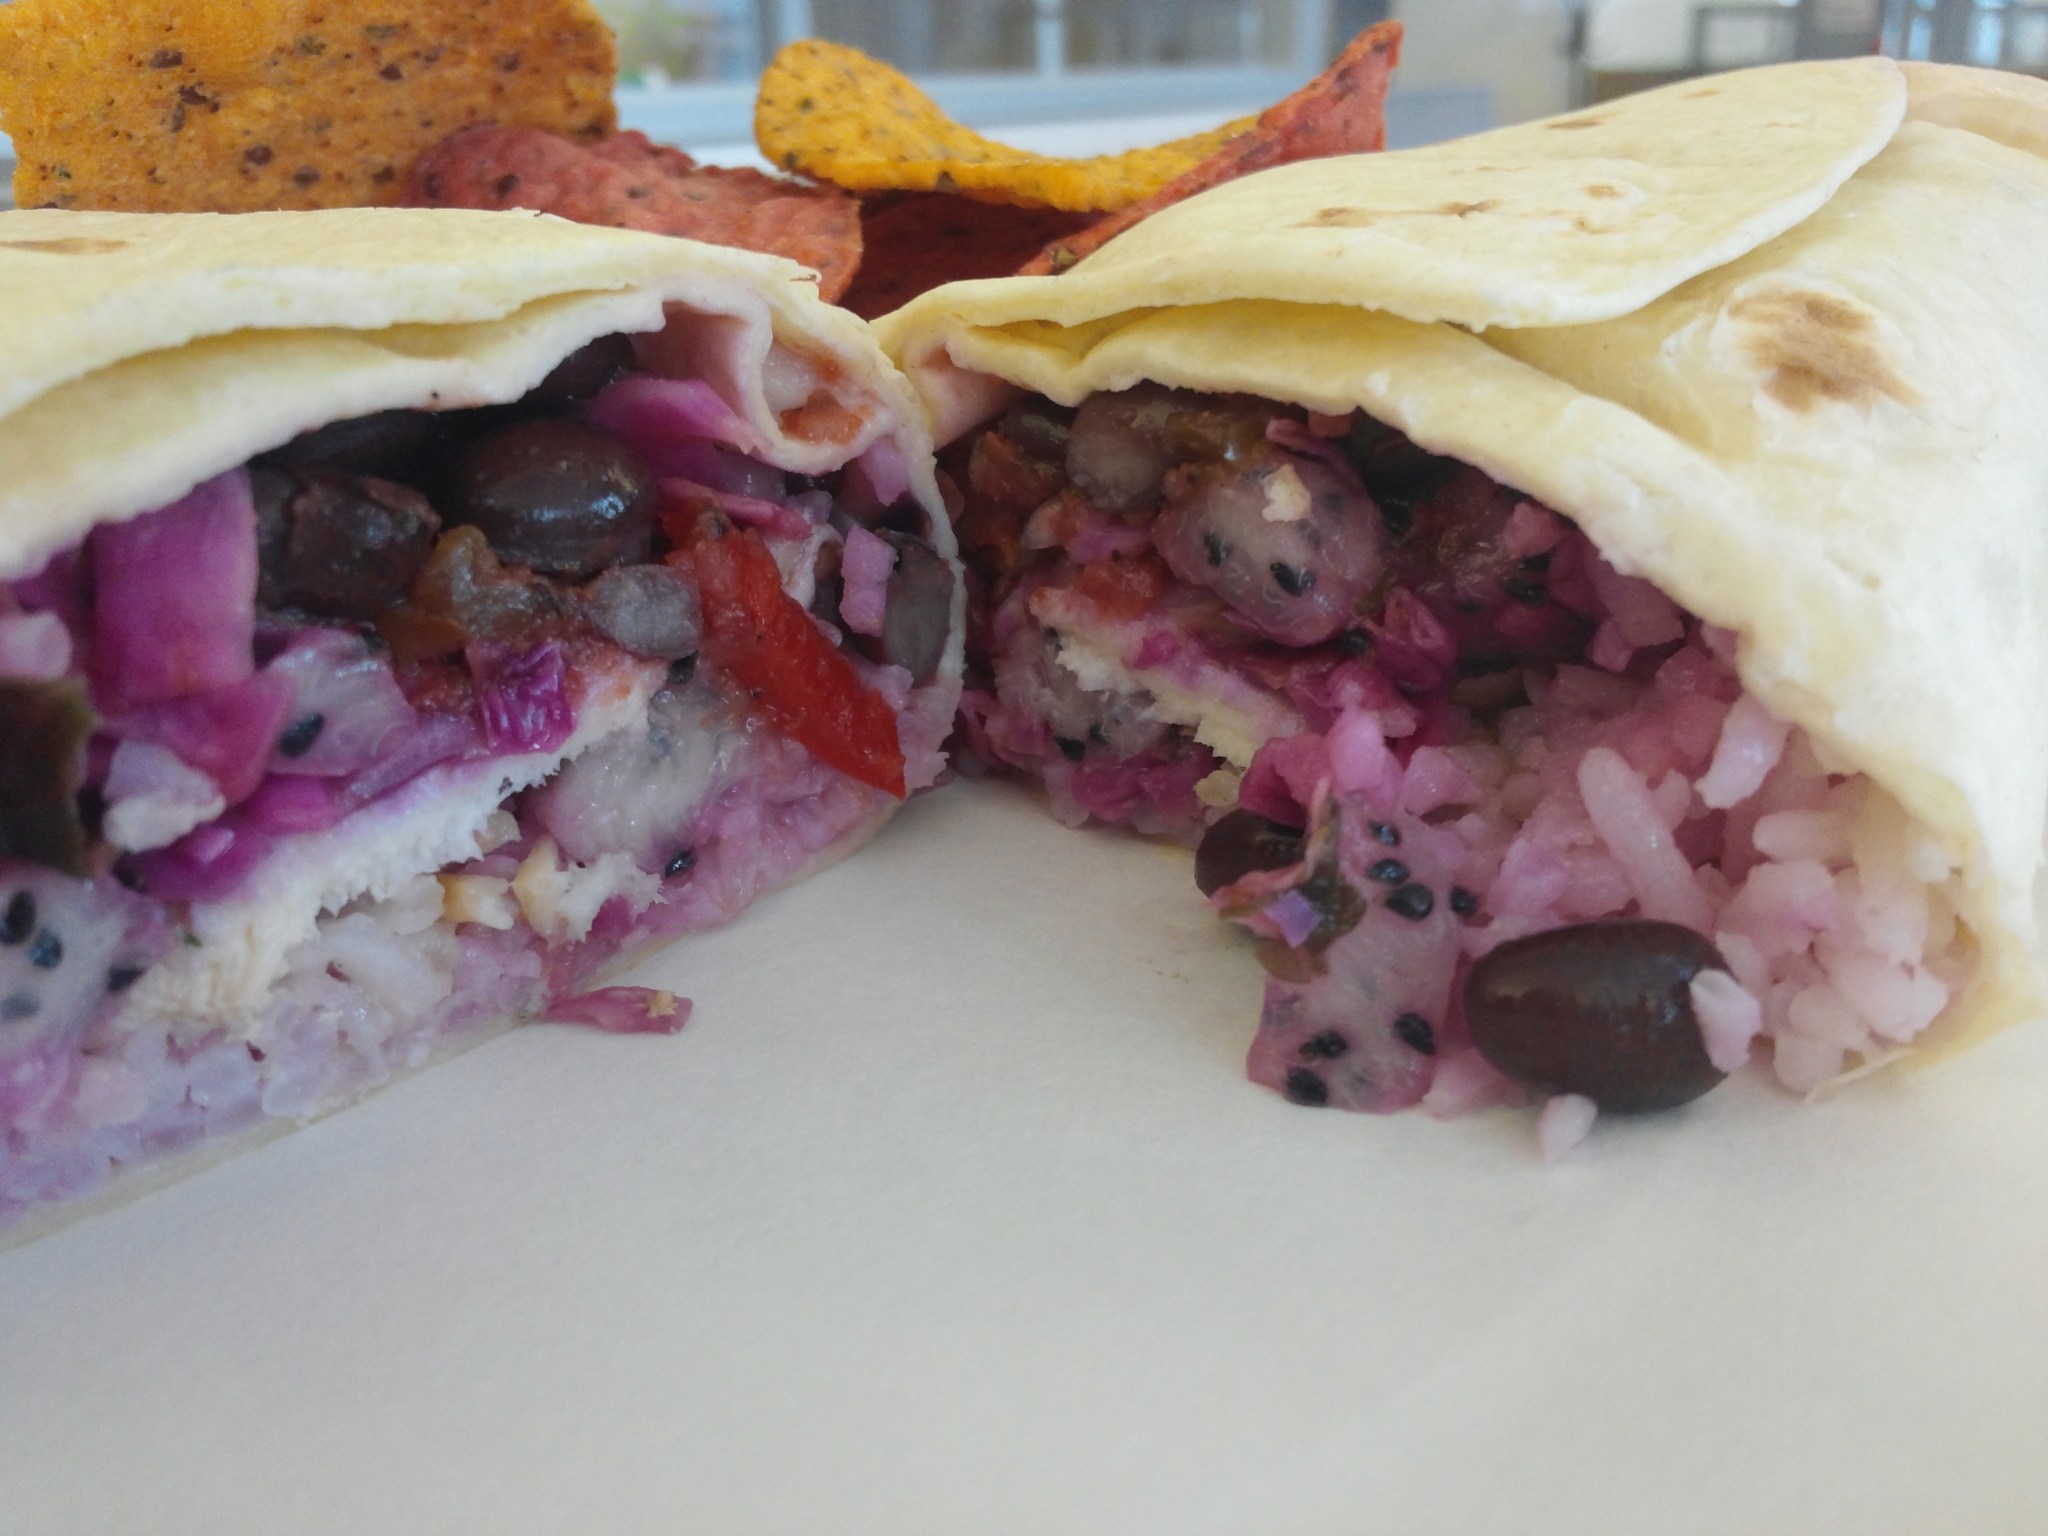
Swordfish and dragon fruit burrito!
Here are some related recipes I consulted for ideas:
Perfect for an autumn meal: this is Gominda Wak (literally: “pumpkin pork,” also sometimes “Wak Gominda”), a hearty traditional stew from the Garo people in northeastern India. It’s a wonderful pork and squash dish that I was introduced to by my Garo friend, who helped prepare it here. It’s surprisingly simple – only 5 ingredients!
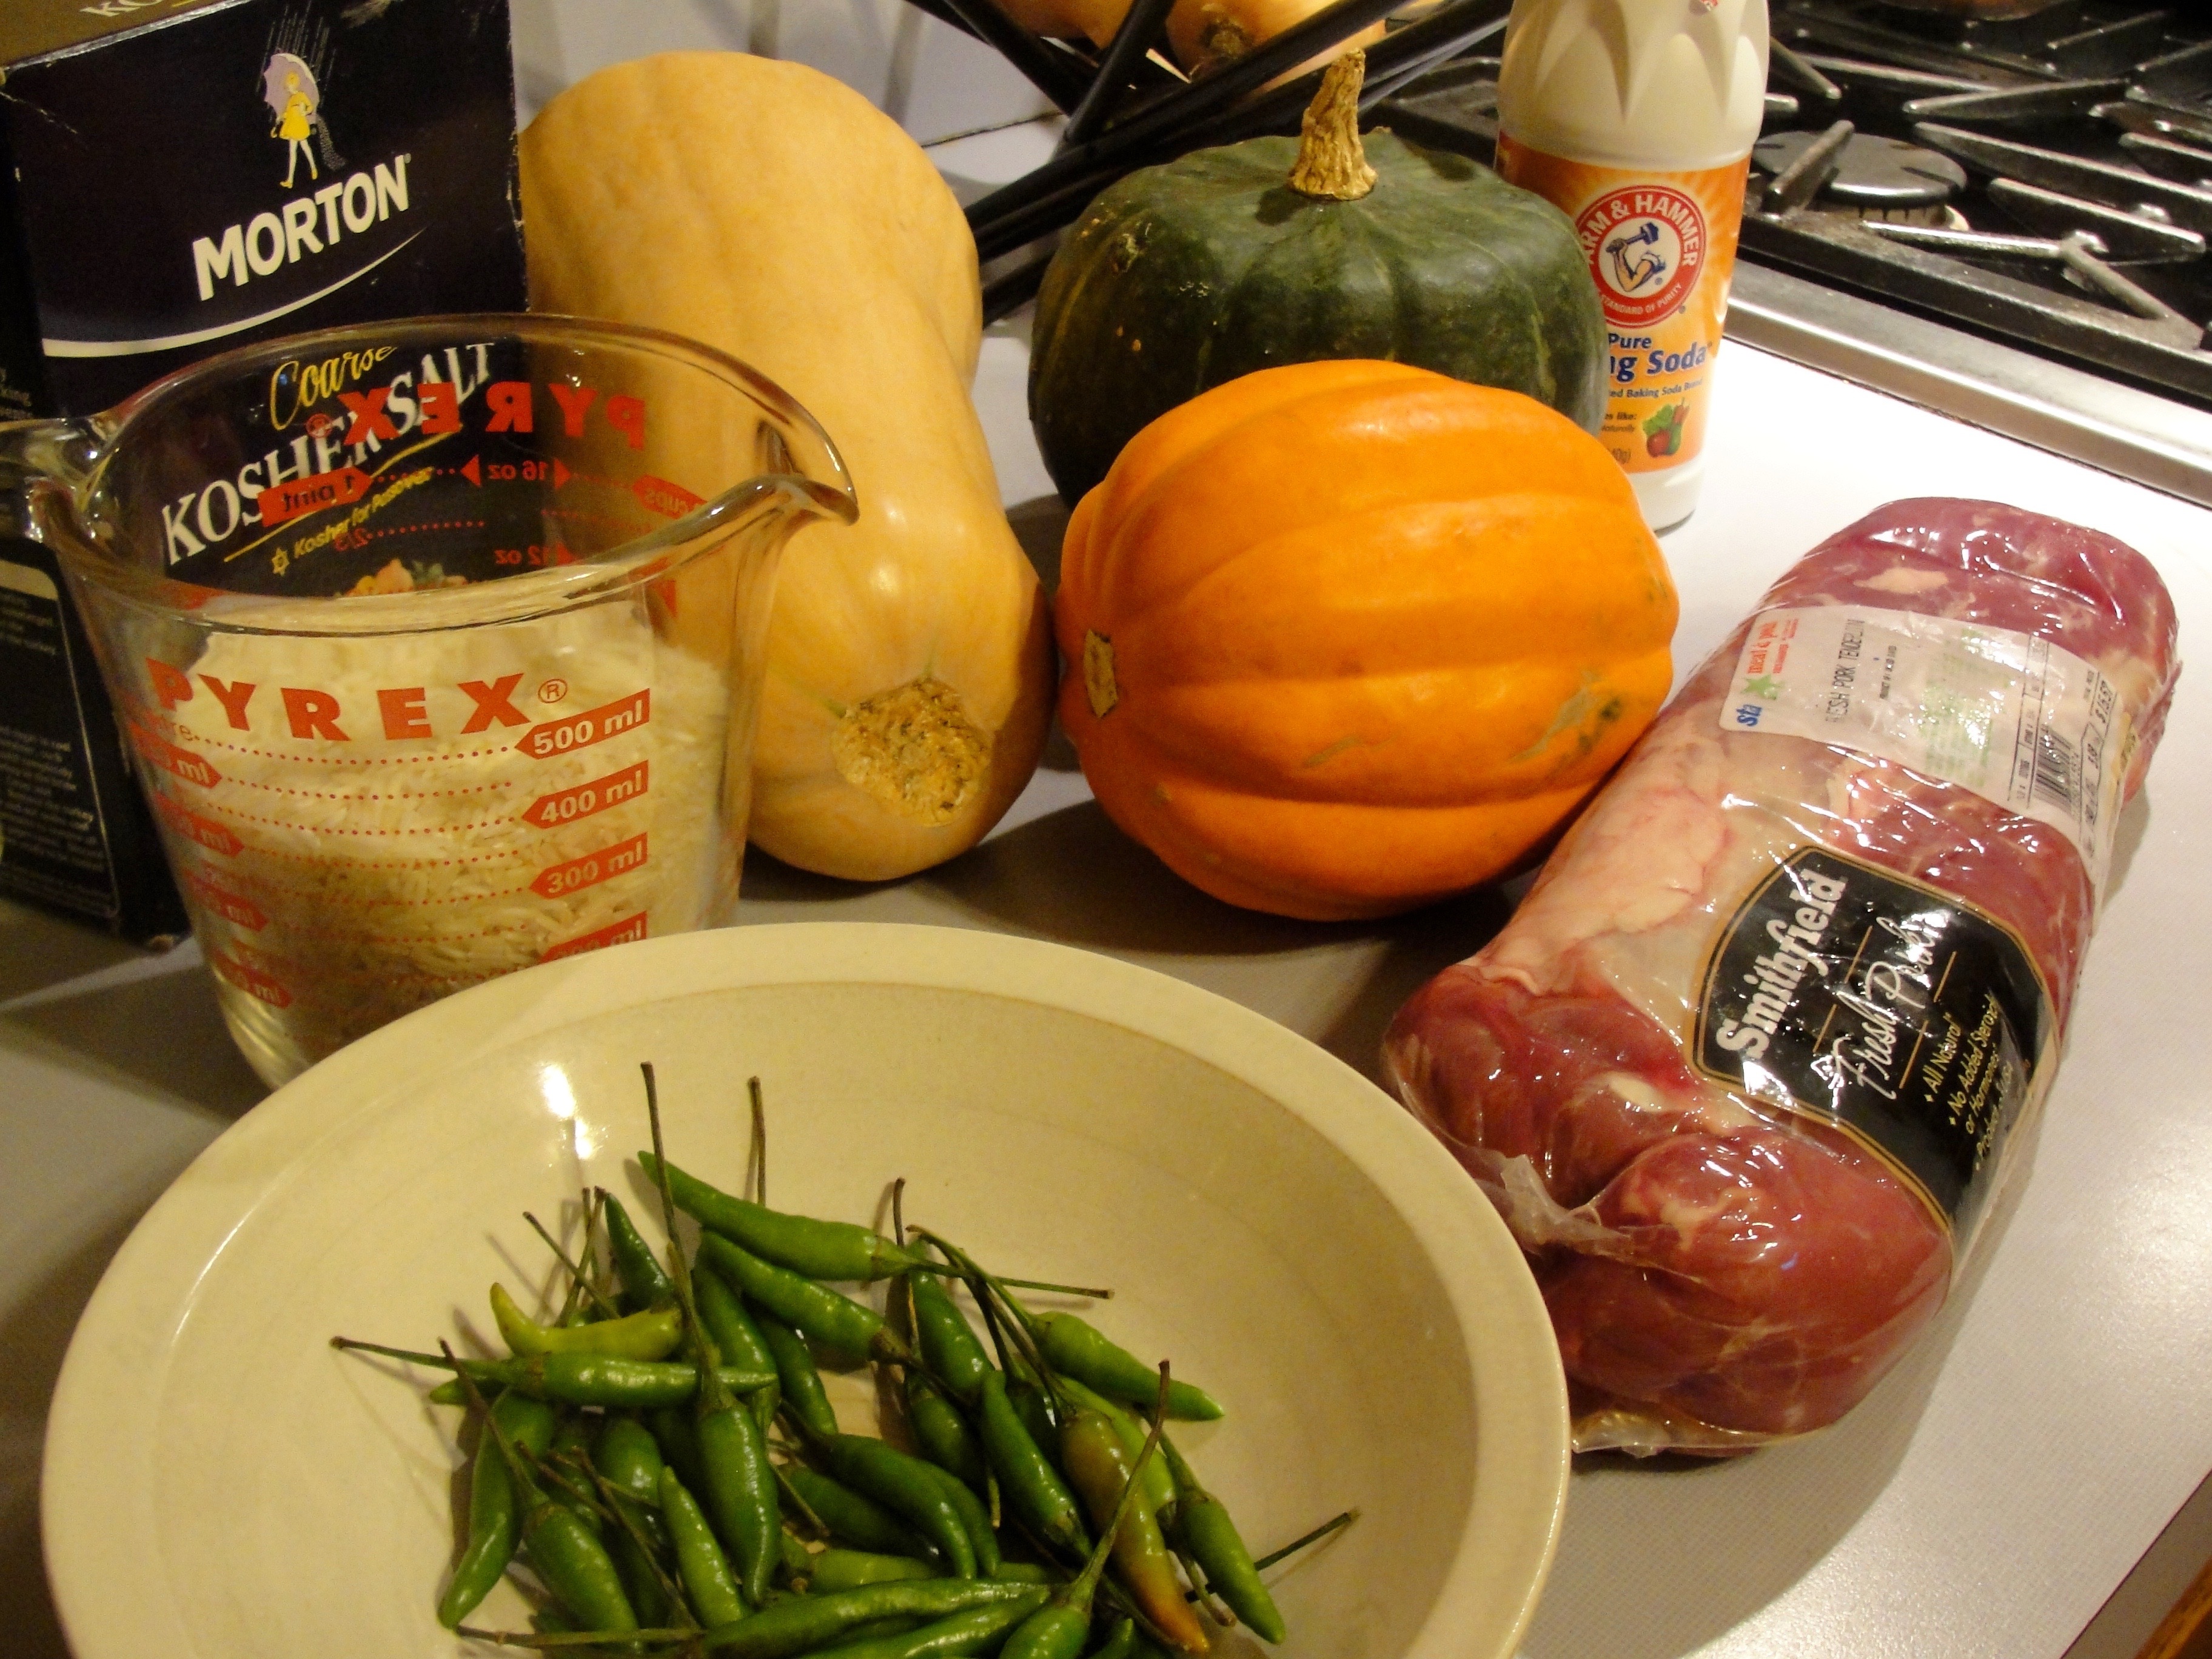
Wak Gominda ingredients.
Ingredients, here for 6-8 generous servings:
Boneless pork; here we used about 3 pounds pork loin; a marbled pork roast might be preferred; it need not be this lean.
Pumpkin or other squash, a couple pounds; we used about 2/3 in total of the acorn, butternut, and buttercup squashes shown.
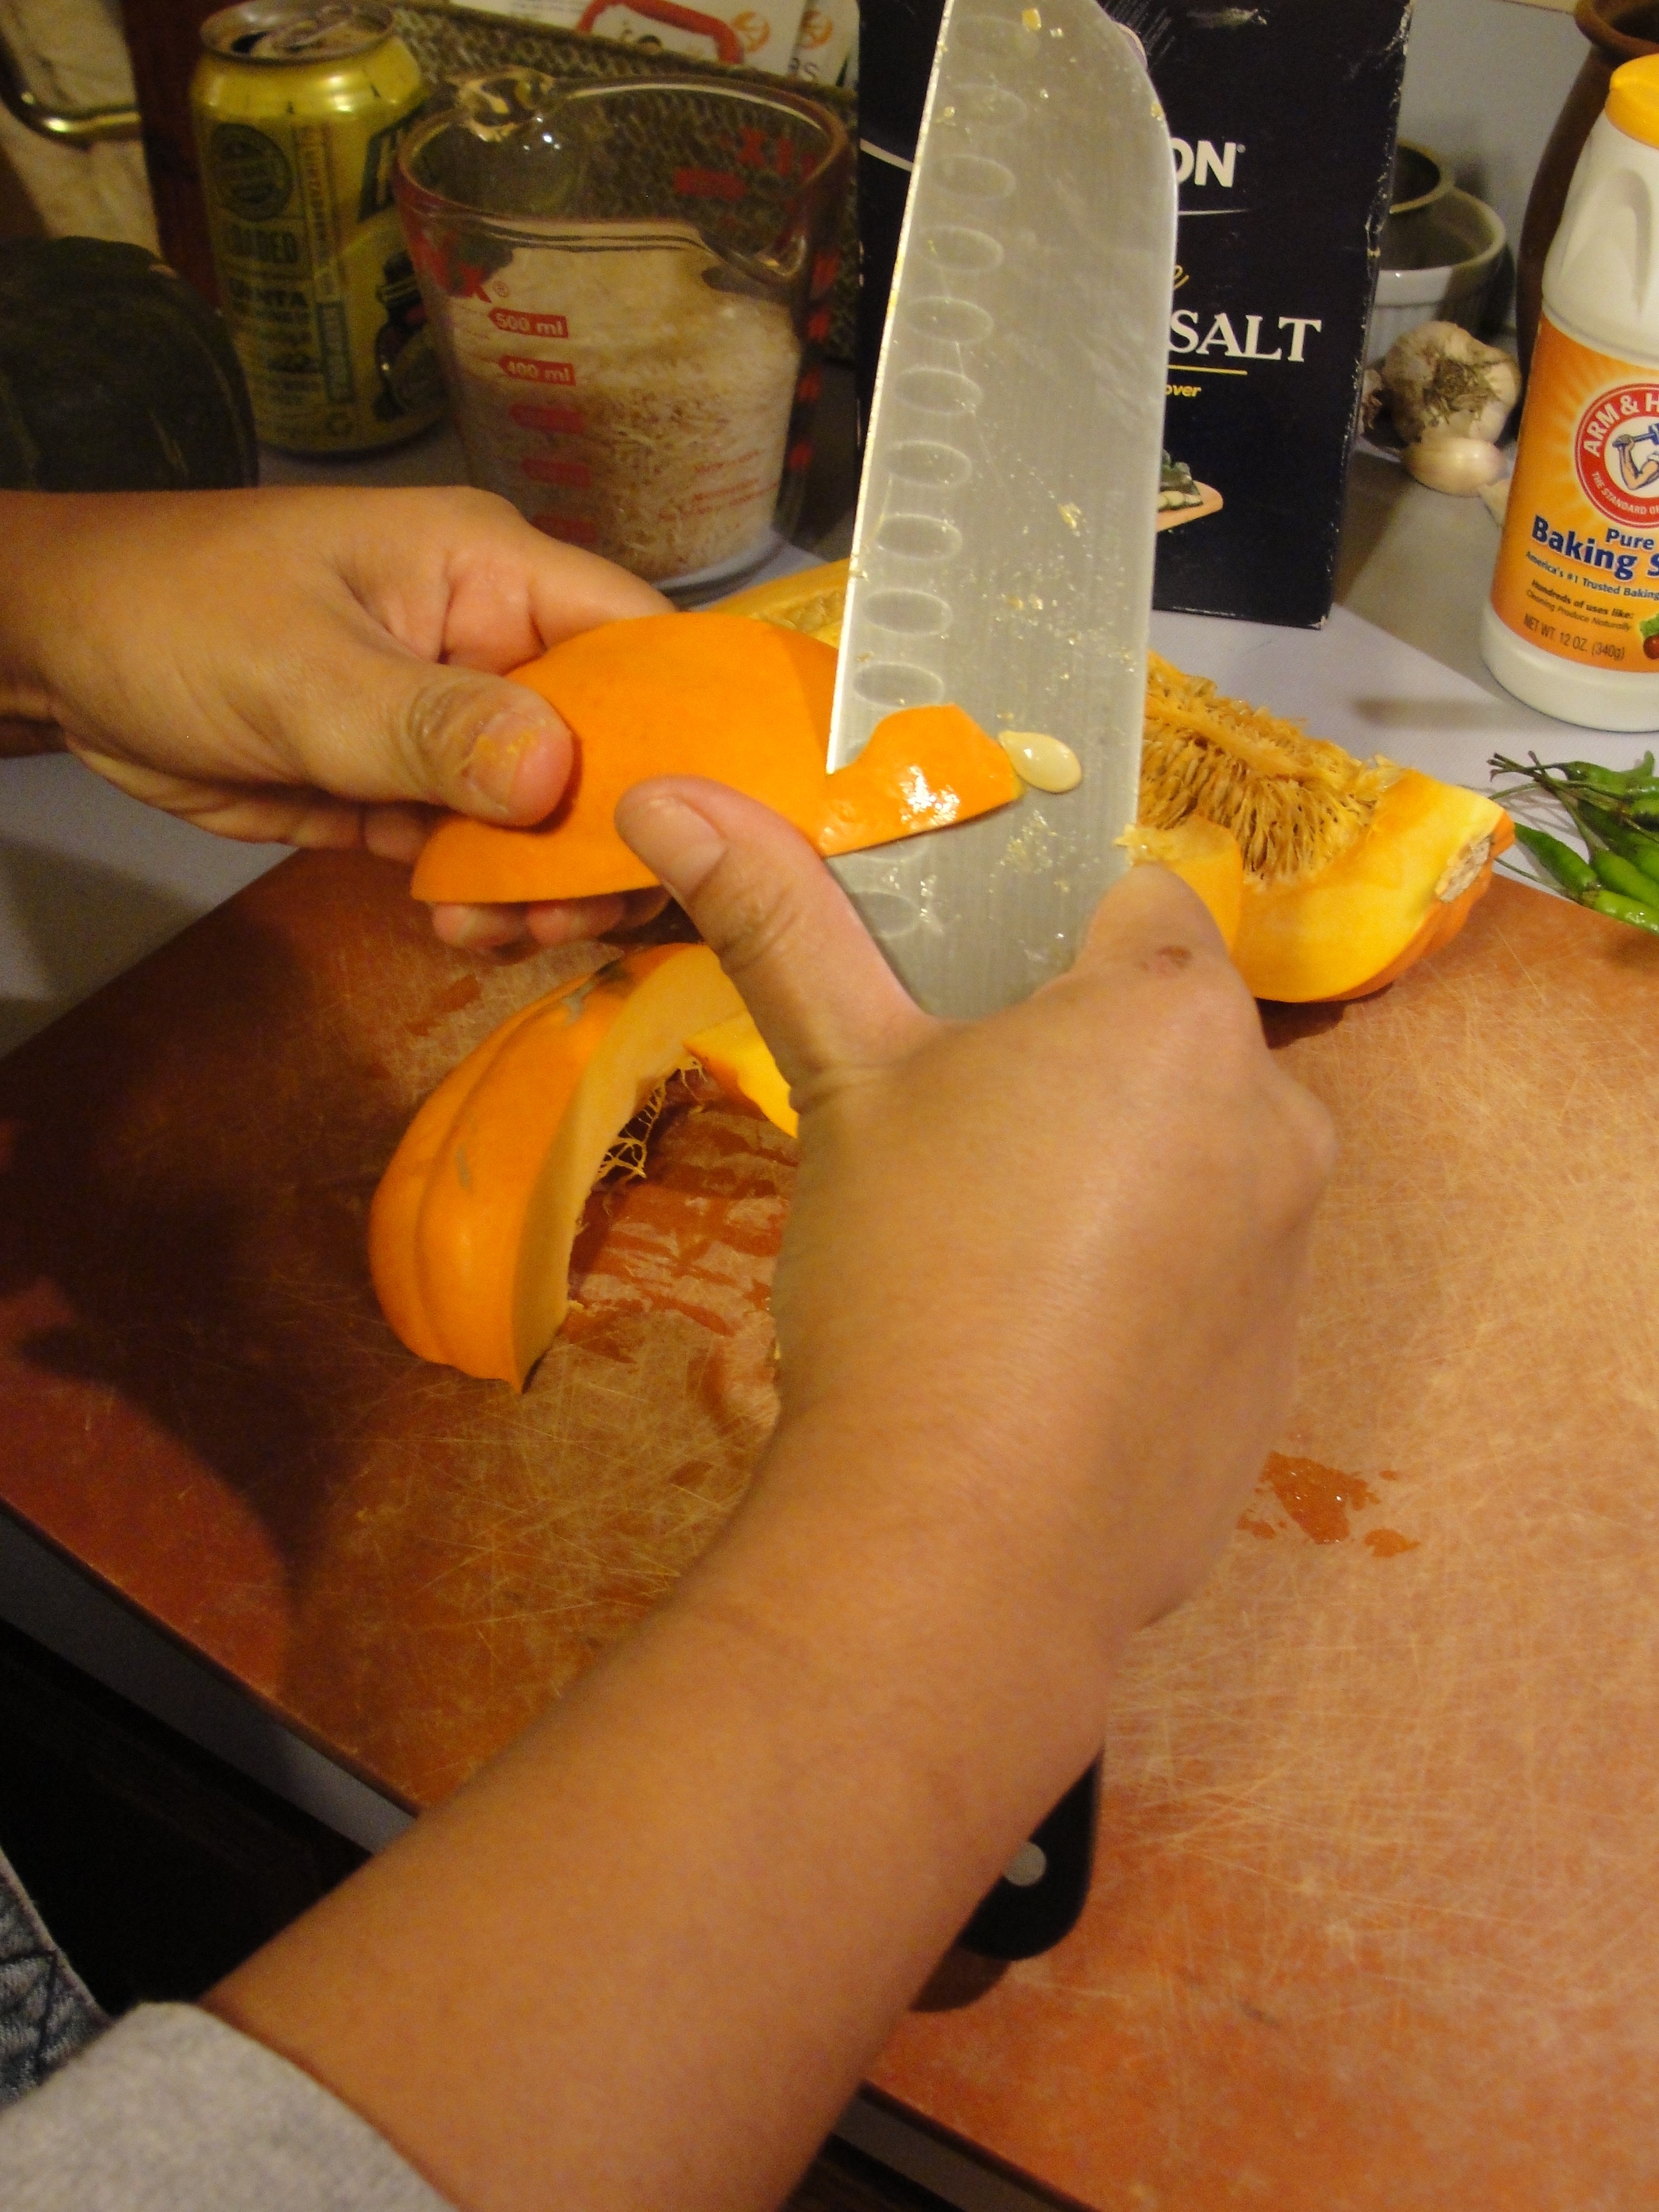
First, rinse, peel, and remove seeds/guts from squash to prepare it for cubing.
I do not endorse my friend’s peeling technique! Use a vegetable peeler if you can. :)
Peel the squash.
Cut the pork into large bite-sized pieces, trimming any gristly fat, but leaving some fat for cooking.
Cut the pork into bite-sized pieces.
In a large pot, beginning cooking the pork pieces over medium-low heat with fat or oil, as necessary to keep it from sticking.
Begin with the cubed pork, over medium-low heat.
Cover the pork, simmering over low heat, stirring occasionally until fat renders and some water is released and cooked until white, i.e., at least mostly cooked through.
Simmer the pork, covered.
While pork is cooking, remove the chili stems and cut the chilis lengthwise, just once so that their seeds can be released and they will disintegrate while cooking. Also, cube the squash.
Baking soda and sliced chilis.
Once the pork is cooked, add the soda and chilis, then stir.
Add baking soda and chilis to cooked, stewing pork.
Next, add the squash and a bit of salt, and then stir, so that meat is no longer on the bottom (to prevent burning).
Increase heat to medium or medium-low, then cover and stir occasionally.
Add cubed squash to pork mixture.
When lightly boiling in the water released from pork and squash, reduce to low heat and simmer slowly, perhaps 1/2 hour, until squash is soft enough to disintegrate.
If necessary, add water sparingly, so that it boils but remains somewhat thick in consistency.
Pork and pumpkin stewing.
Stir and use a spoon to squash any whole squash cubes. Taste for spiciness (it will likely be quite spicy with 8-10 thai chilis) and salt, and adjust as you like.
Gołąbki are Polish cabbage rolls. I’m of Polish heritage, on my father’s side, and have enjoyed this very common, traditional dish, but hadn’t previously tackled preparation myself. As it turns out, it can be done in about 2 hours preparation time, and 2 hours cooking time. “Gołąbki” is the plural Polish word for pigeon, and is a apparently based on the resulting size of the rolls. To an English speaker, it is pronounced like one would say “gawumpki.”
The occasion that caused me to make gołąbki was that we have a Polish graduate student visiting for a summer internship at my work, and I thought he might like some taste of home… given that our Polish-named staples here in the U.S., such as Polish pickles or Polish sausage, are nothing like he knows from home. It also helped put a good dent in our CSA share of vegetables in that it uses a head of cabbage and my, unusual, vegetarian version also used a fennel bulb.
There are many preparation techniques for gołąbki, some involving pan frying and then boiling or steaming them. I chose to use this recipe as the basis for my gołąbki, which simply has you to bake them, covered, in a 350° F oven for 2 hours.
The filling for the meat-based gołąbki was a combination of the following:
1 cabbage, medium
about 2 pounds raw ground pork sausage (I used Italian sausage, or what we call Italian sausage in the states)
2 cups cooked rice, with some butter added during cooking, cooled
2 eggs, beaten
garlic cloves, minced, sautéed in butter
1 large onion, diced, sautéed in butter
butter
marjoram
salt
pepper
1 large can diced tomatoes
1 can tomato sauce
For the vegetarian gołąbki I used the above except substituted the following for the ground meat:
chopped fennel bulb, sautéed until tender
chopped mushroom, lightly sautéed
For the fillings, mix the above (except for butter, tomatoes and tomato sauce), in a large bowl similar to the way one makes meatballs; cover and refrigerate until ready to fill and roll the cabbage leaves.
To prepare the cabbage leaves, I followed the method show in this video. That is, I brought a large pot of water to very low boil, enough water so that the whole cabbage head could just be submerged. Then removed the core of the cabbage leaves, and boiled it slowly, carefully removing the leaves one by one with tongs and cooled them on a cutting board. It’s important to remove the core complete so that the leaves can separate as they soften and loosen while boiling.
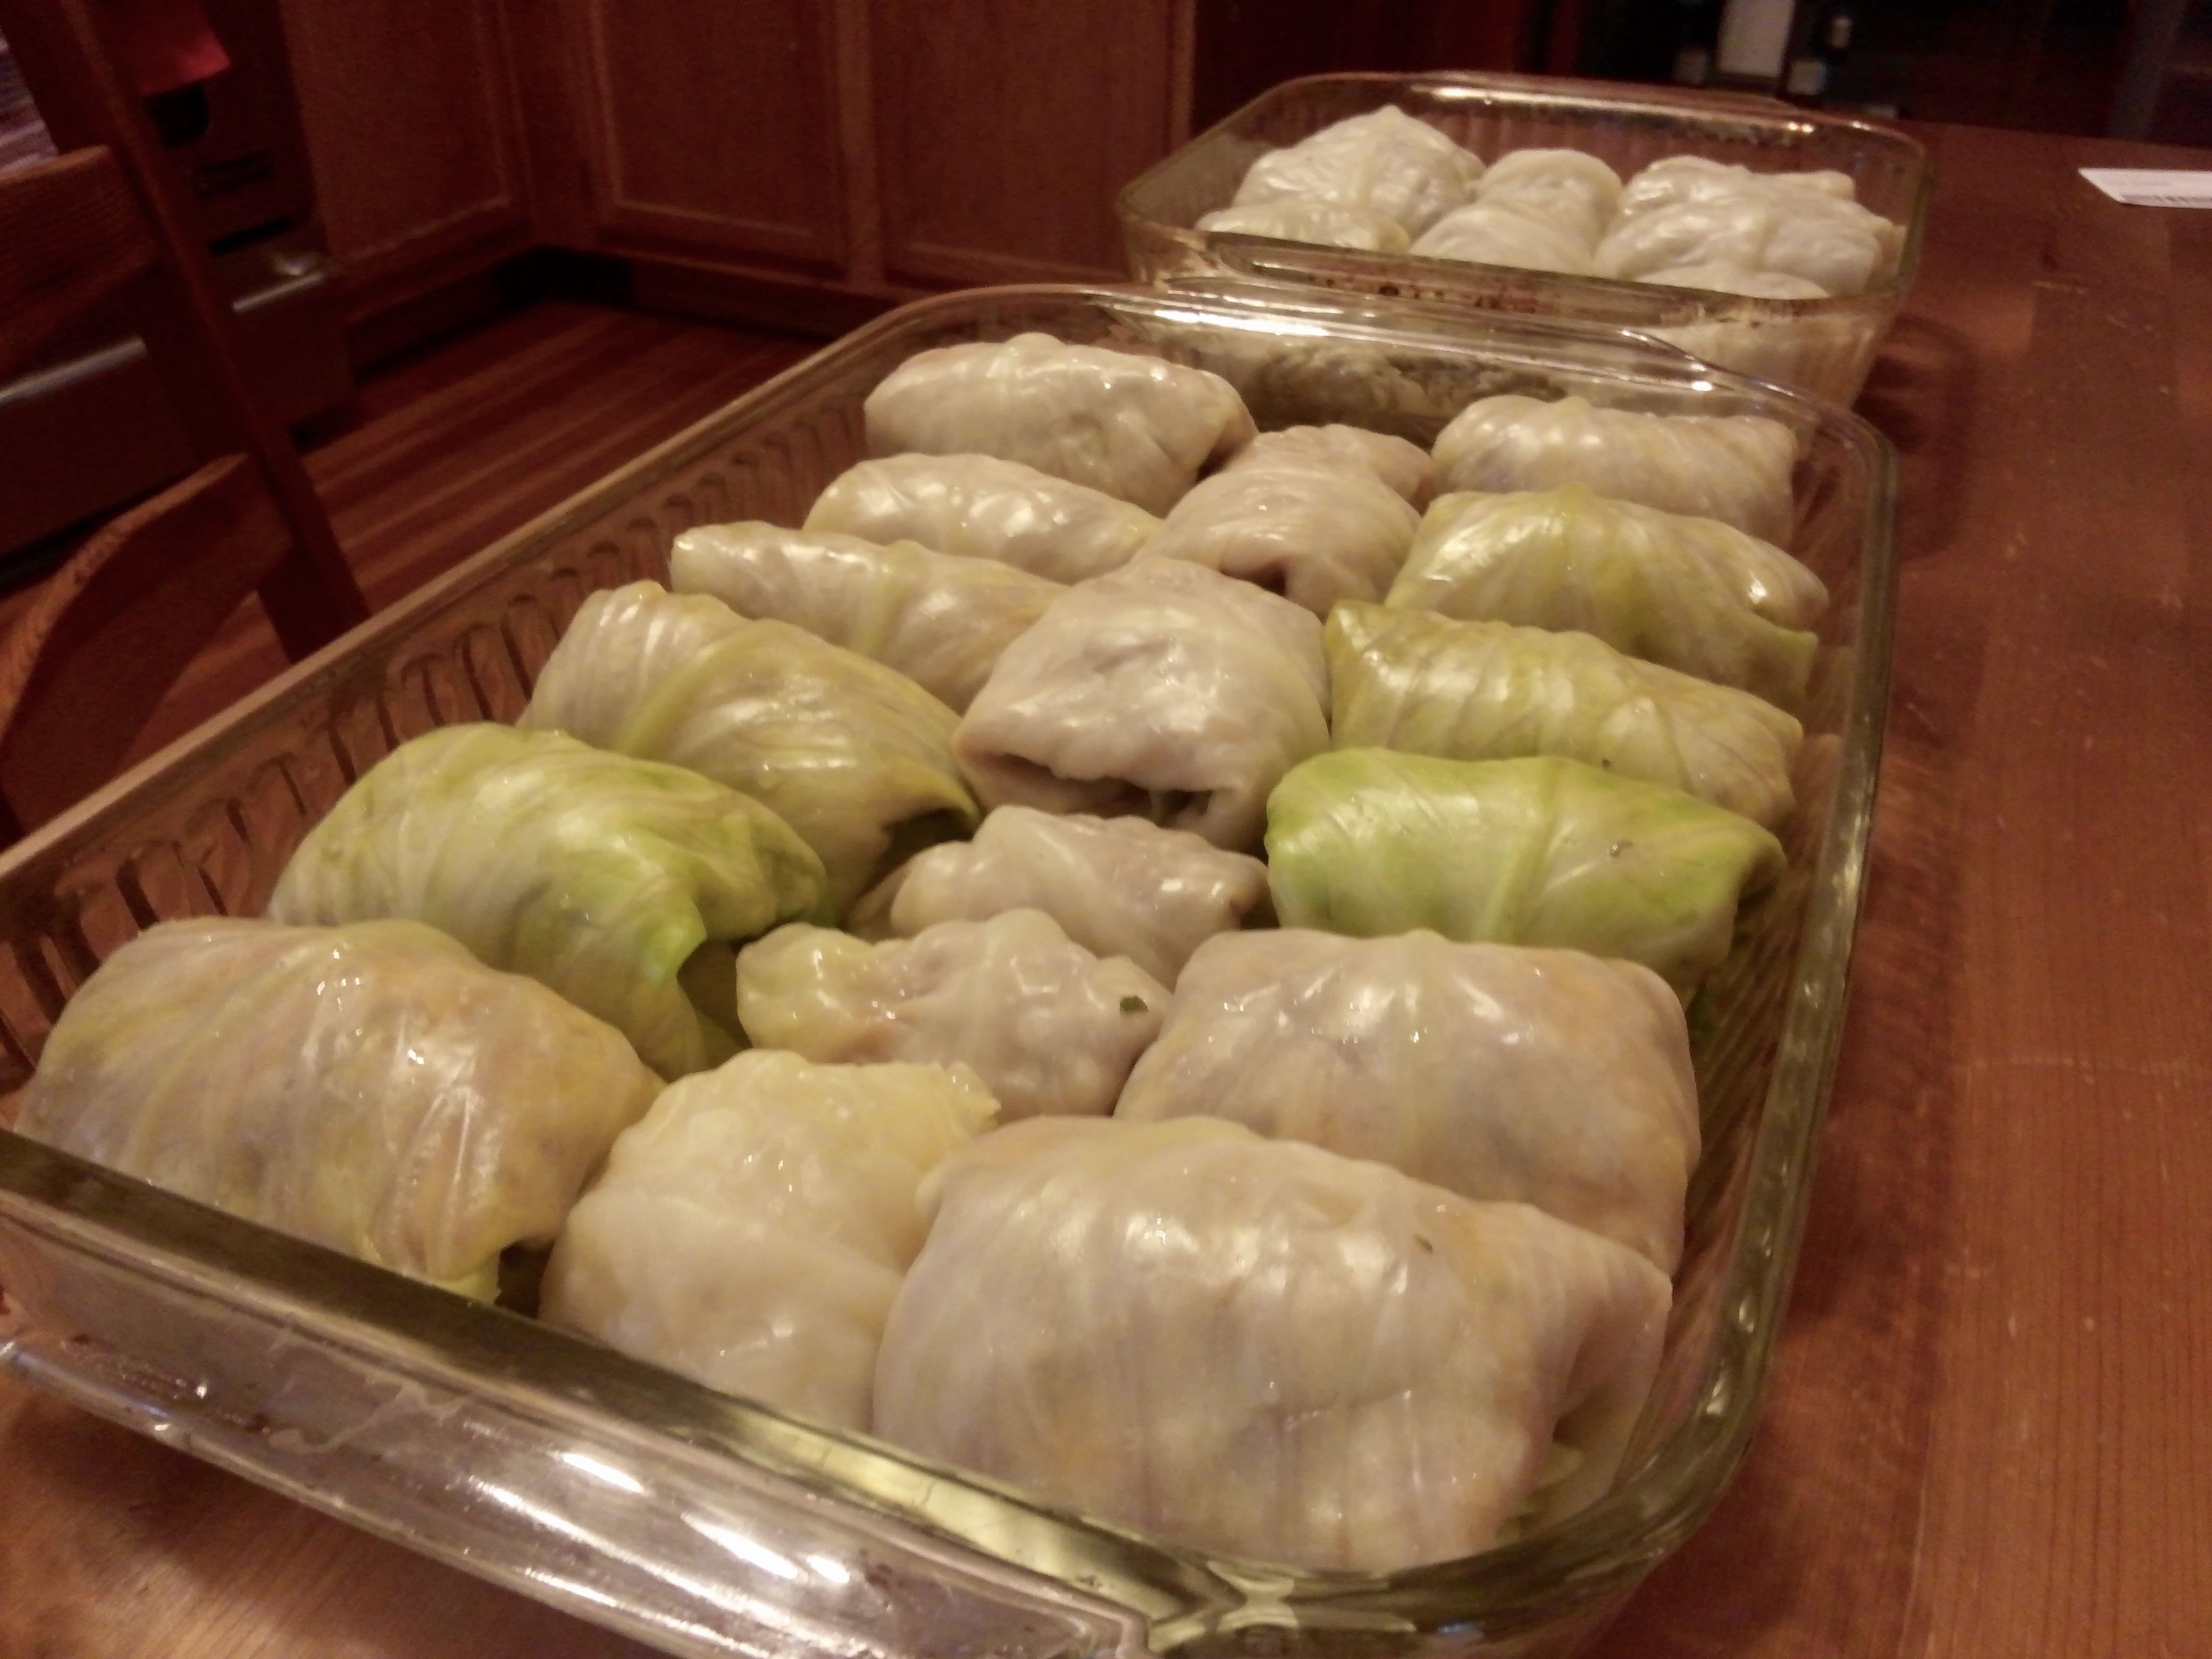
Once the leaves were prepared, cutting out some of the cabbage leaves’ “stem” if it’s too difficult to roll, I filled them with an amount of filling proportional to the size of the leaf (from 1 Tablespoon to 2 or more), and rolled them by folding the sides first, and rolling them, typically with the more substantial base of the leaf toward the outside of the roll. After rolling, I packed them fairly tightly in a baking dish. (Use a separate baking dish for the meat and vegetarian gołąbki if you make both.)
Gołąbki before cooking.
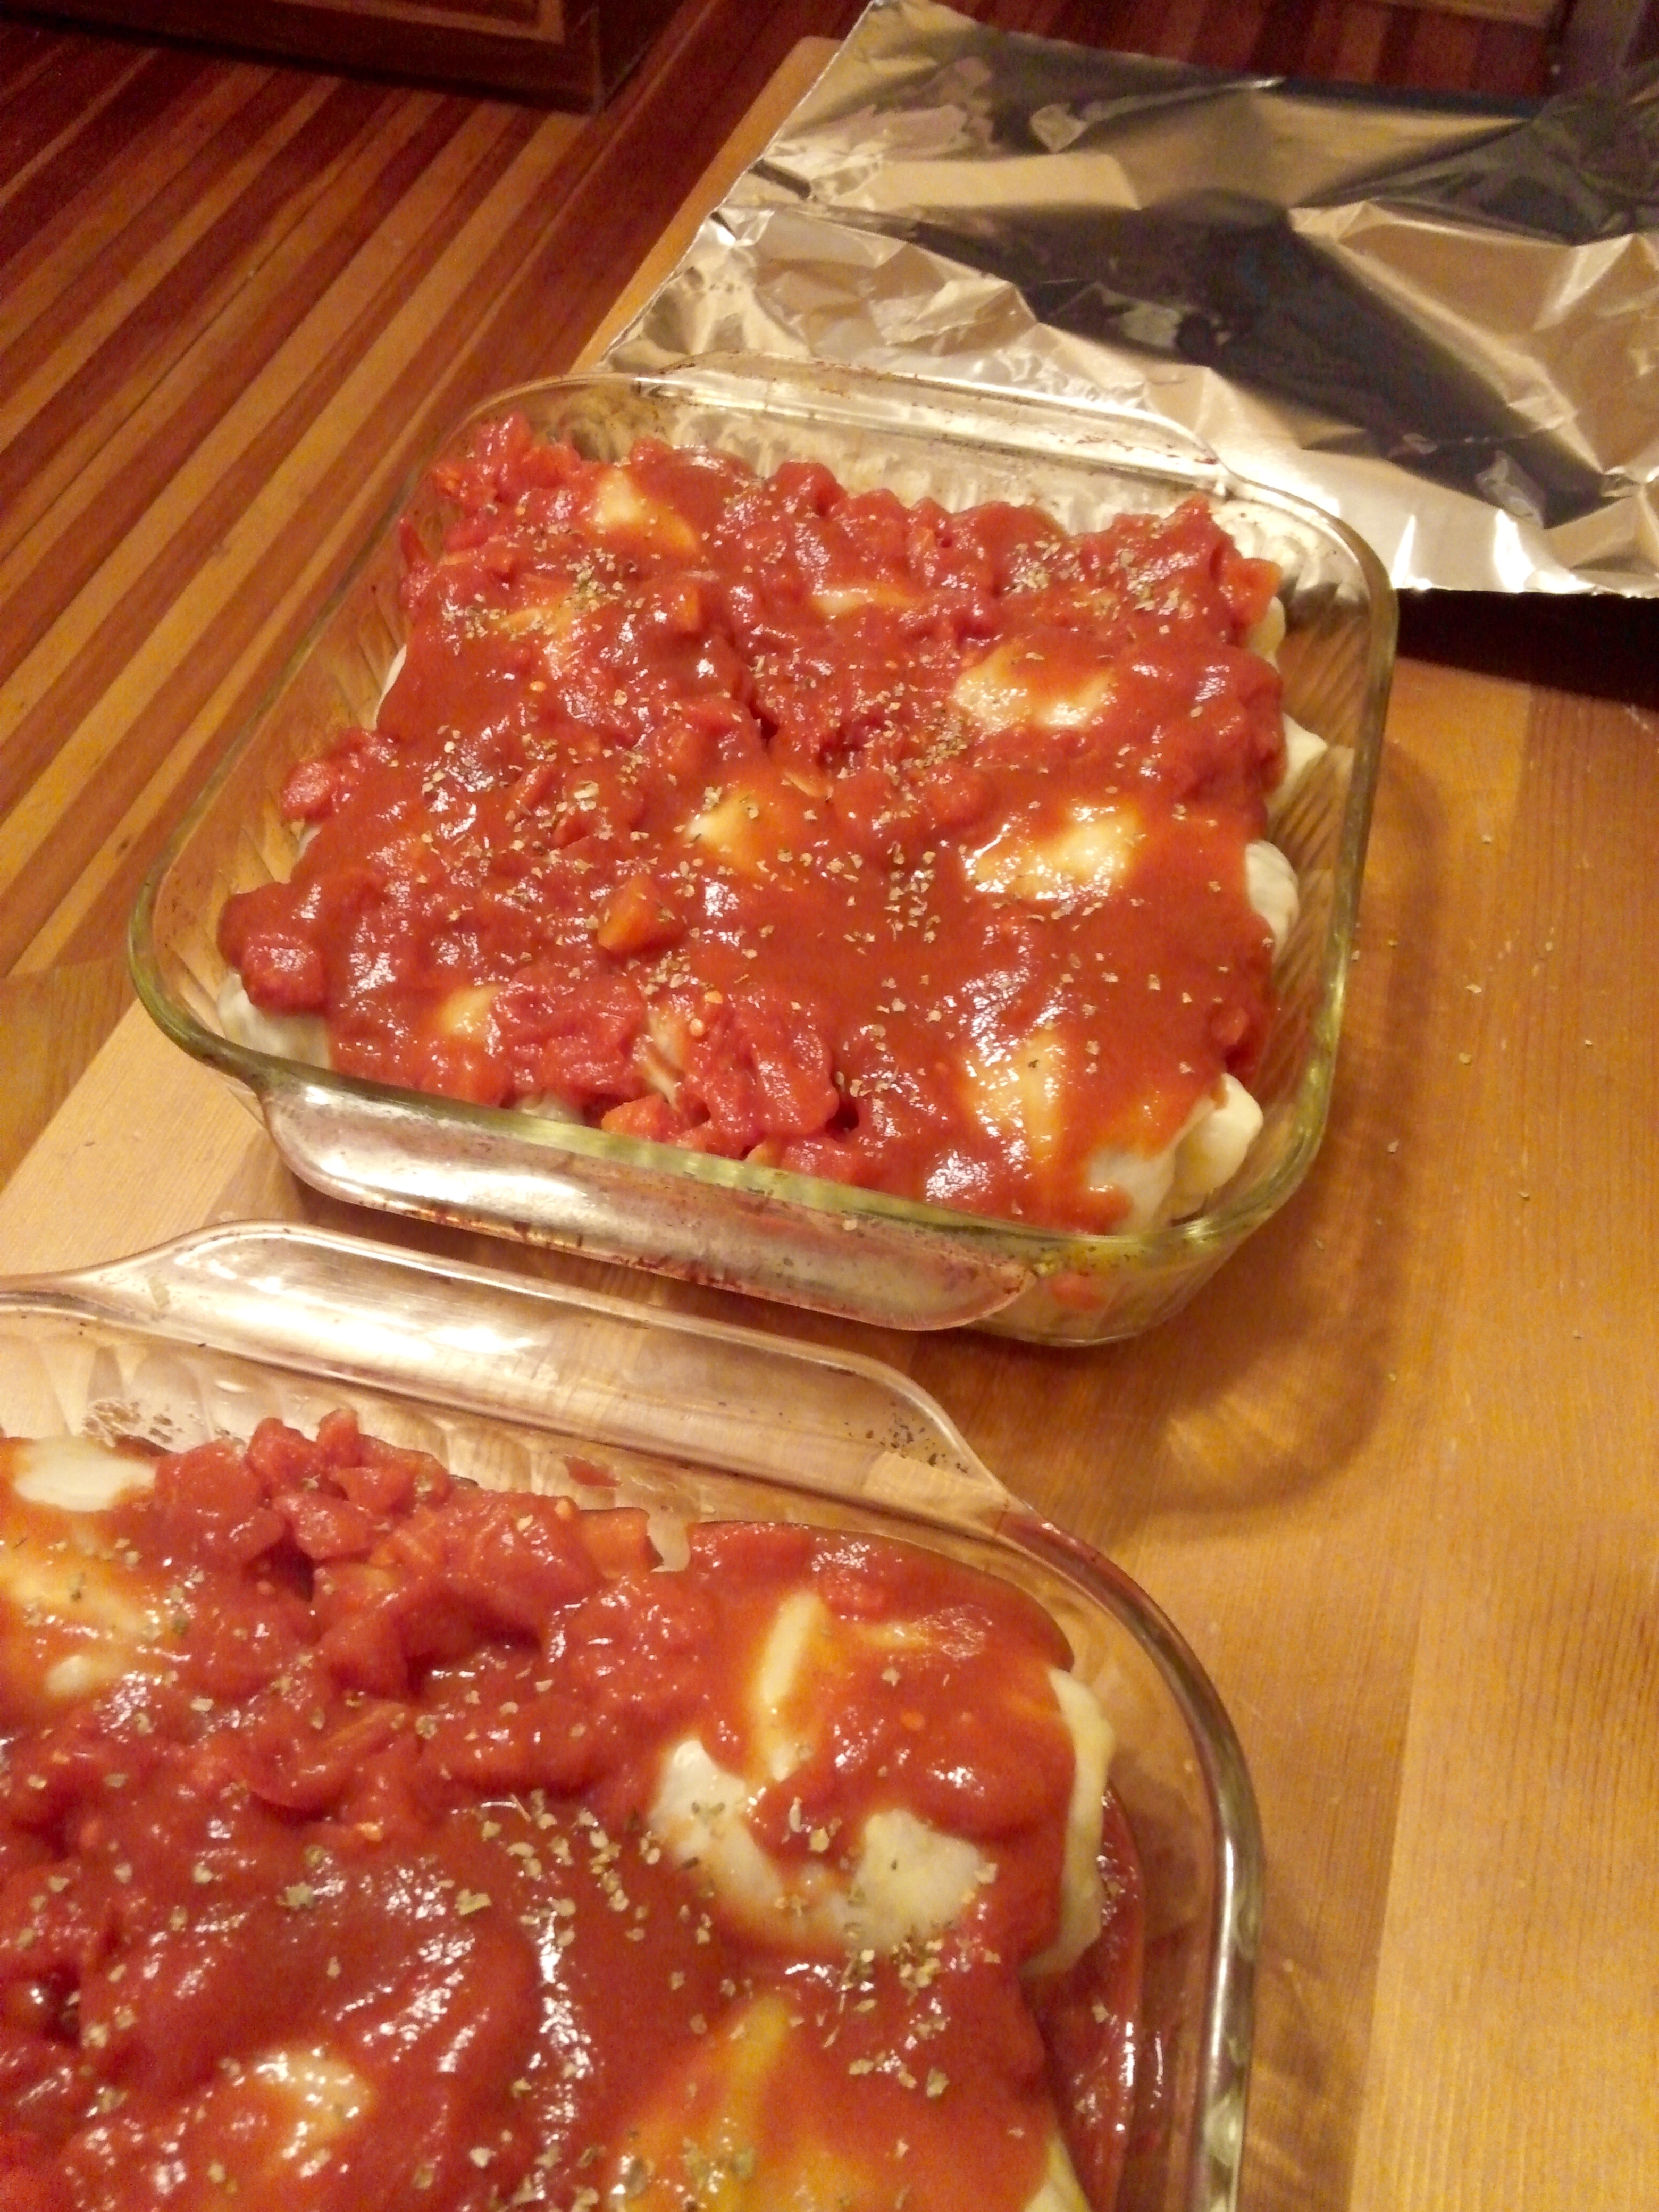
Once the baking dishes are filled, pour the diced tomato and tomato sauce over the top, spreading evenly, and sprinkle again with marjoram. Cover the dishes tightly with aluminum foil and bake in a 350° F oven for 2 hours.
Gołąbki, ready to be covered and baked.
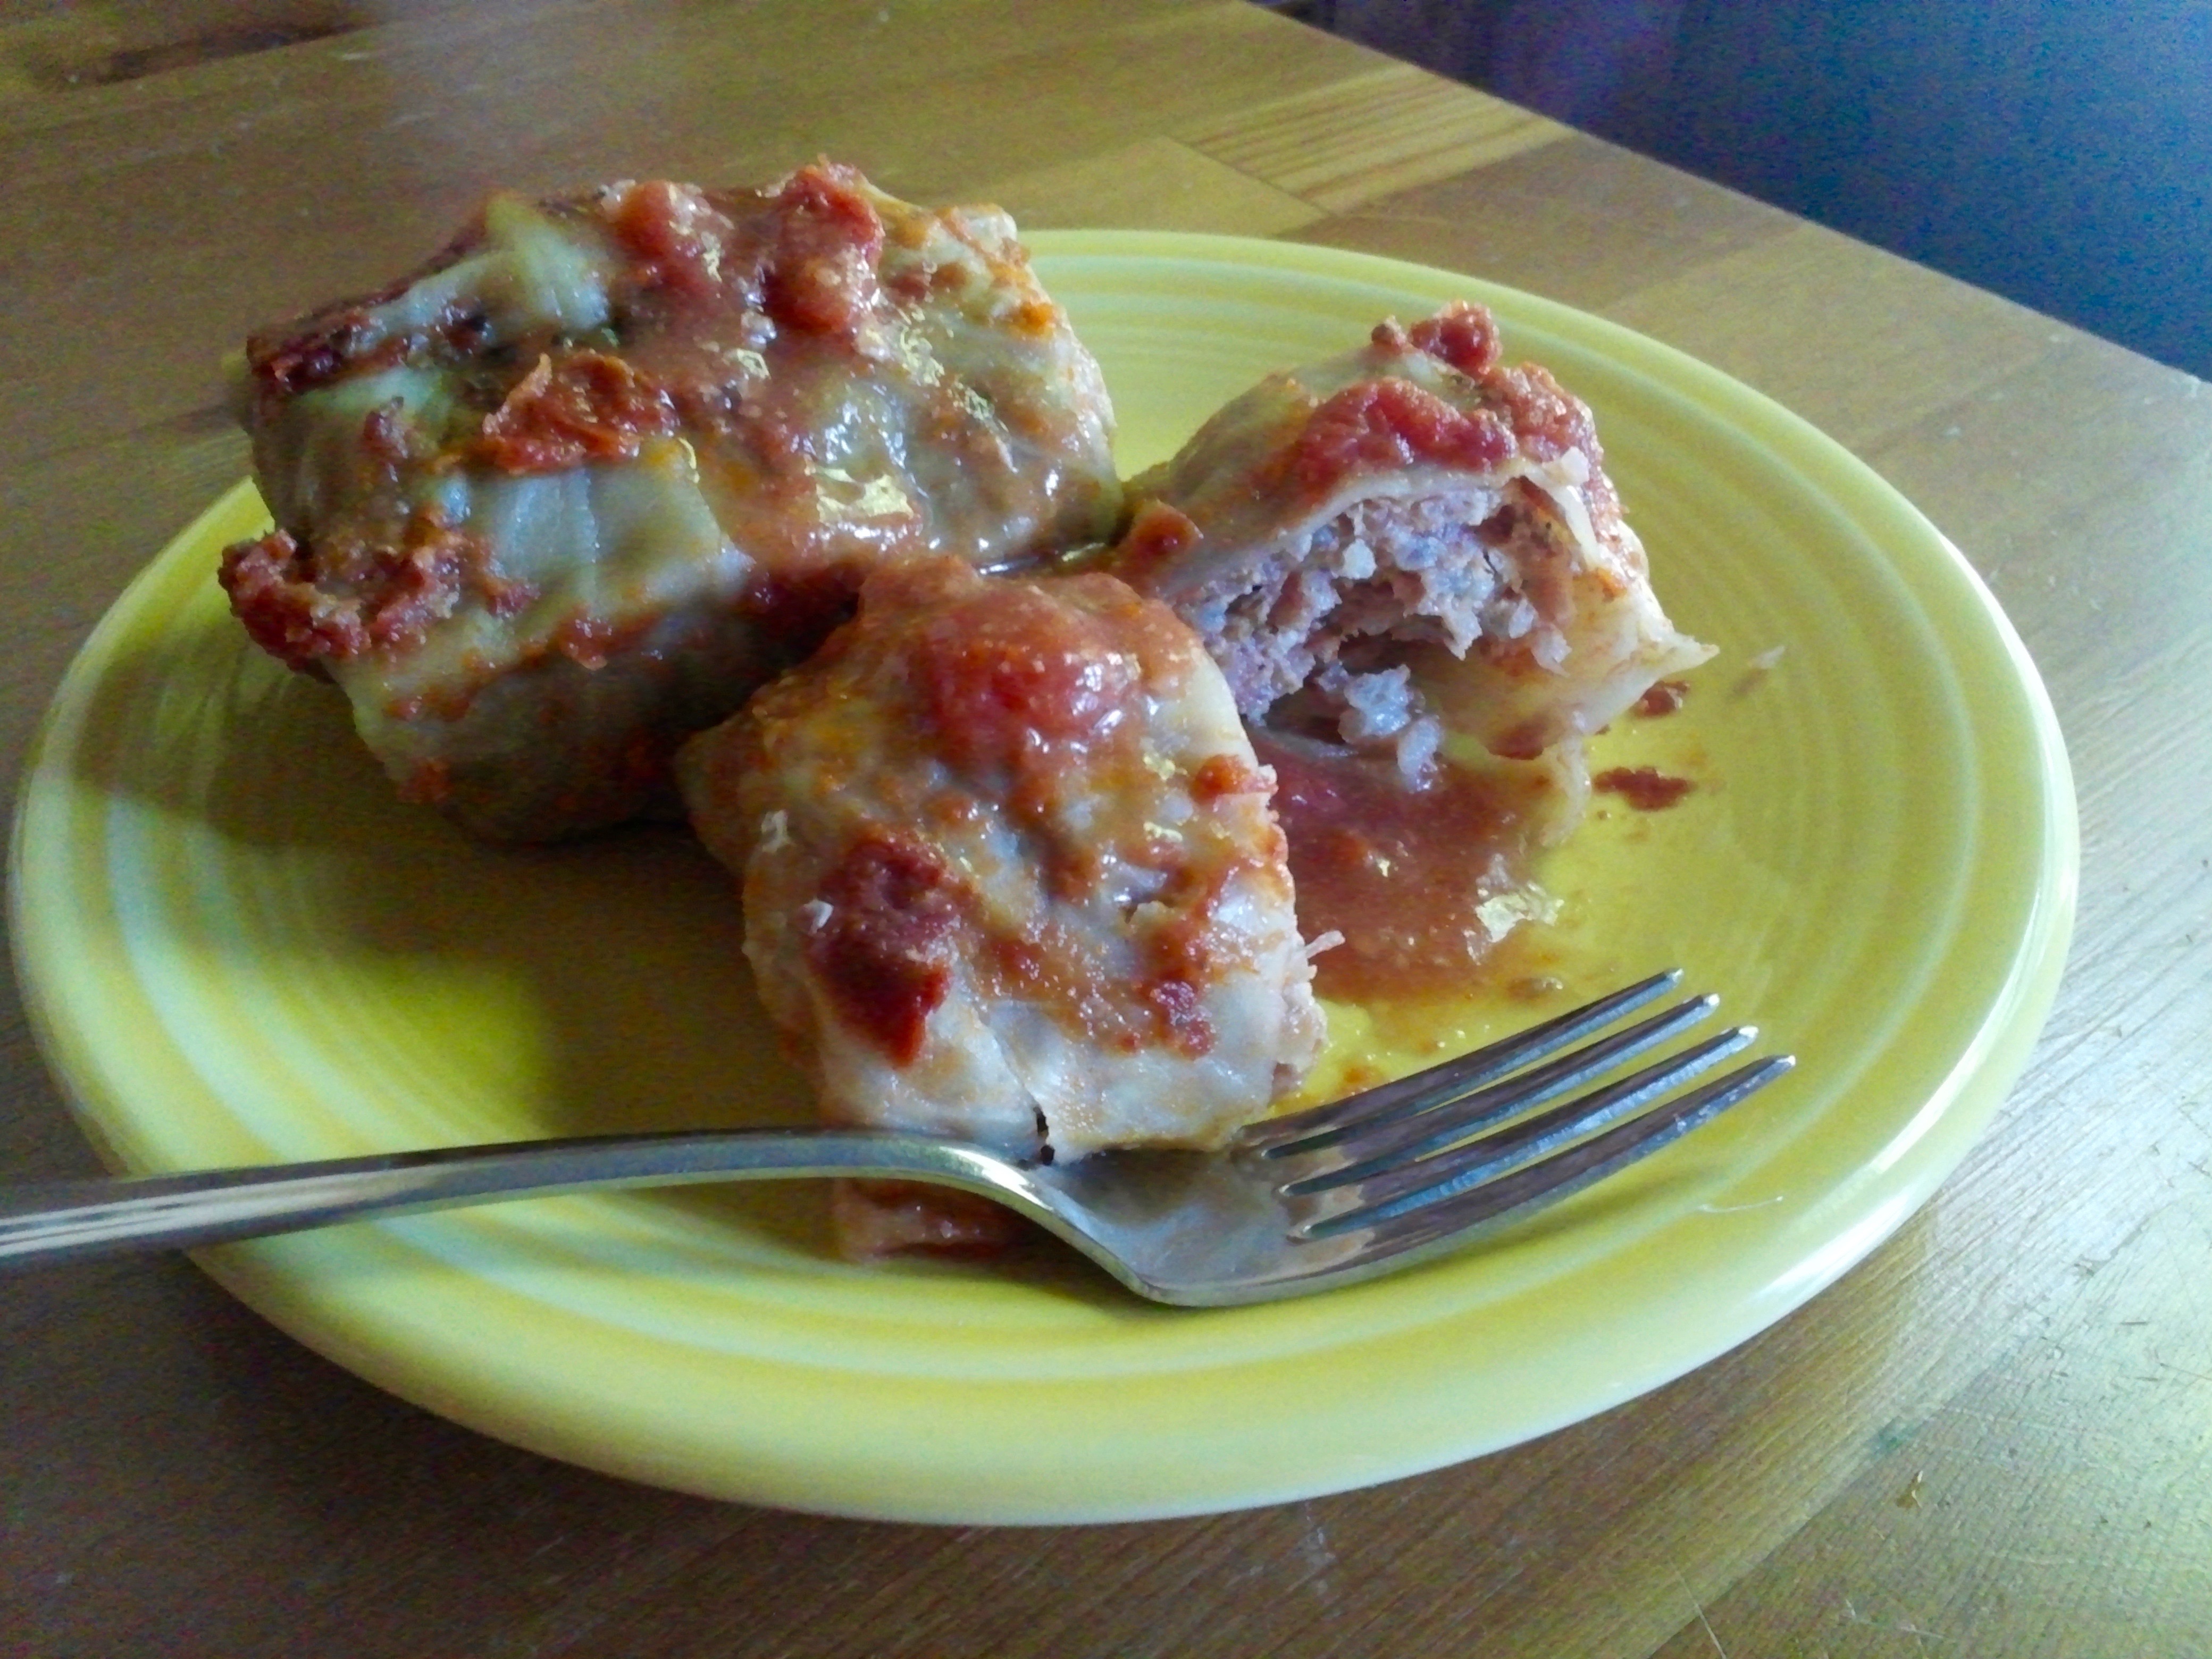
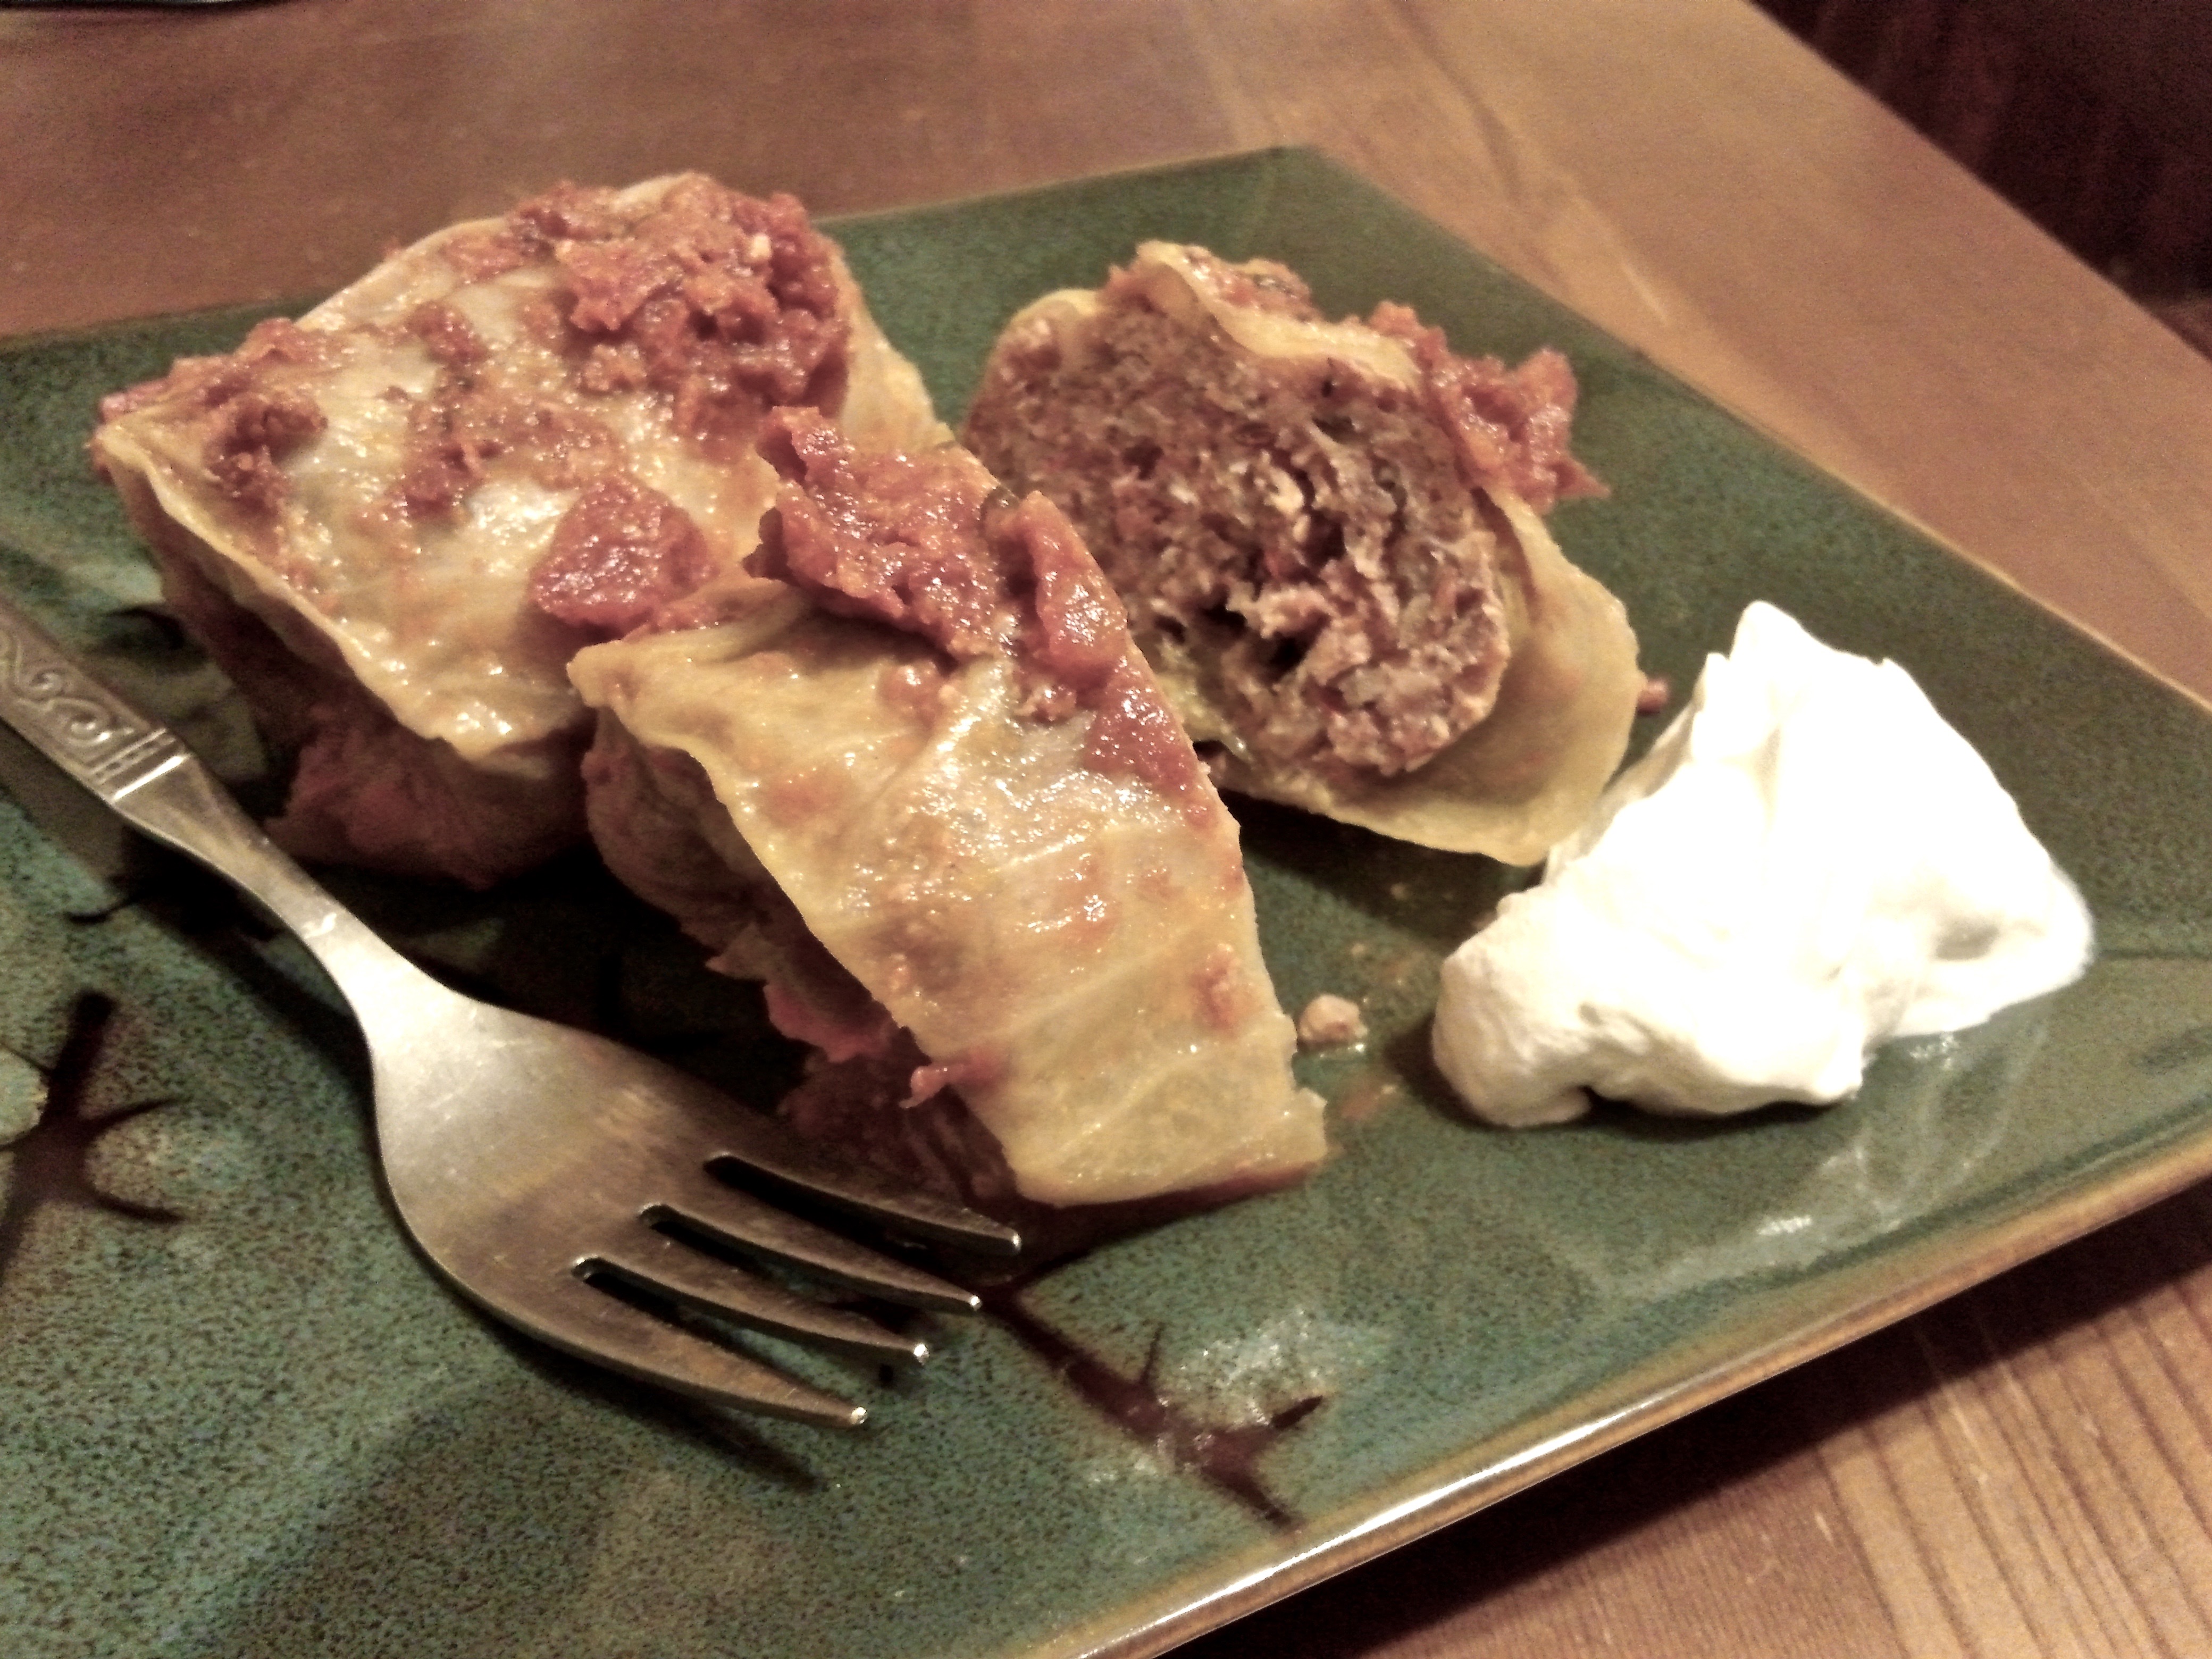
Once cooked, let the gołąbki sit and cool a bit and serve them, accompanied by a dollop of sour cream if you like.
Gołąbki with tomato sauce, served with sour cream.
I really enjoyed making and eating these.These are also nice left-over, even frozen and reheated as necessary; this is a good thing, since it’s best to make quite a large batch given the work. My Polish student friend liked them, but rated them as spicier than his grandmother’s version. (That was by design, in that I used a medium spicy Italian sausage rather than the typical blander combination of ground pork and beef that most gołąbki recipes call for.) He also noted that they leave the tomato sauce to be added only after cooking.
Here are some related recipes and a video I referenced:
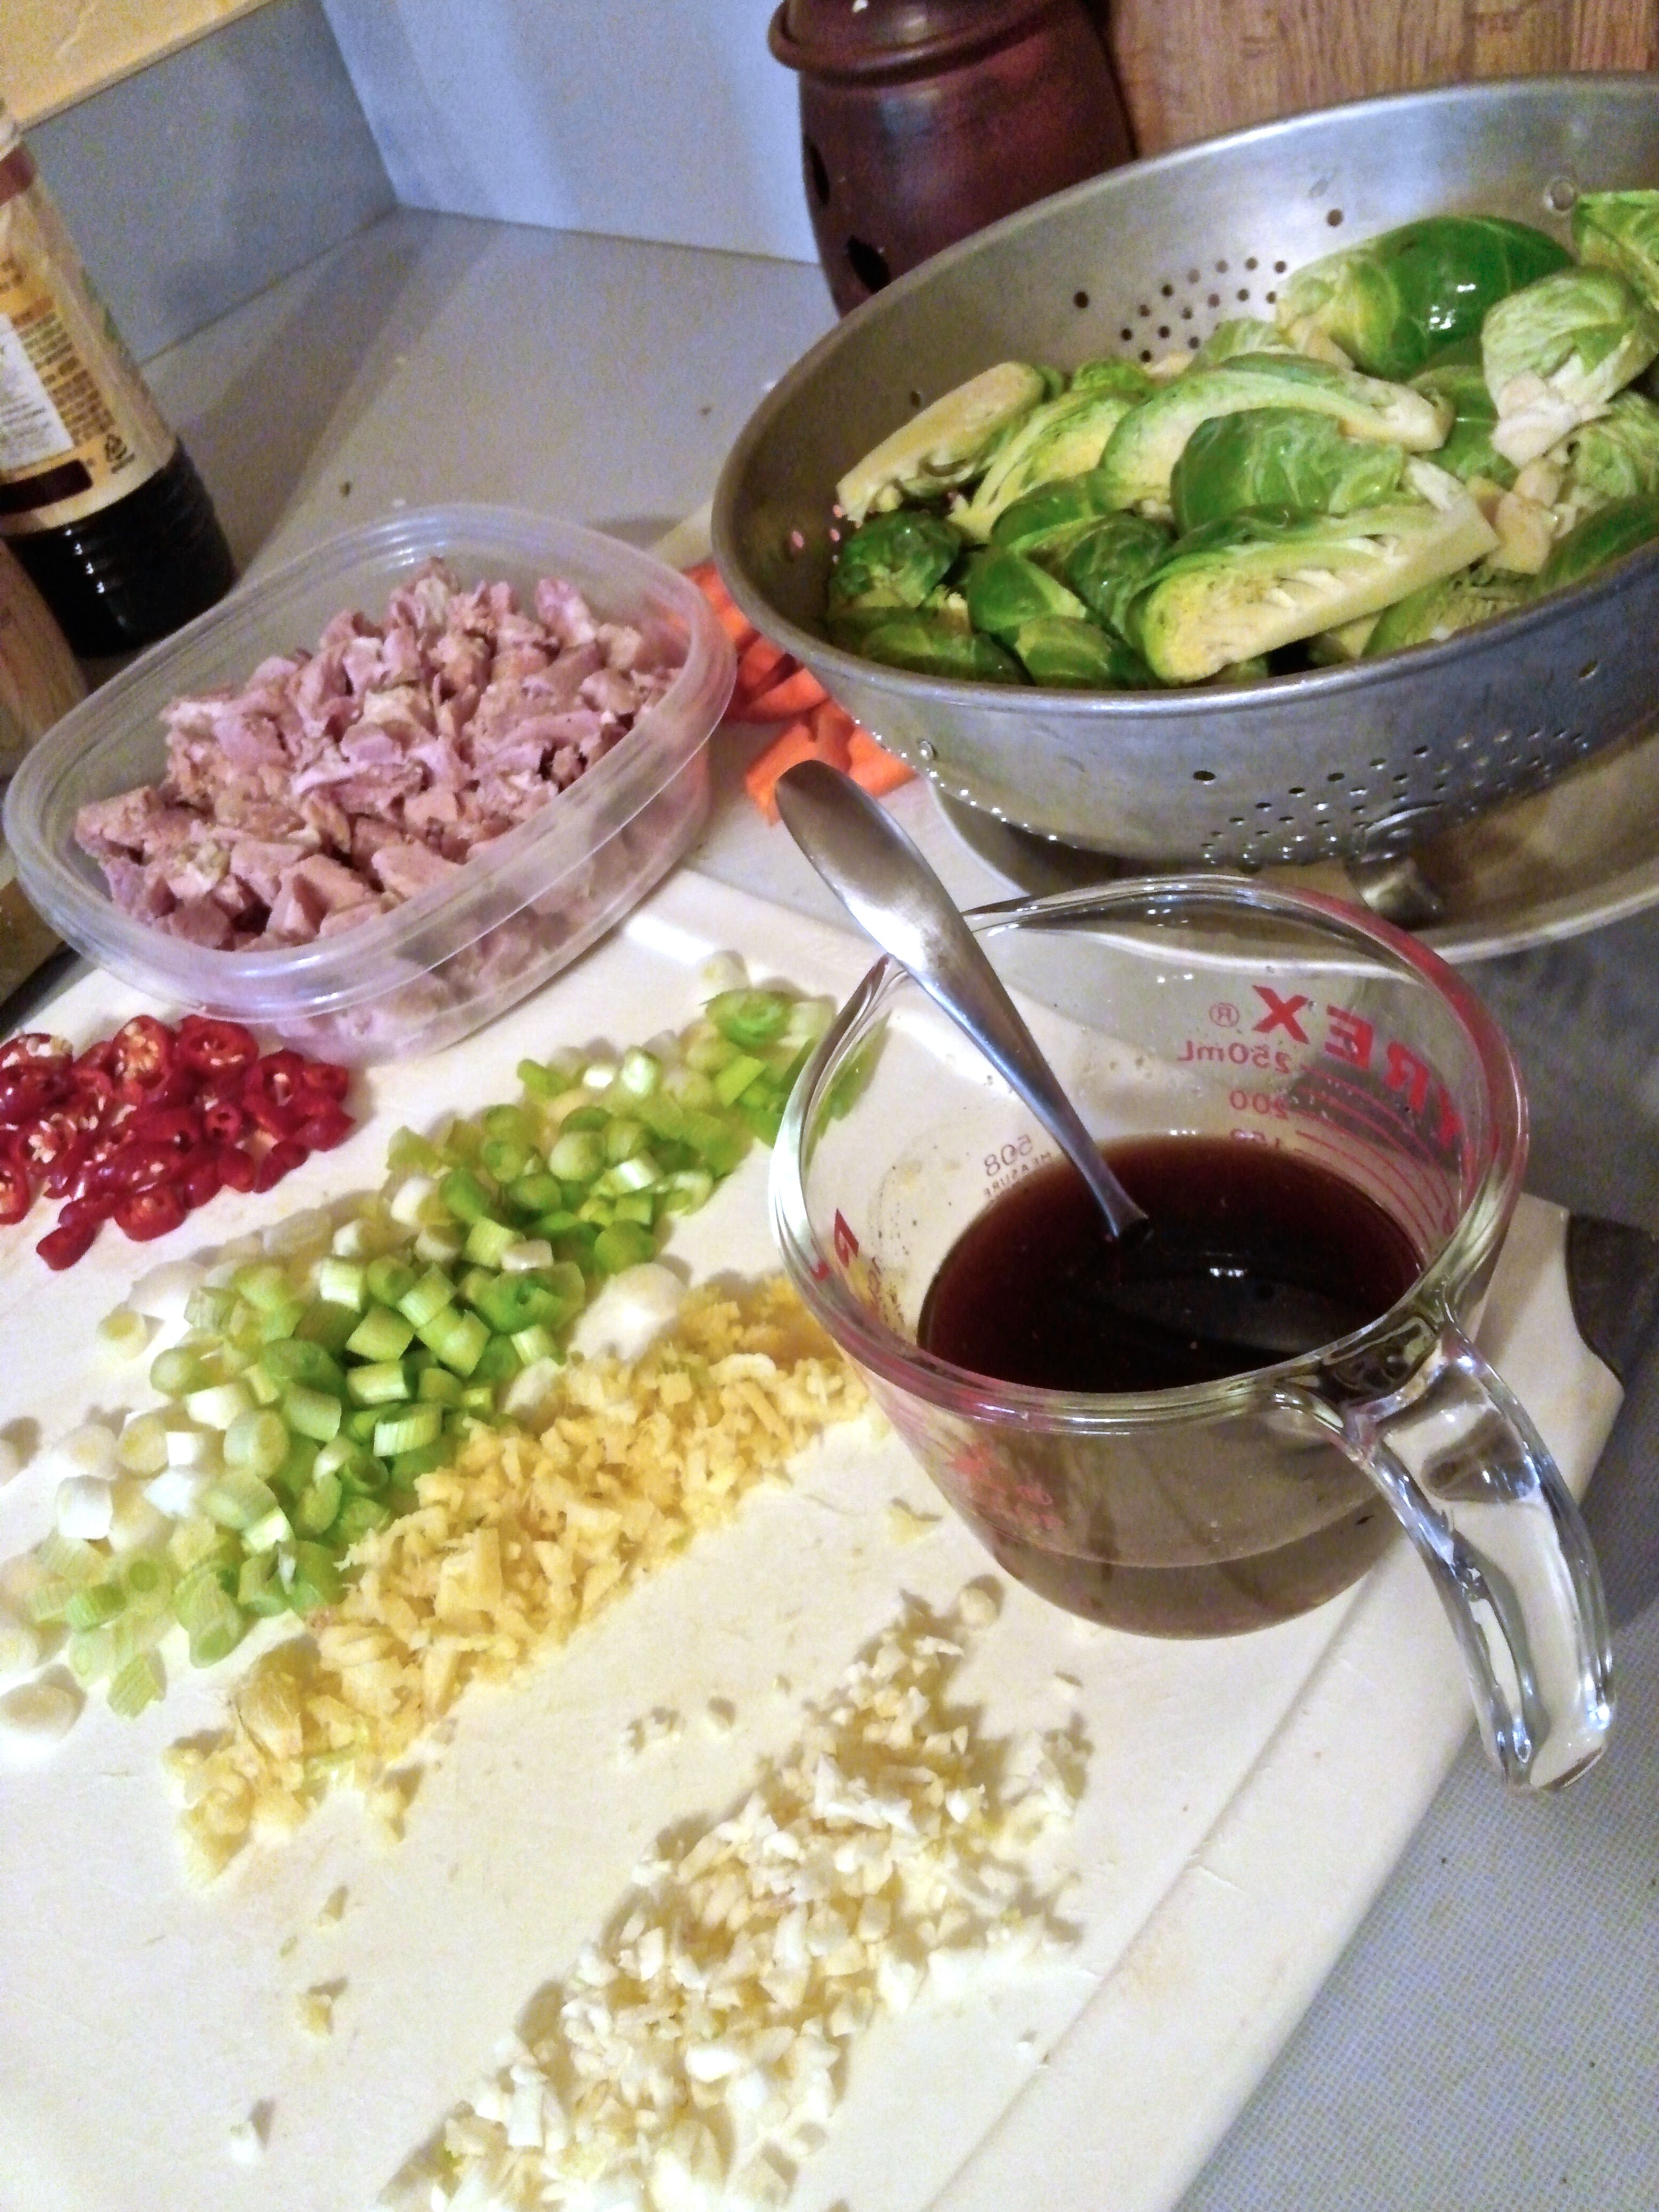
With the goal of making use of some of the leftover Easter ham (admittedly, my Easter is more of a meal than a religious experience… unless the food is exceptionally good), we decided on a dinner of Brussels Sprout and Ham Fried Rice. This was a bit of an East meets West fusion flavored with a touch of mustard and whole mustard seed.
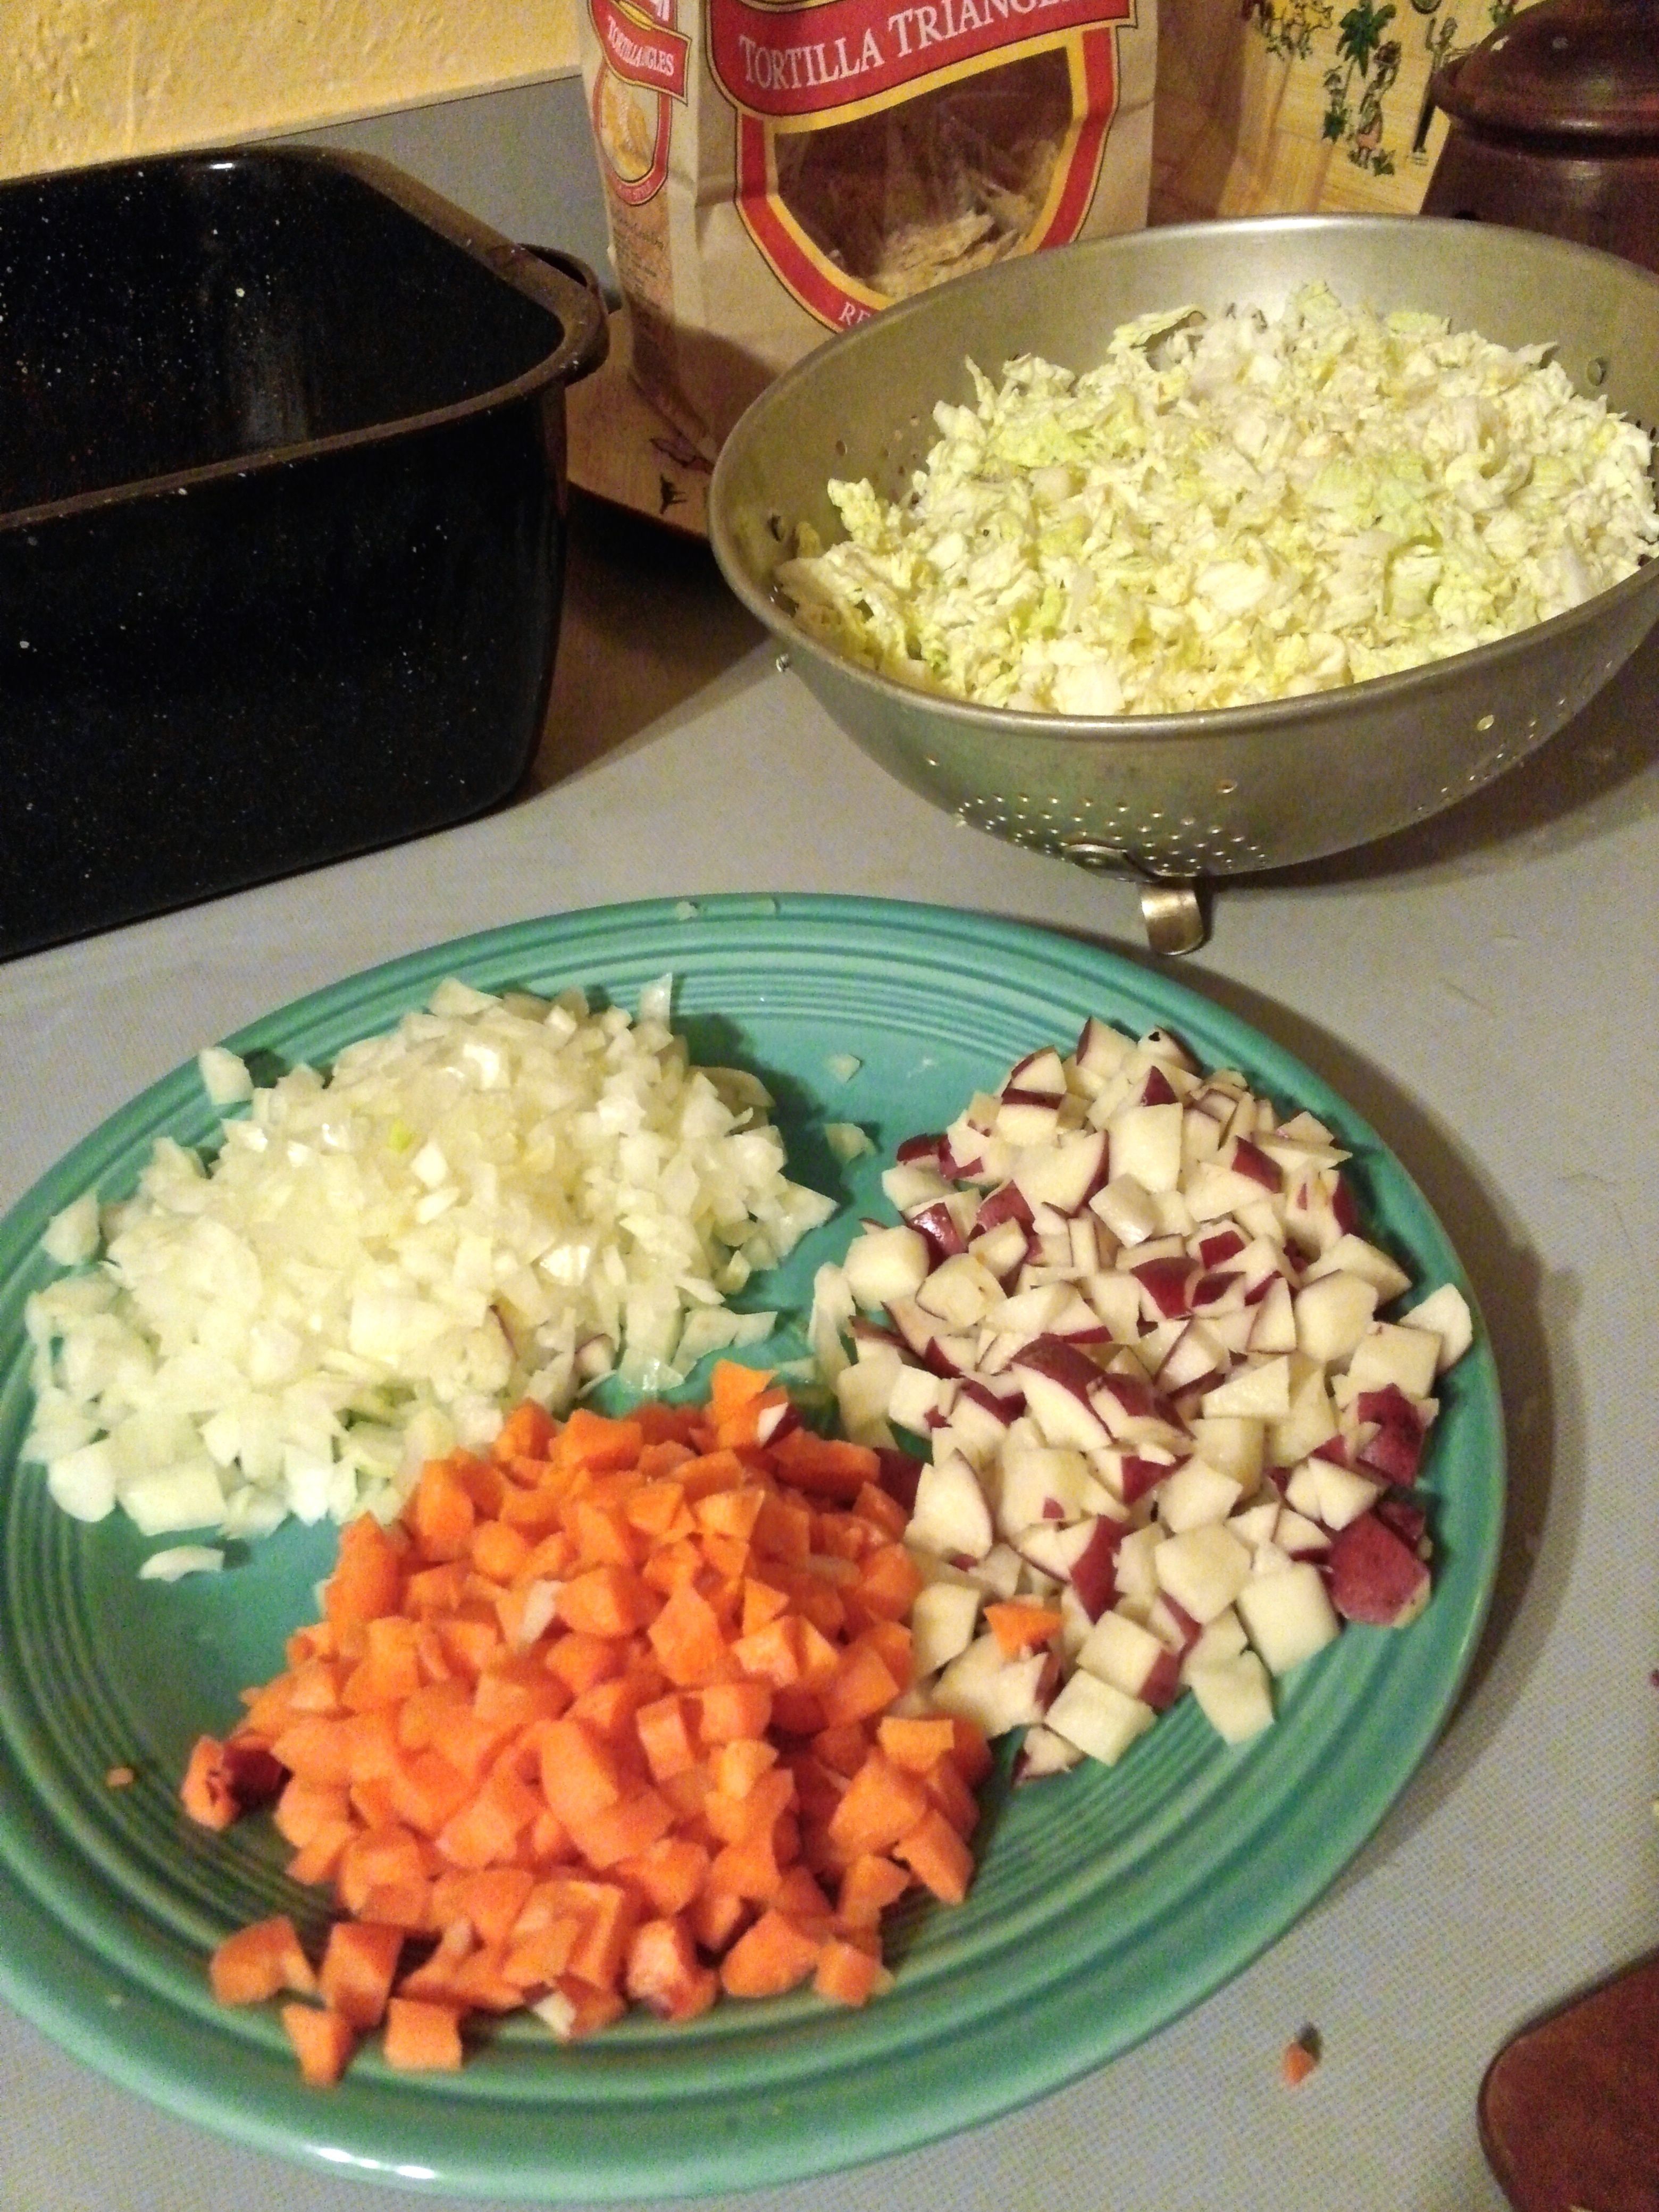
Ingredients for Brussels Sprouts and Ham Fried Rice.
The ingredients are as shown, except for the mustard and freshly-ground black pepper. (You might notice the spring onions are missing their green tops; my partner likes to use the greens in her lunchtime salads, so lately there have been plenty of the white portions available for dinnertime recipes… for flavor, anyway, if not for color.) The rice was prepared in the morning and refrigerated for some hours. The red peppers are some large, spicy variety from our asian grocer. I’d not seen them before but they were sort of like large version of Thai bird chili pepper. (If you know what this larger version is, please let me know! The seeds were hot but not the rest, and not as hot as the typical smaller Thai chili.)
Prepped ingredients for Brussels Sprouts and Ham Fried Rice.
The sauce was what I typically do for fried rice: a combination of soy sauce, water, rice vinegar, chili garlic sauce, and something sweet (this time a bit of brown sugar), but this time I also added a couple tablespoons of a coarse brown mustard.
Yellow mustard seed in oil.
The frying started off with yellow mustard seeds in oil.
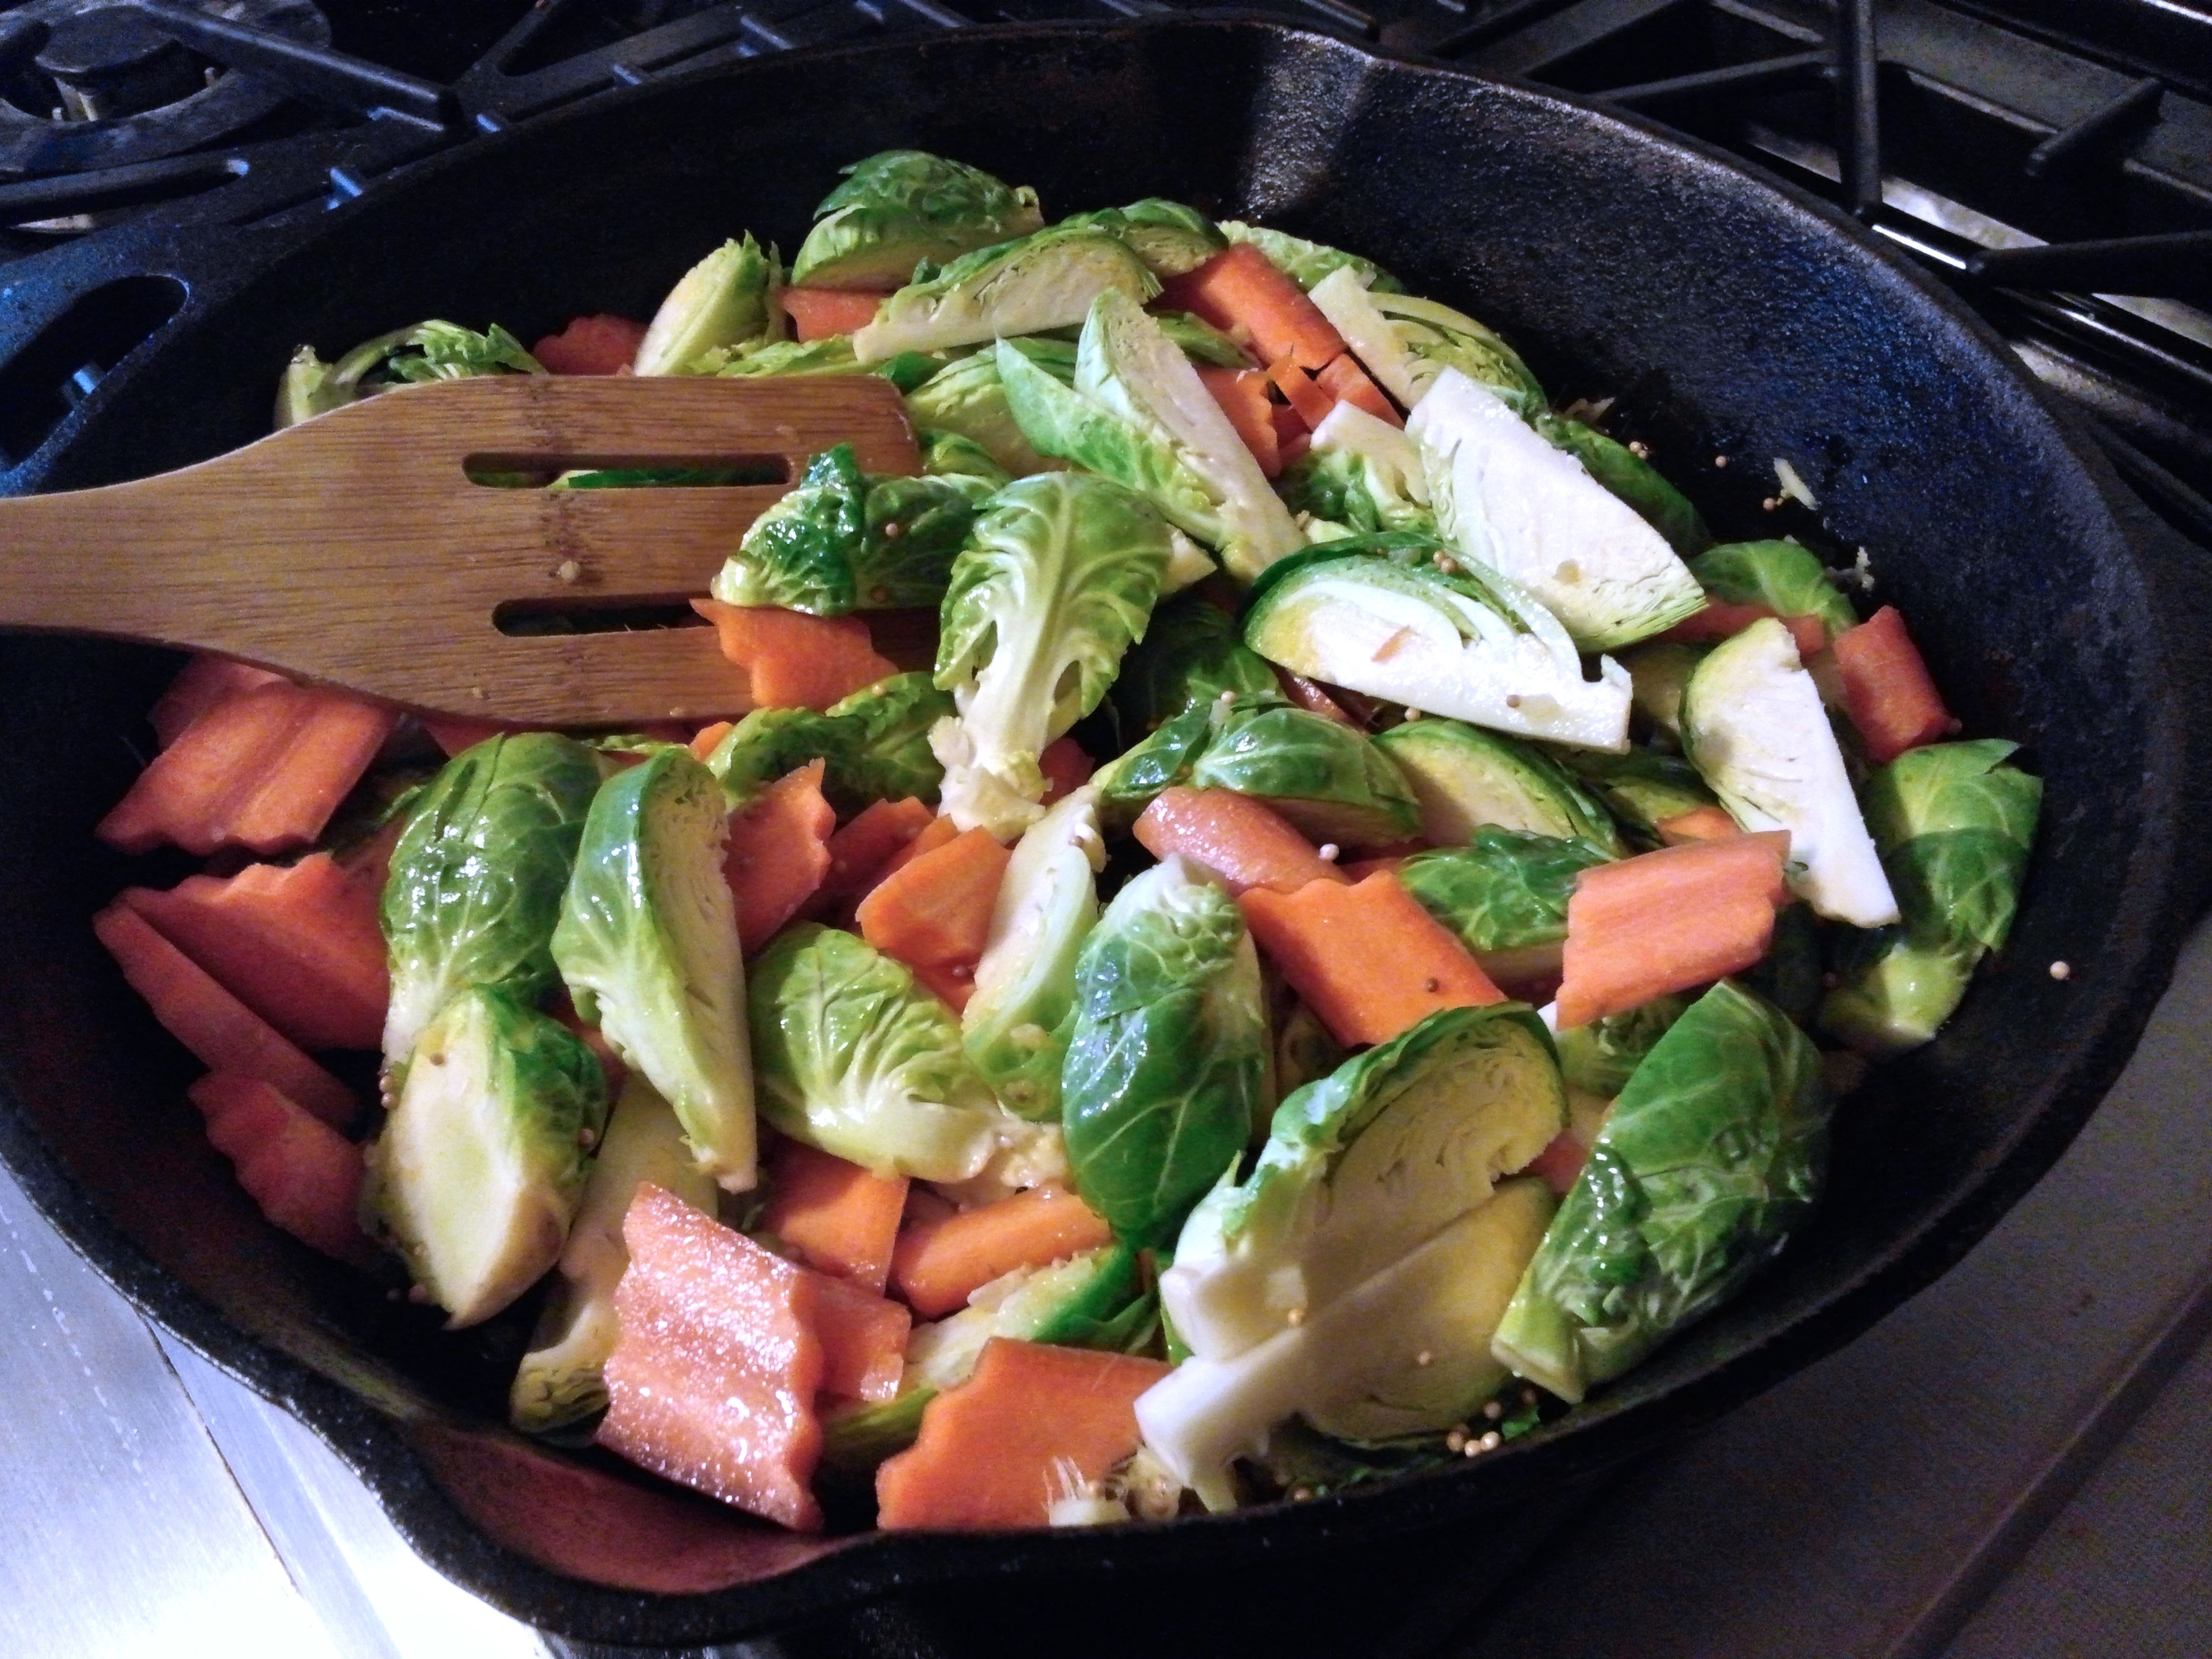
Fresh Brussels sprouts, sliced carrot, and ginger.
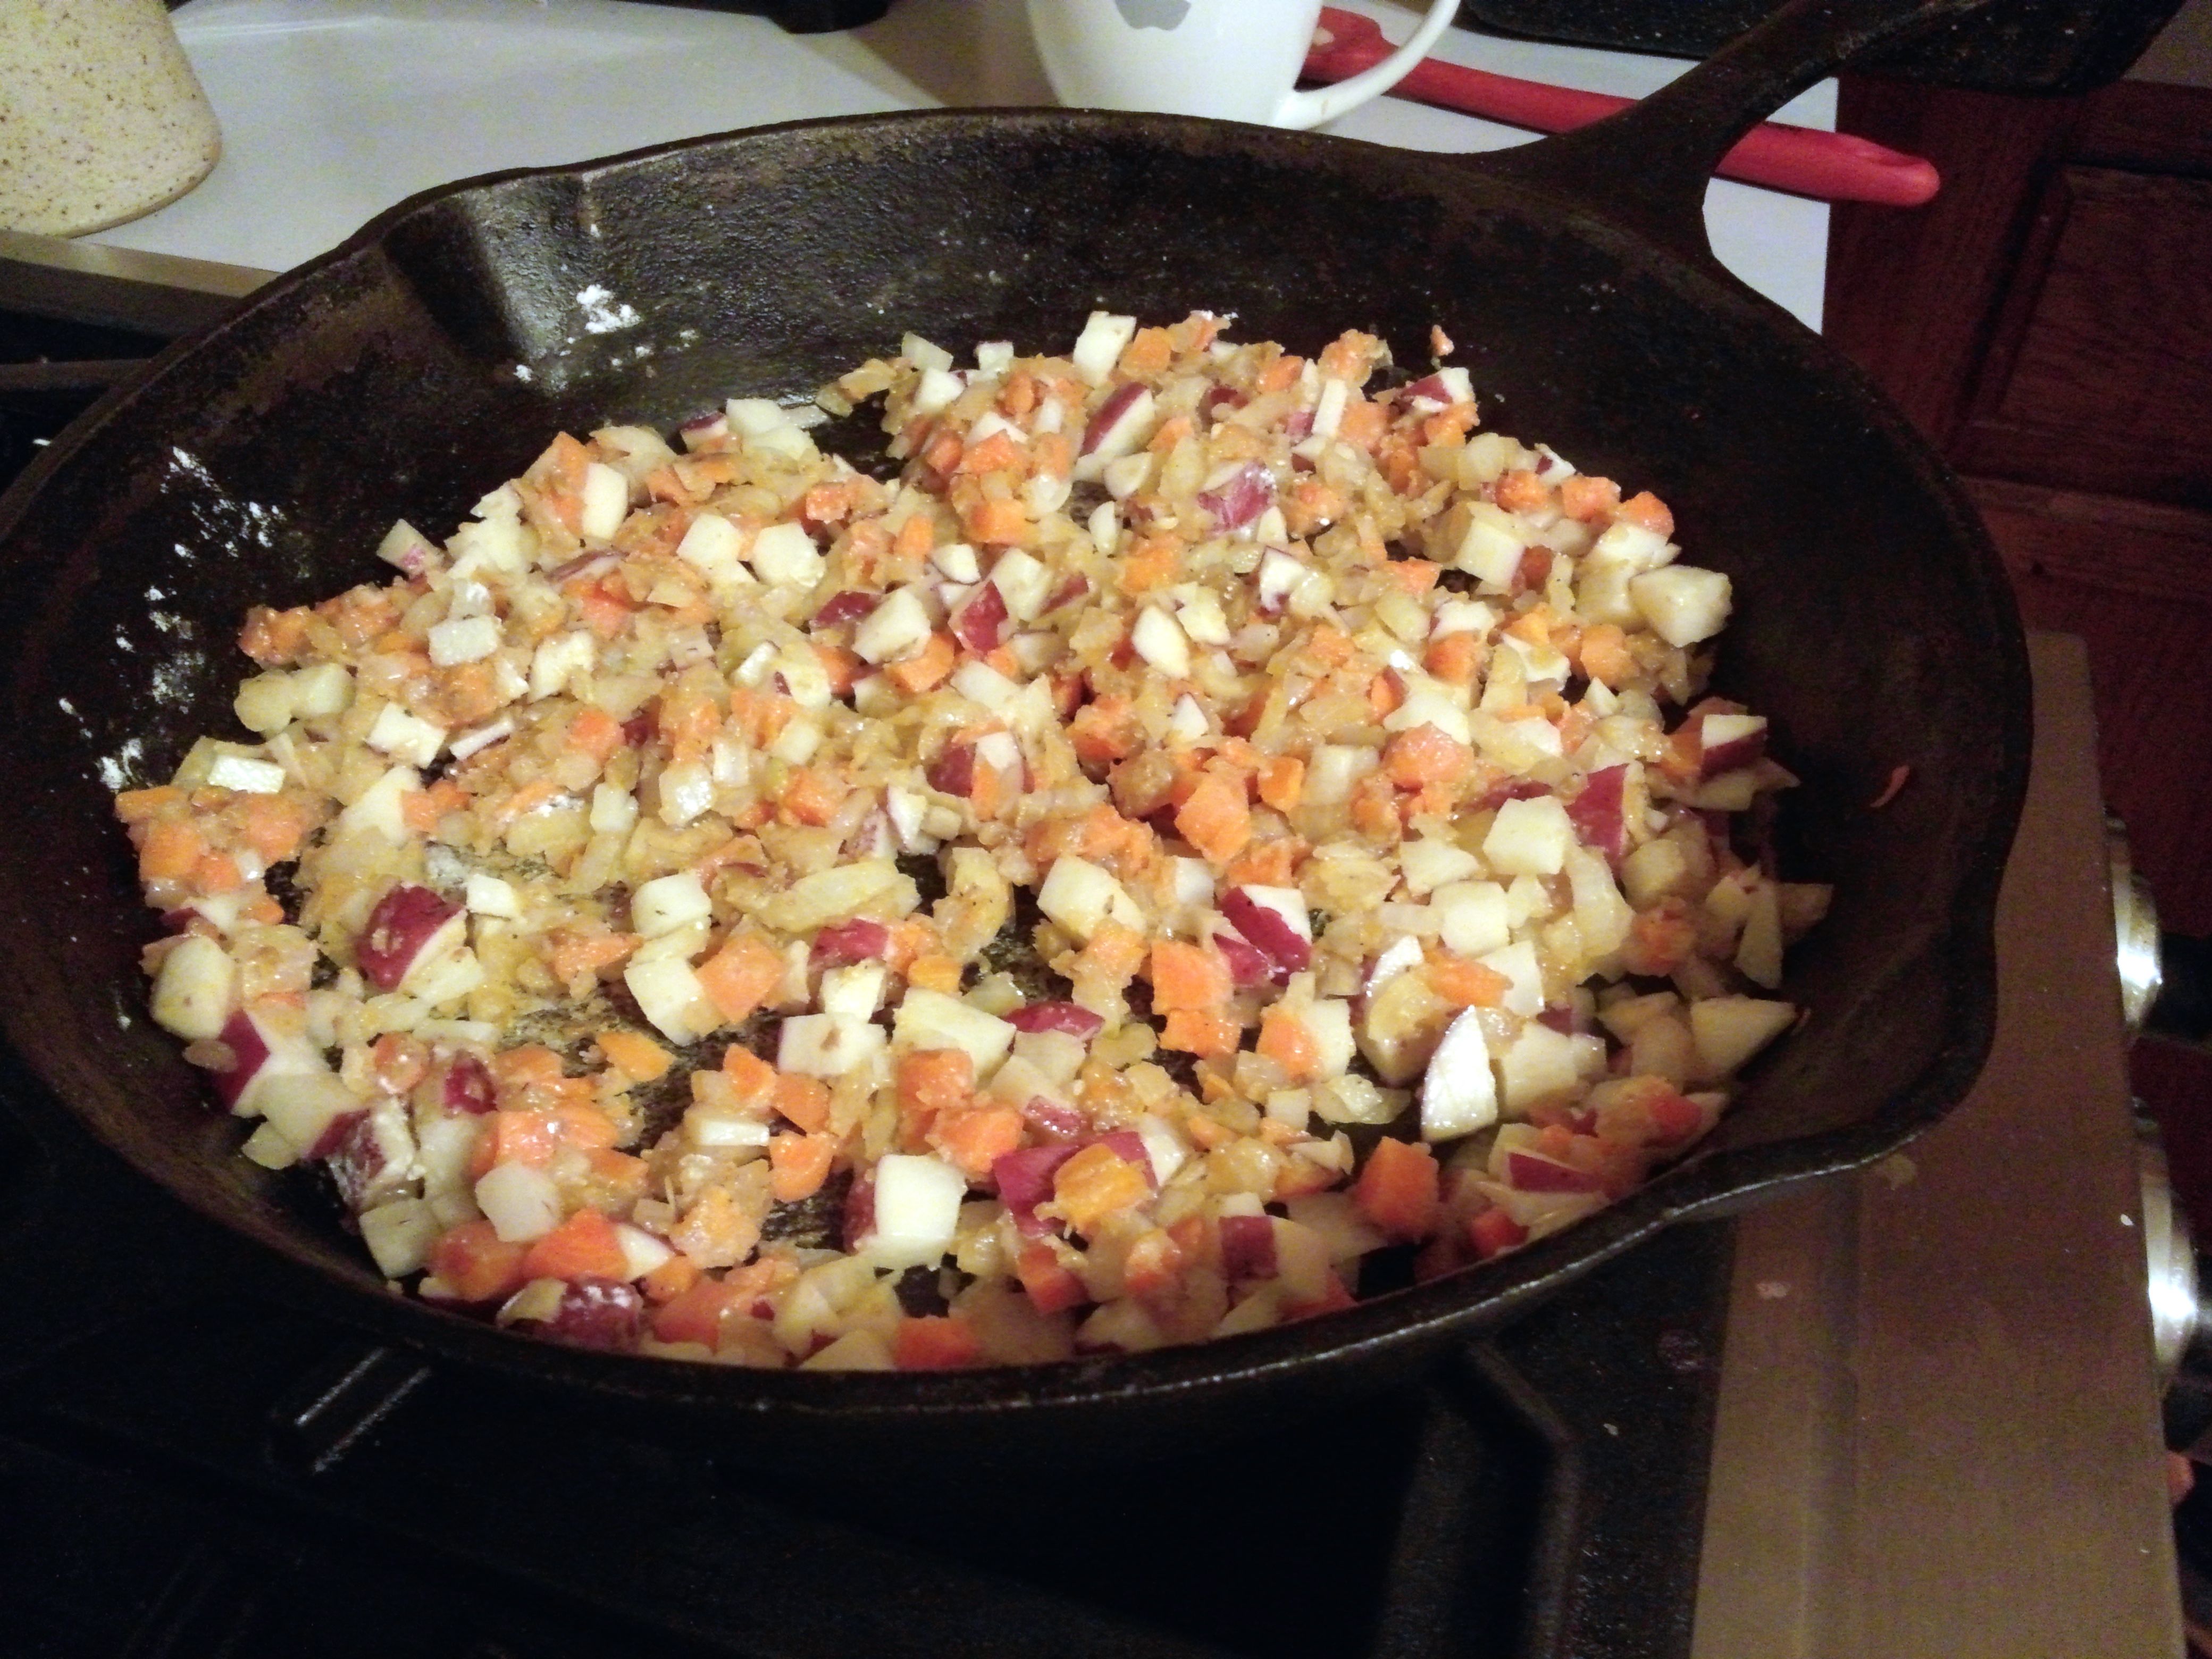
Then the sprouts, carrot and a couple thumbs of ginger (minced)…
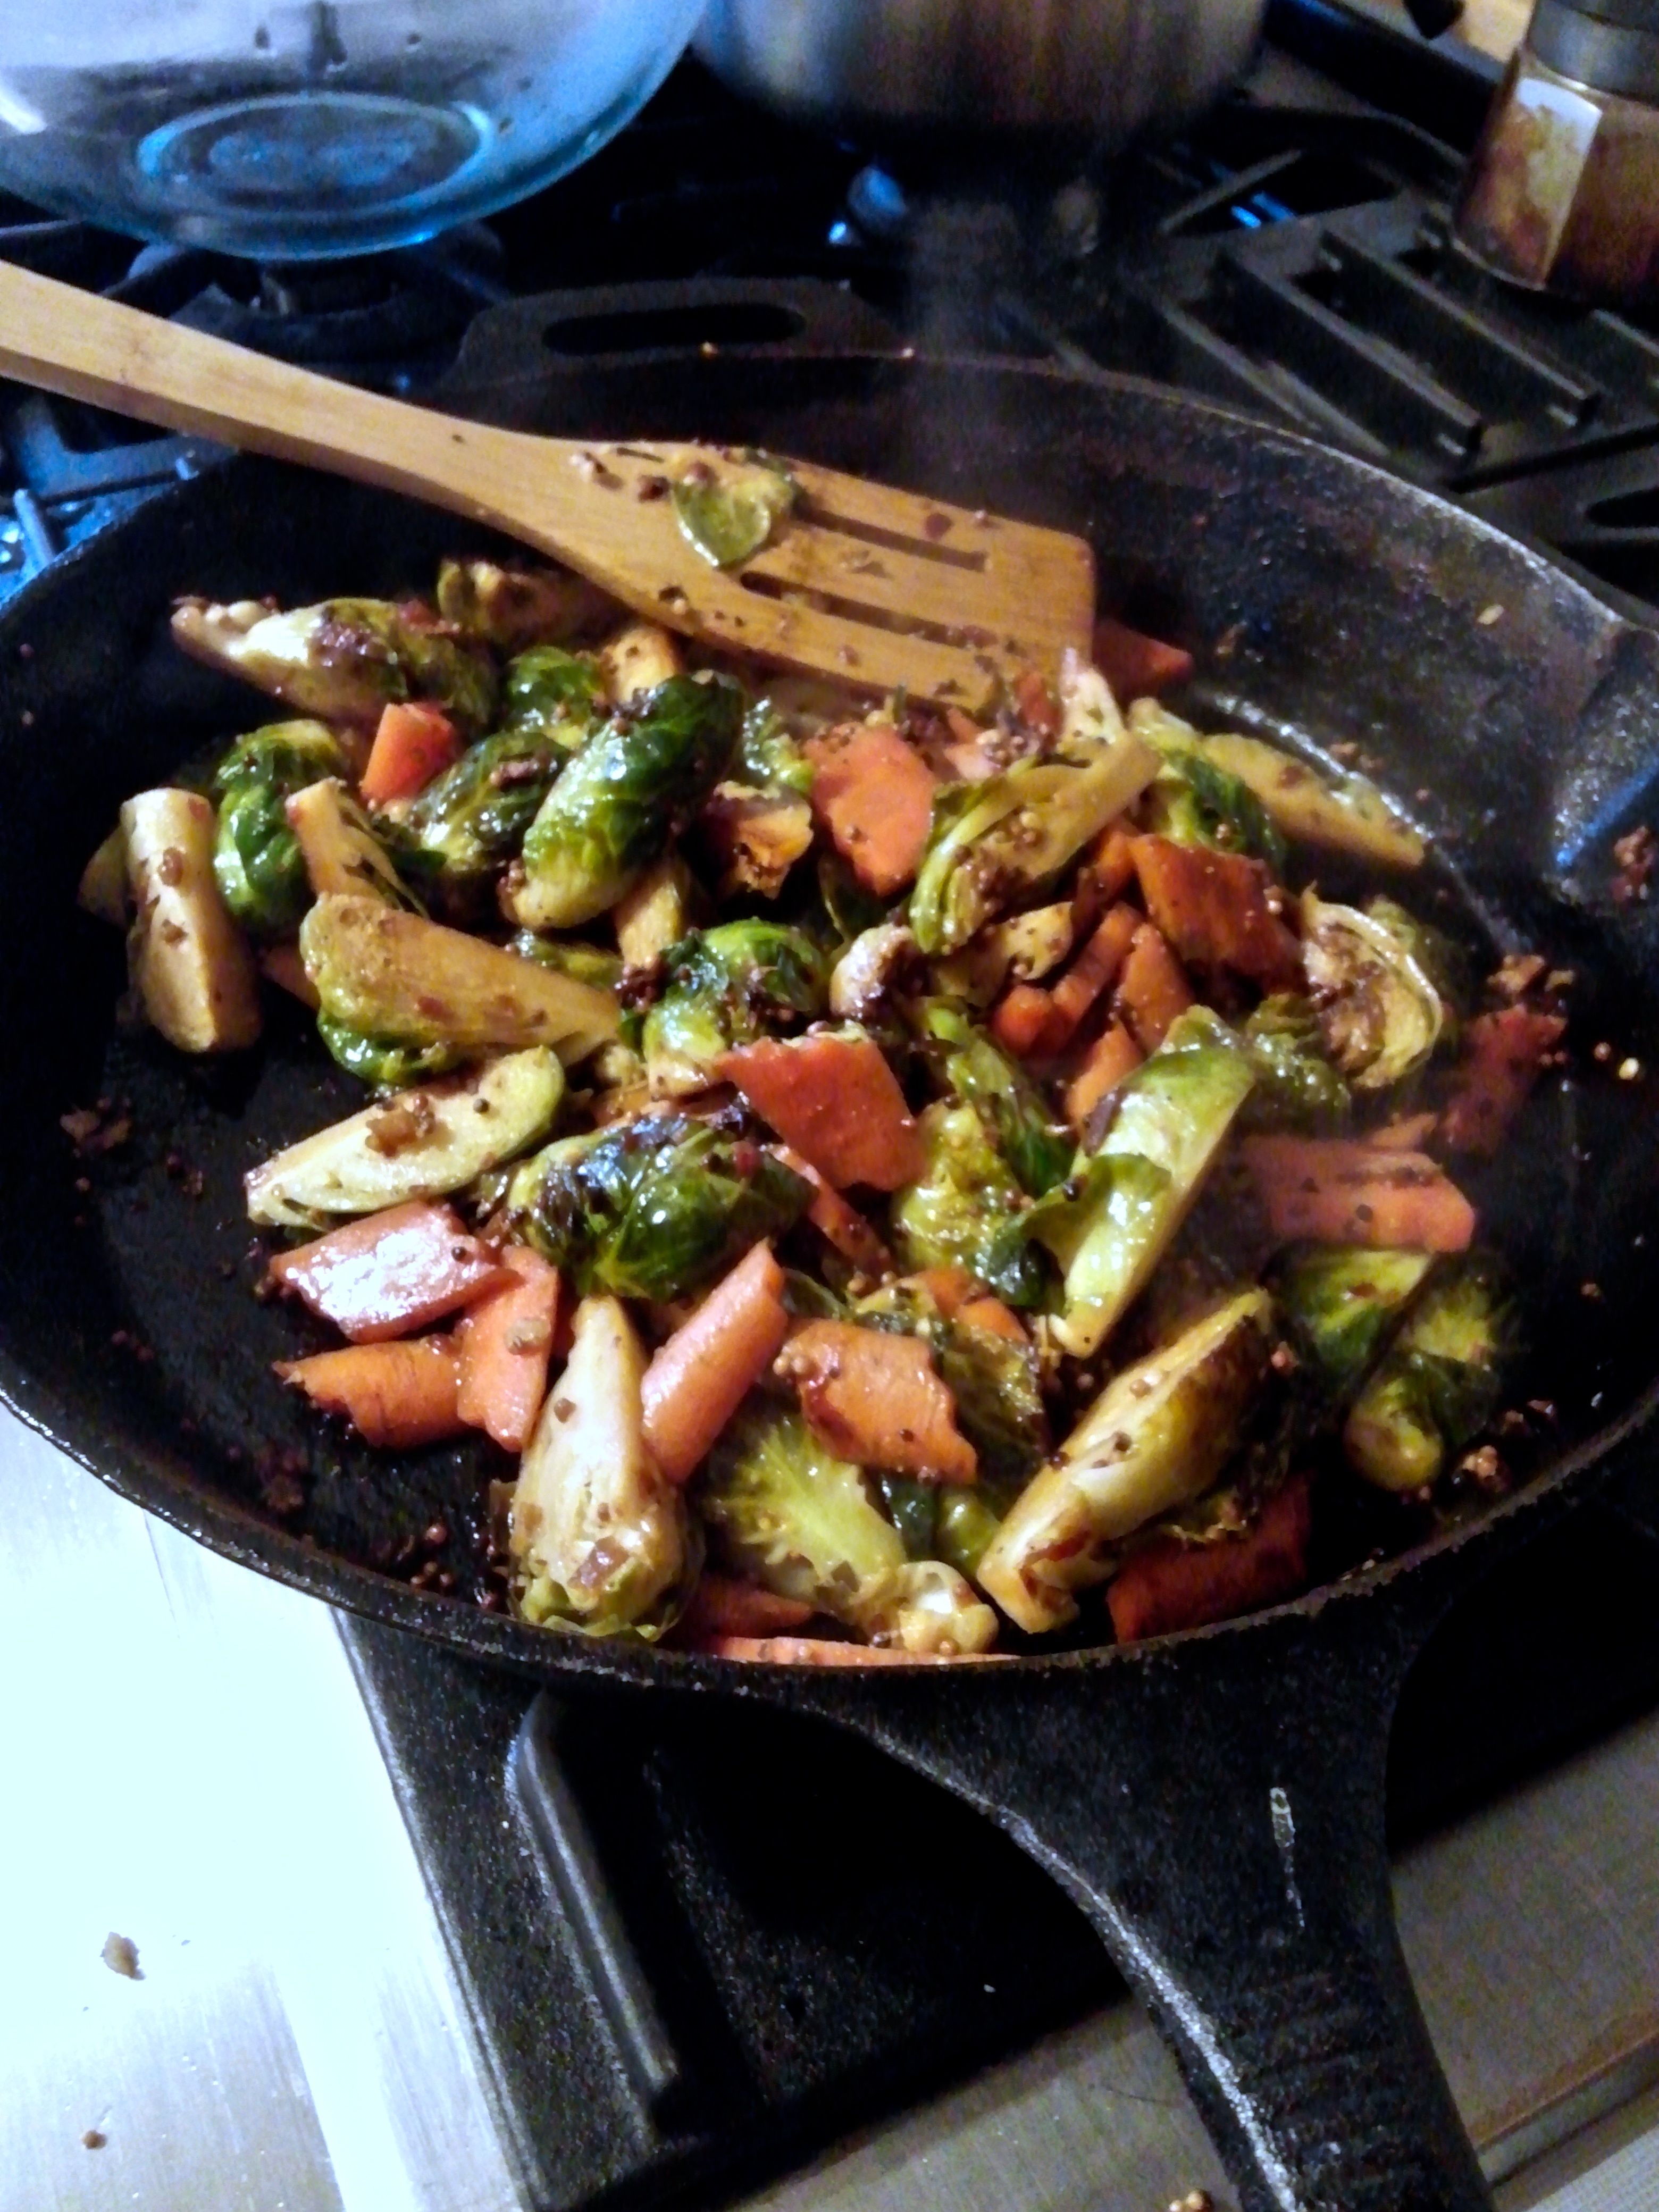
Stir frying the Brussels sprouts, carrot, and fresh ginger in mustard seed and oil.
stir-fried in hot pan until they were cooked through and a bit blackened at the edge. I used a bit of the sauce and a bit of water to keep the fond in the pan from burning by sort of deglazing it along the way.
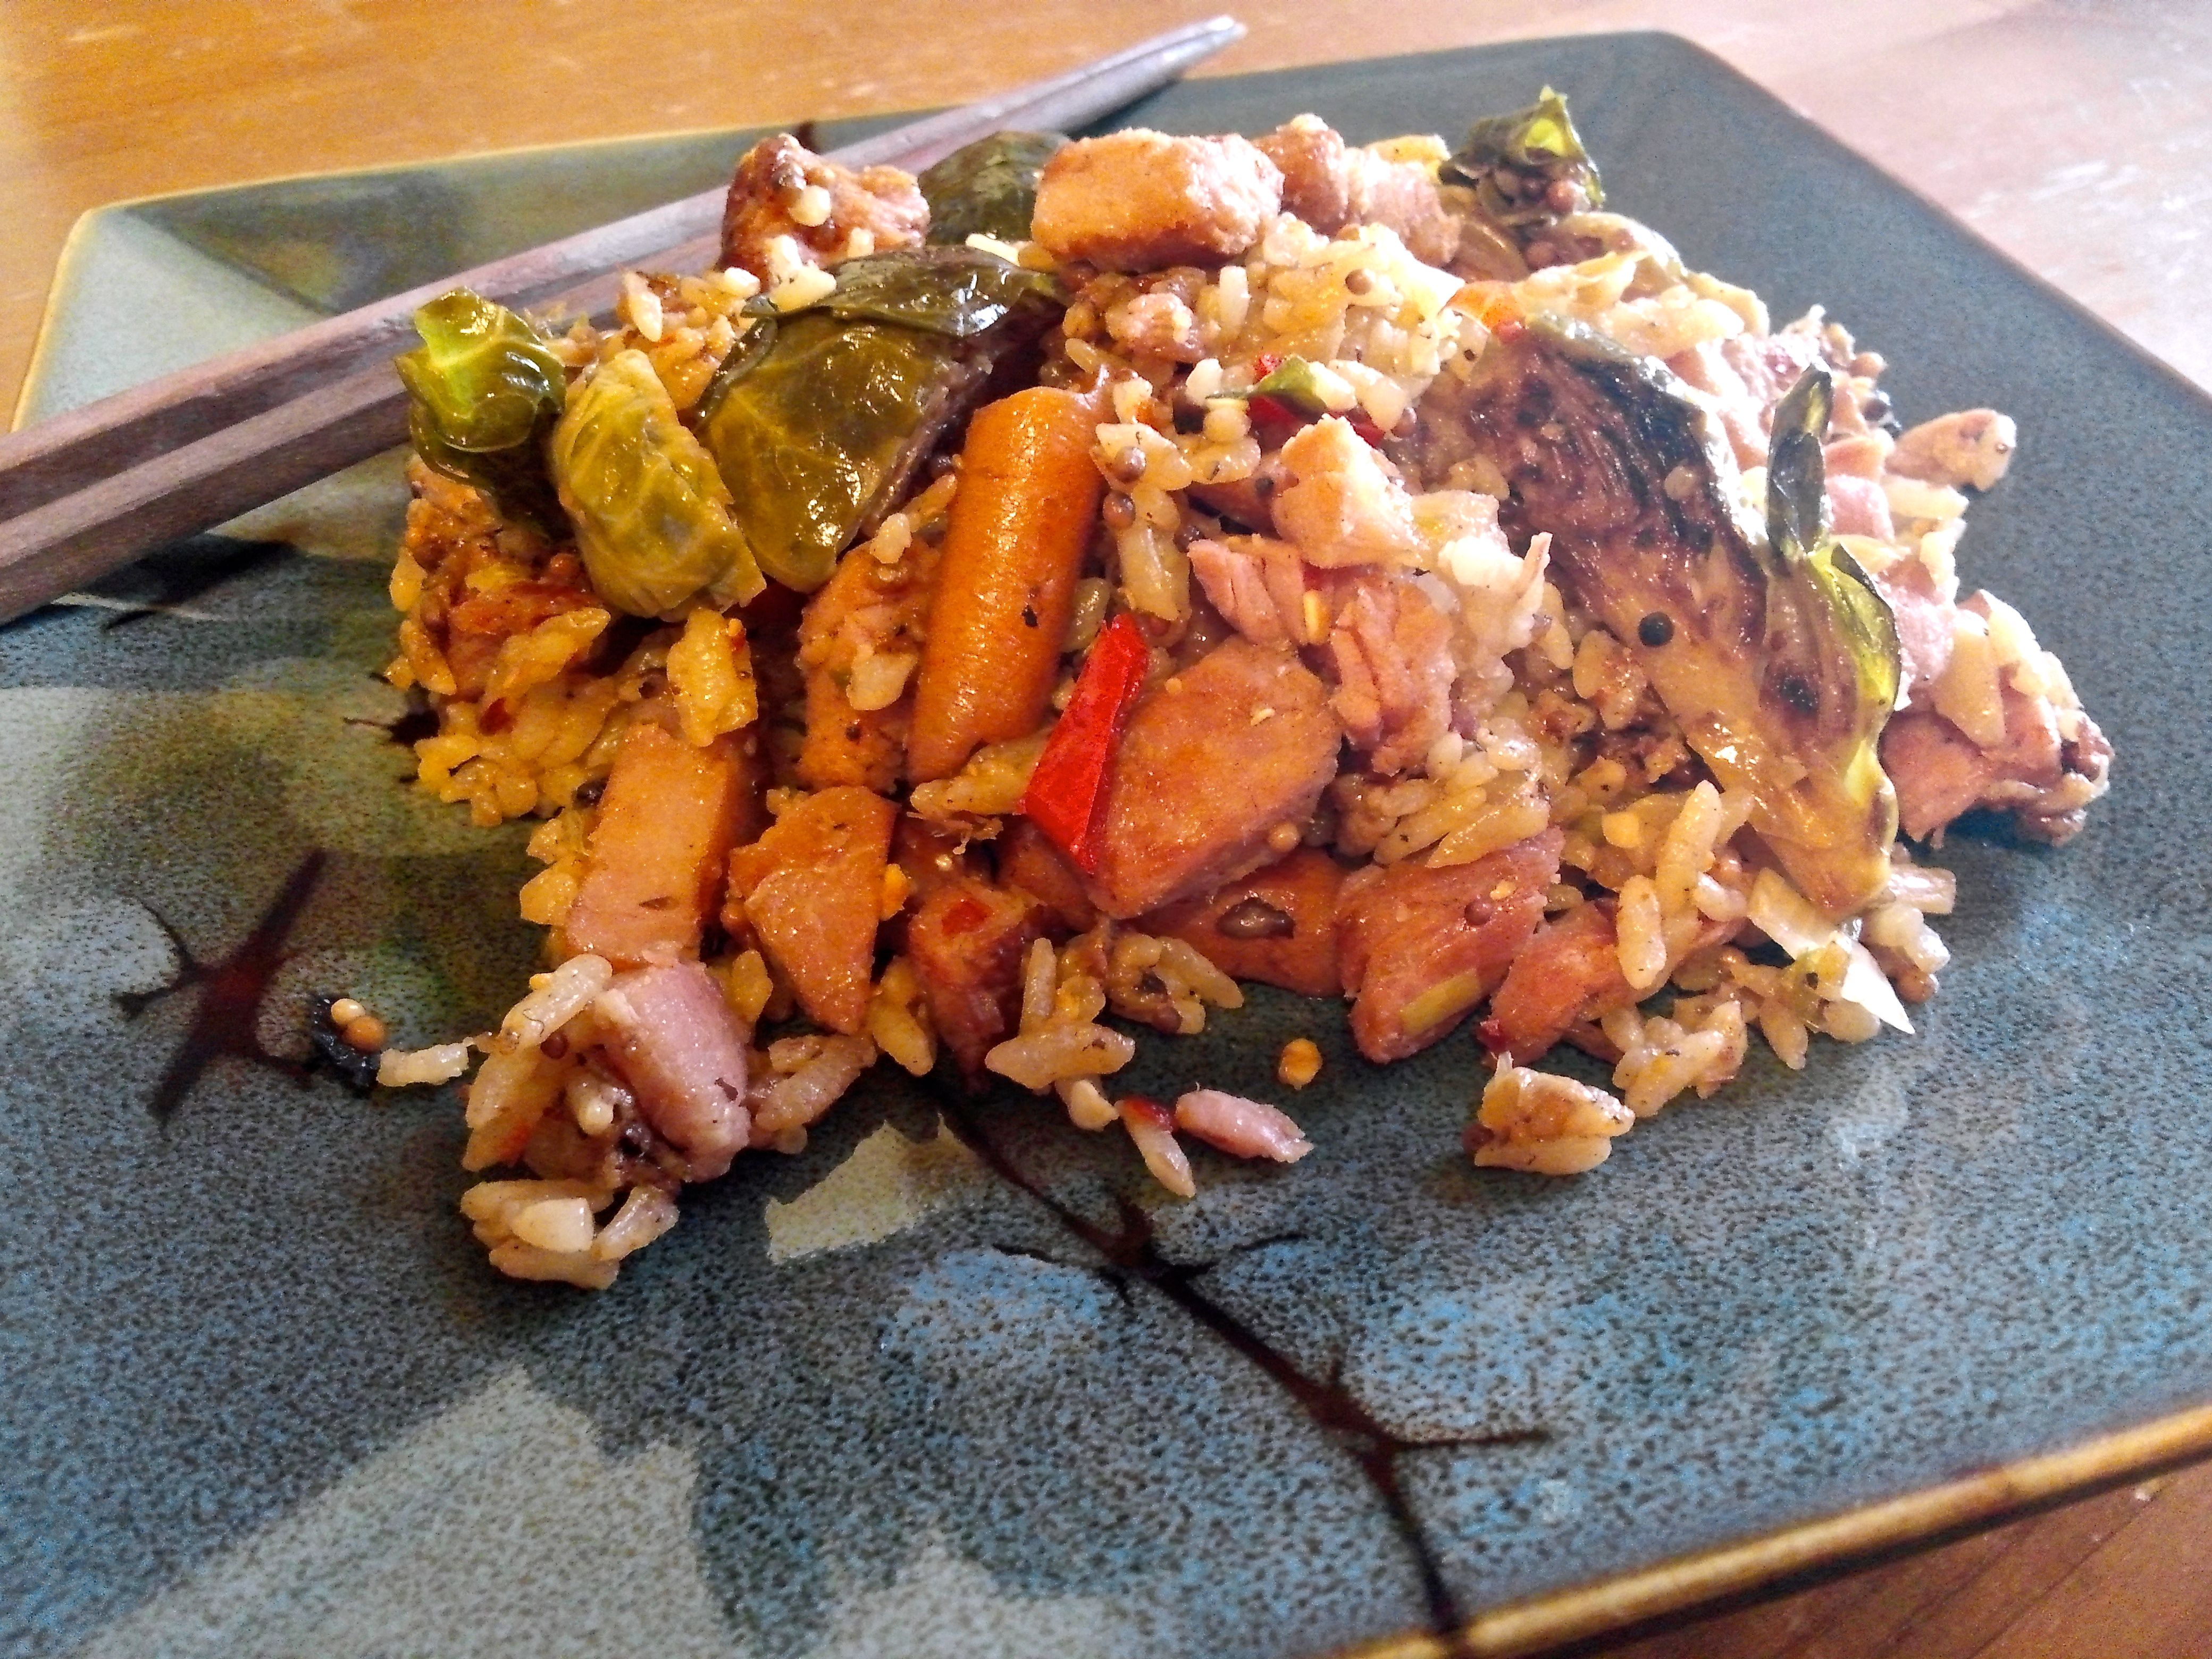
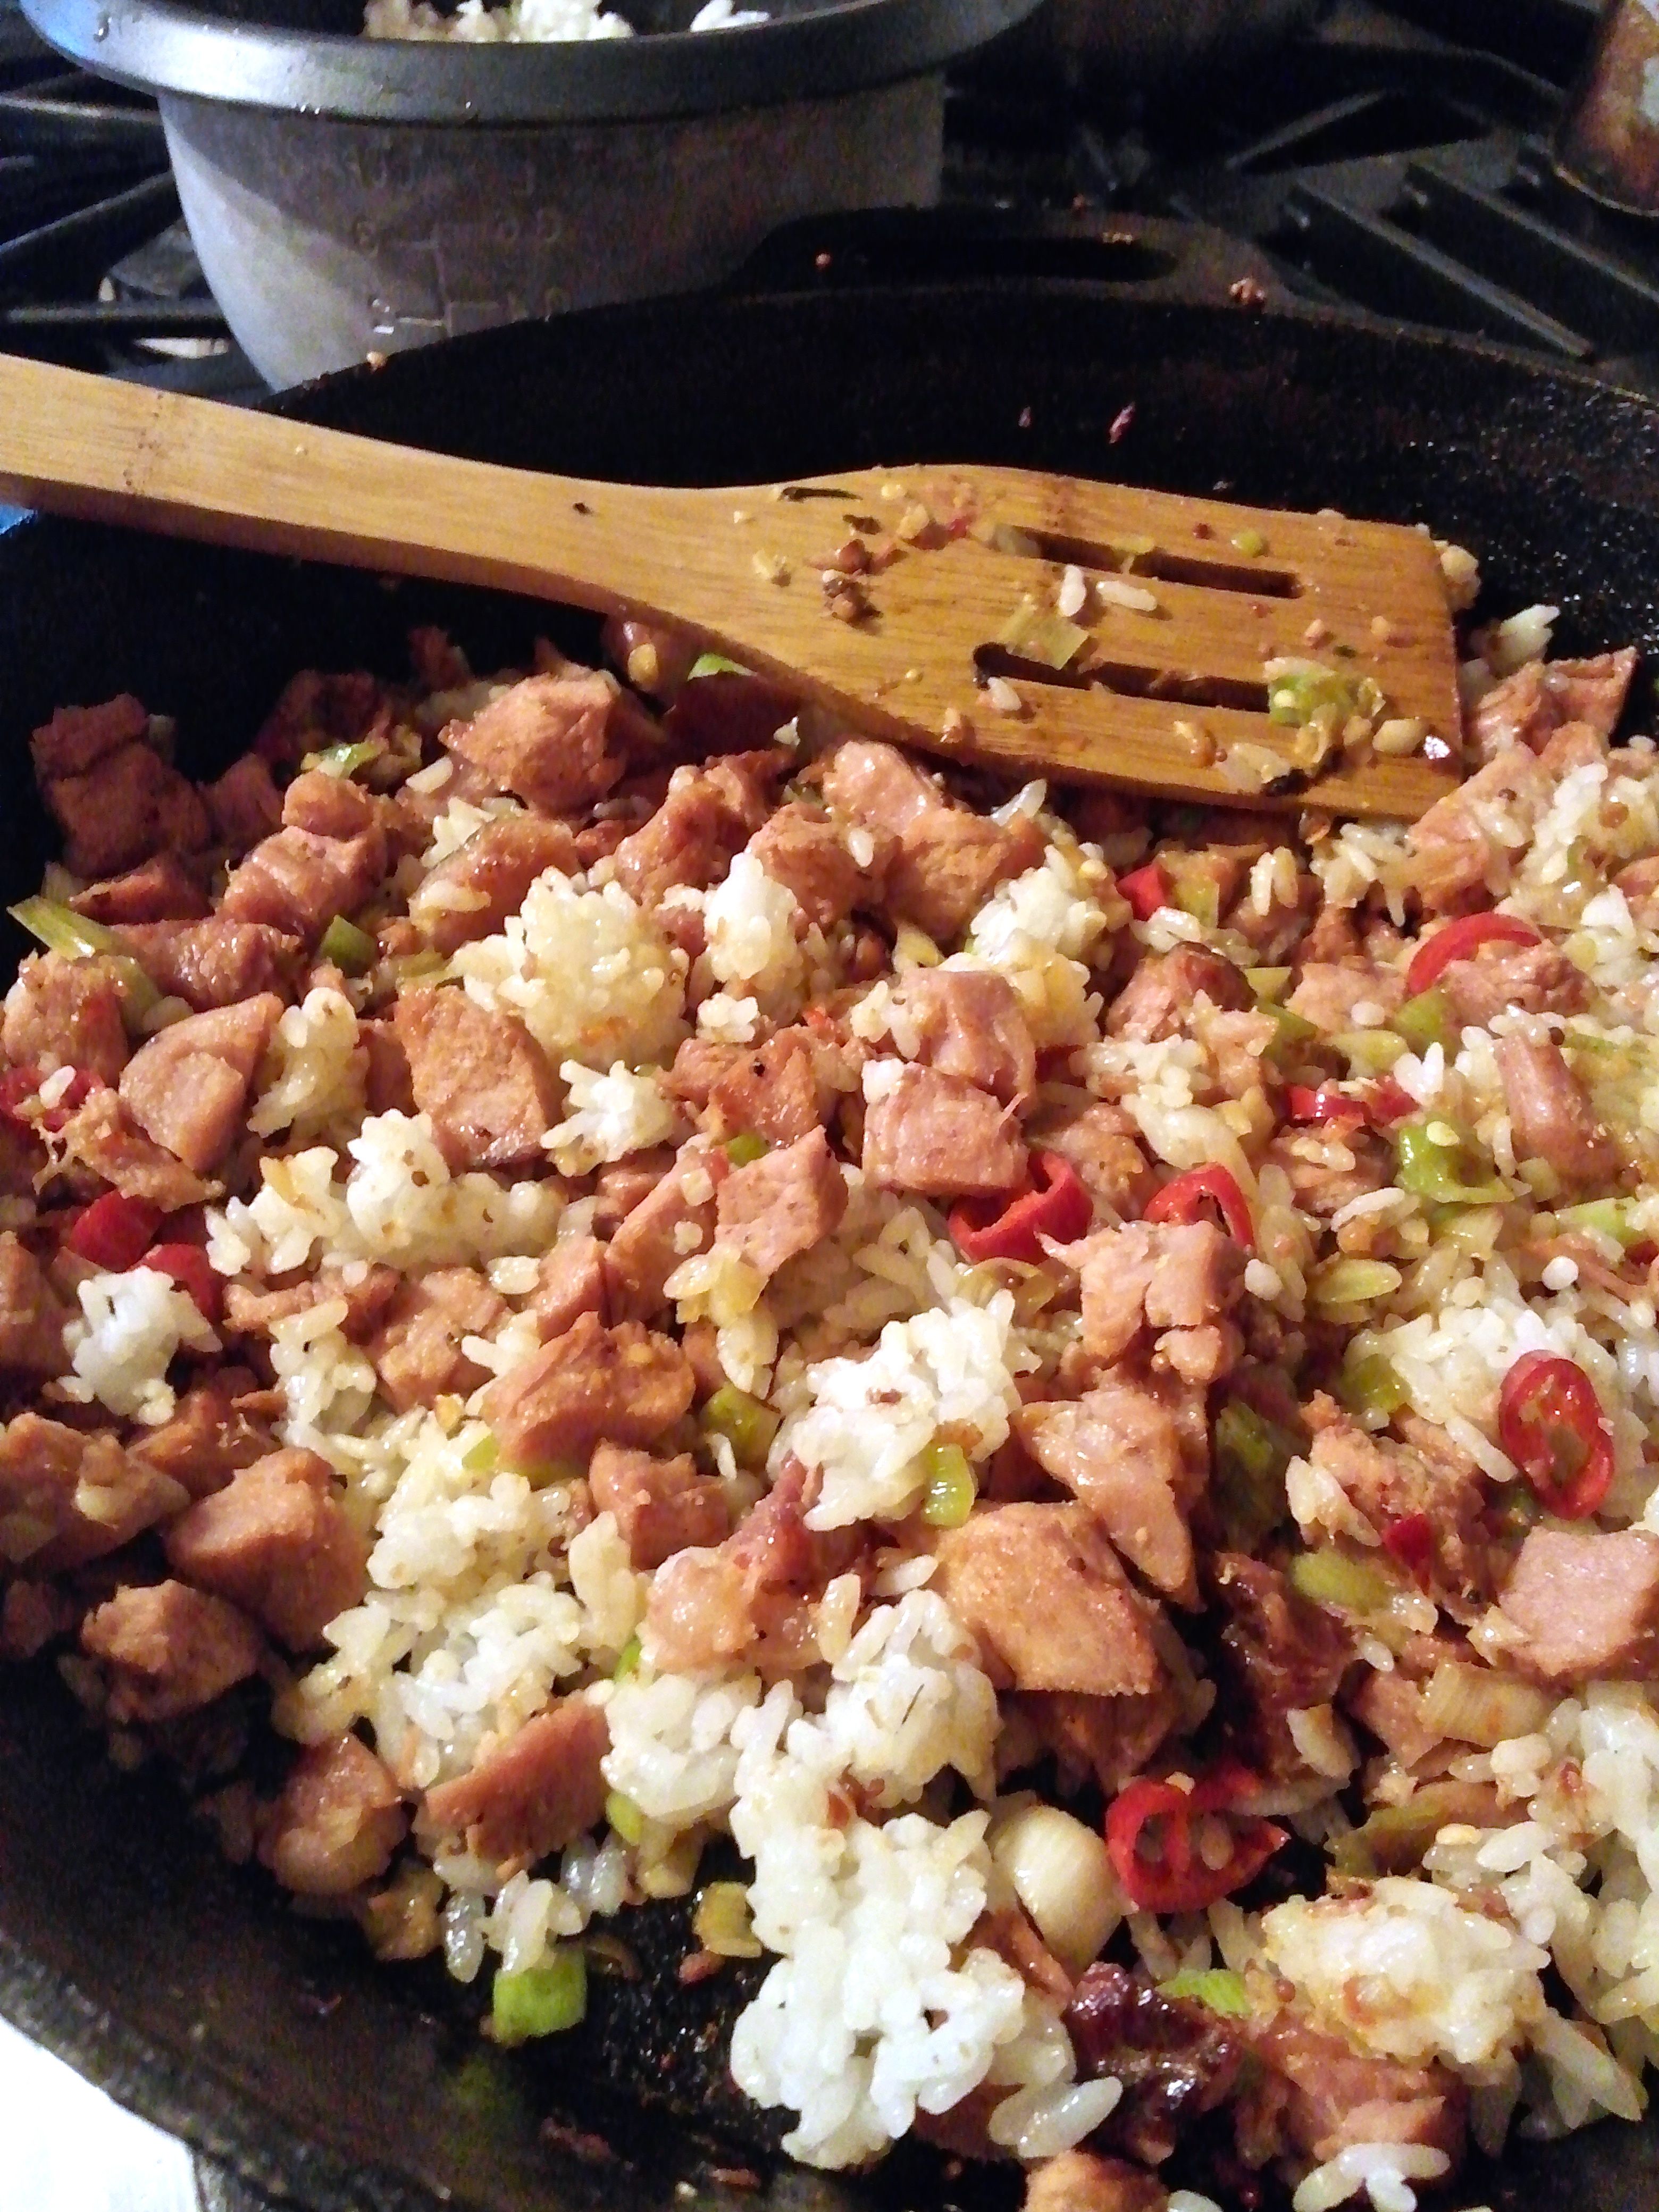
Stir frying the ham, garlic, spring onion, red pepper, and rice.
The rice and ham were stirred in and fried a bit over medium heat, and, lastly, the spring onion, hot peppers, and sauce added.
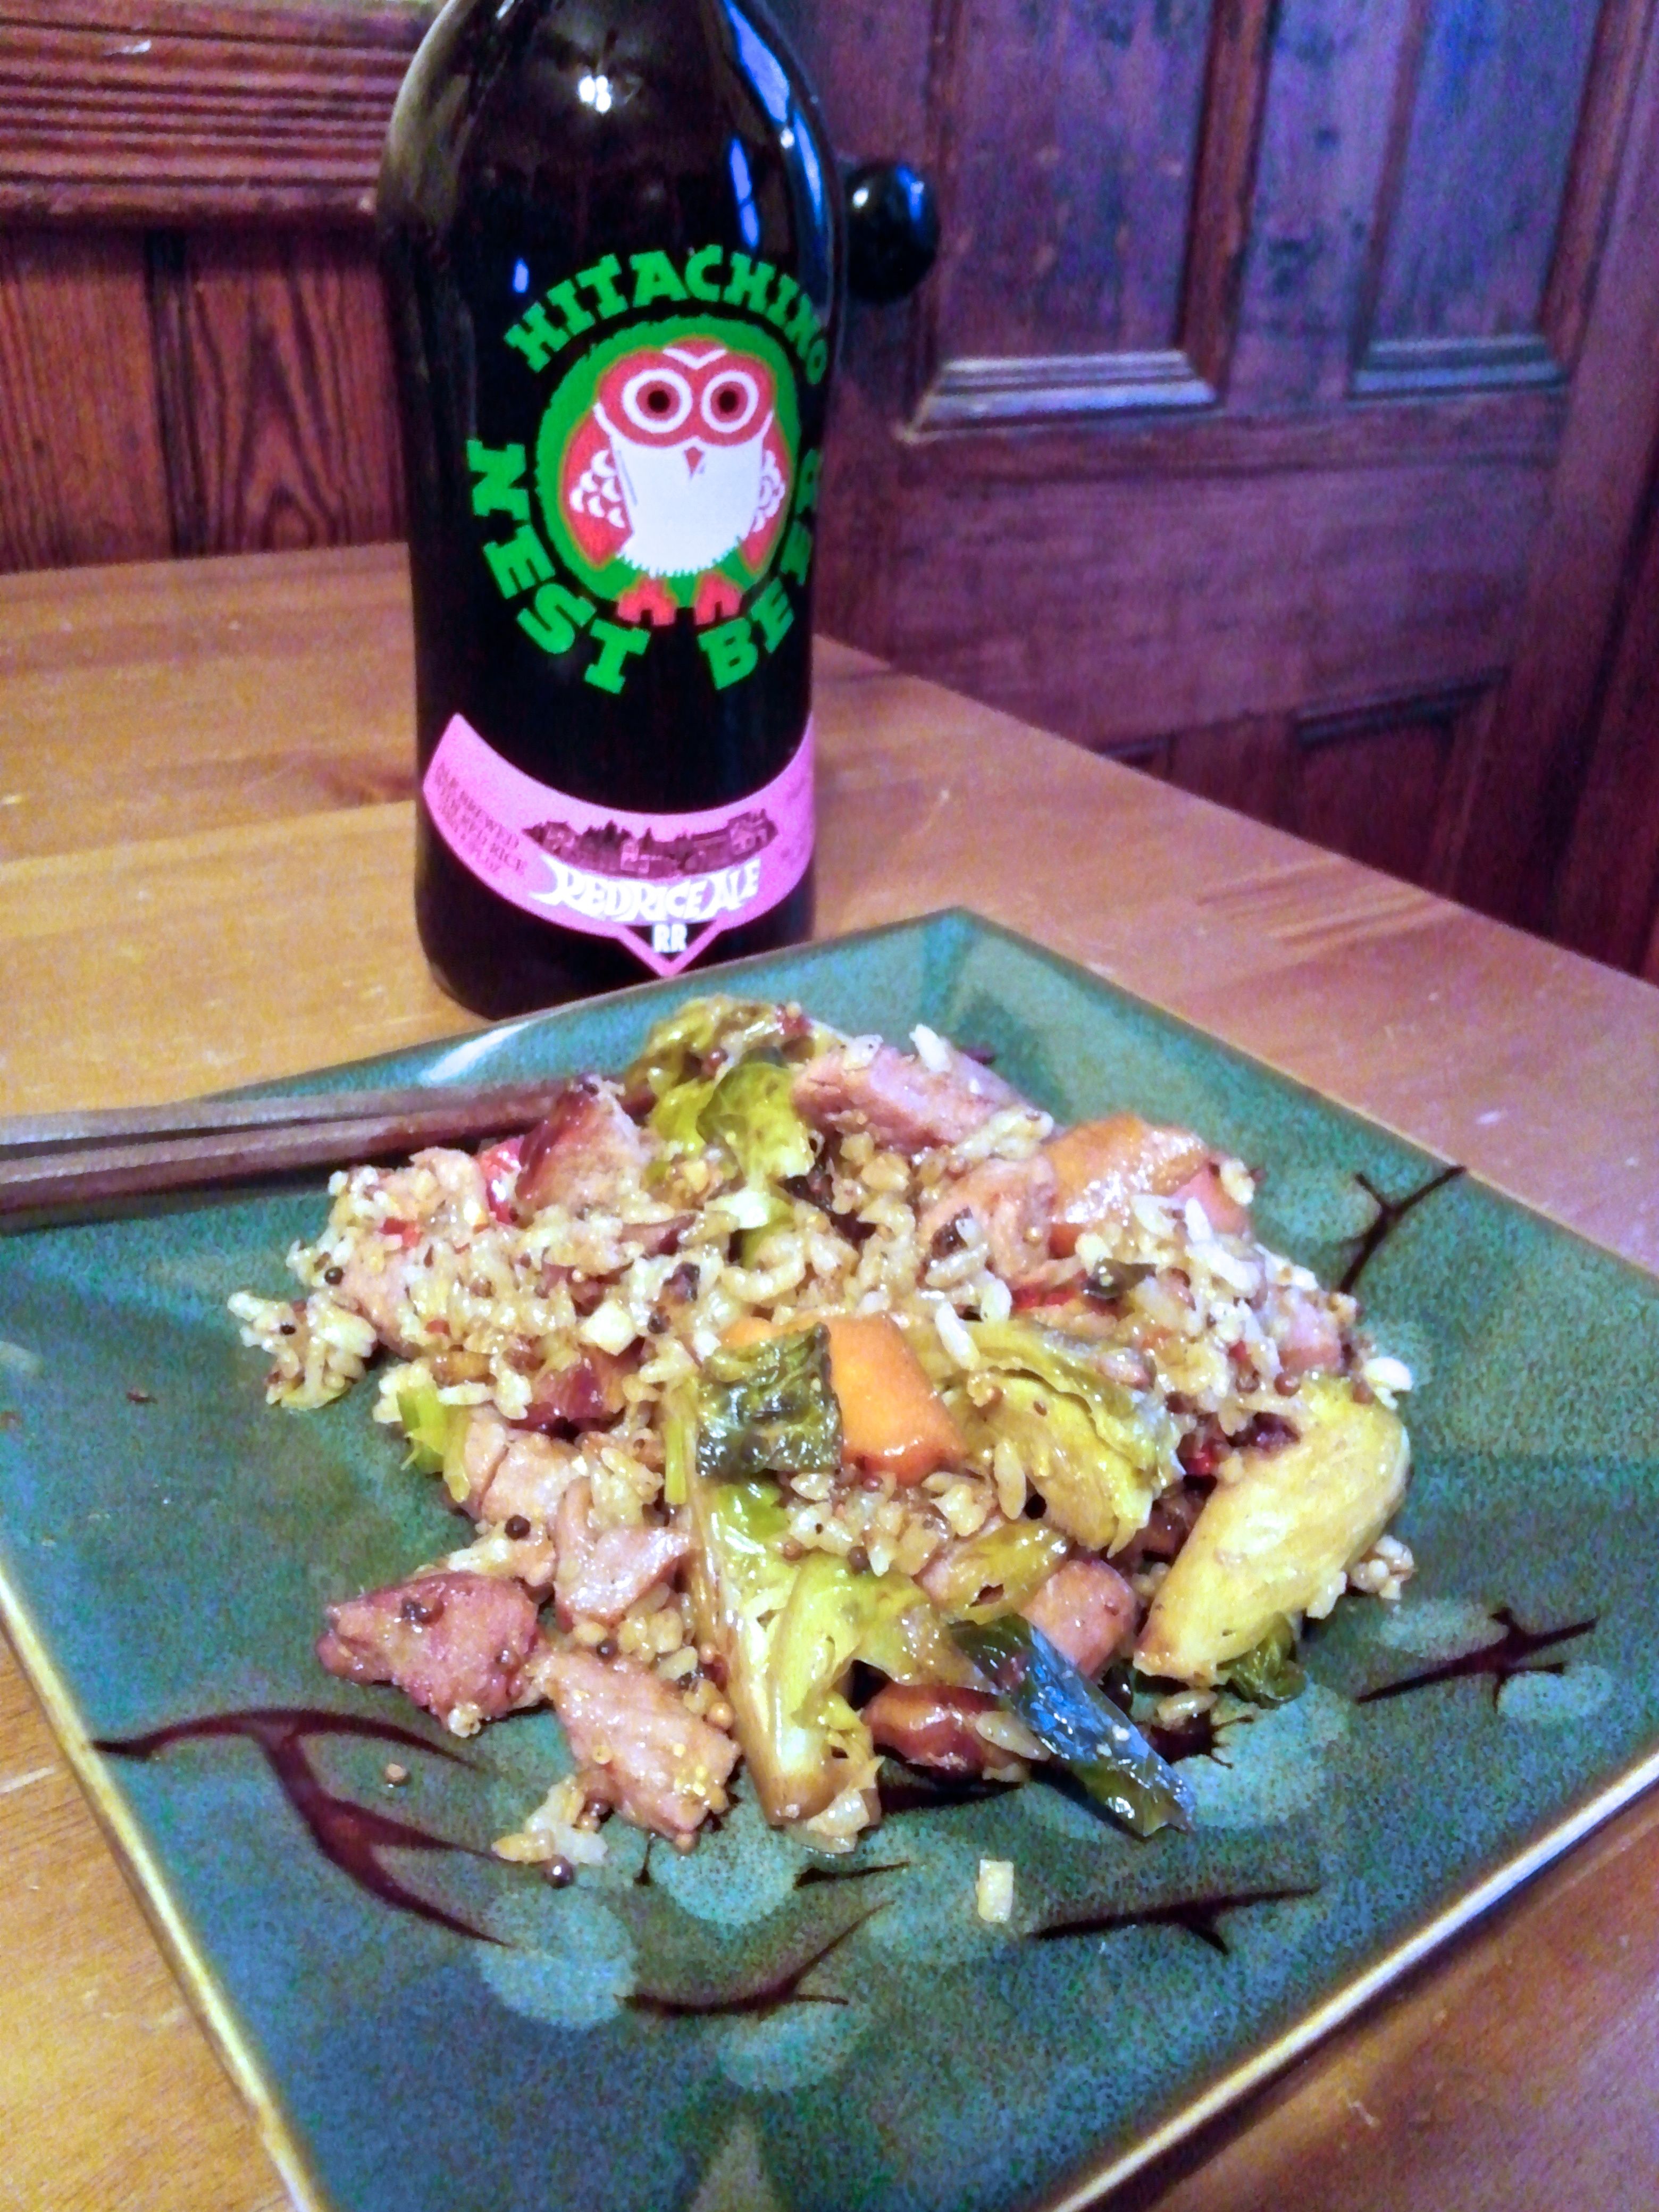
I served this fried rice accompanied by a glass of Red Rice Ale, an appropriate fusion beer for an asian fusion fried rice!
Brussels Sprout and Ham Fried Rice served accompanied by Hitachino Nest Red Rice Ale.
Here is a recipe that inspired us to make this dish (but they forgot the ham!):
Pi Day, March 14, is not a favorite of mine; I don’t care for sickeningly sweet dessert pies and, to my mind, associating a significant achievement in mathematical understanding with a meaninglessly arbitrary calendar date smacks of numerology. (Consider Neil deGrasse Tyson’s take on it here.)
Still, I appreciate the frivolity of partying for no real reason other than the coincidence of a date and mathematical constant, so I’m up for a Pie Day this year and looking forward to the upcoming Saint Patrick’s Day, at least the ridiculous way we observe it in the United States: with lots of beer and delicious corned beef and cabbage, but perhaps not the parades.
For this meal we decided to roll Pi Day and Saint Patrick’s Day treats into one: a meat pie. While corned beef and cabbage would be wonderful fillings for, say, cornish pasties, today’s pie should be as round as possible.
Corned beef brisket. (No, it wasn’t cooked this way, it’s just resting in the warm oven. :) )
To begin preparing the pie filling, we cooked a store-bought corned beef brisket (3 1/3 pounds including liquid in package) in a roasting pan in the oven. The roasting pan was filled to about 1 inch depth with a mix of water and beer (a bottle of Milwaukee Brewing Co.’s Polish Moon sweet milk stout), pepper corns, whole mustard seed and the random pickling/corning spices supplied in the package. Specifically, we cooked the brisket, fat-side up, for 2.5 hours, covered, at 350° F and then about 20 additional minutes, uncovered, at 375° F.
Corned beef brisket cubed for pie filling.
After resting for some time, about half of the brisket (perhaps a bit more than 1 pound), was cut into medium/large cubes. While larger than the vegetable filling ingredients (below), I wanted to retain the meat texture rather than turning it all into a fine mince.
Onion, carrot, potato, and cabbage for pie filling.
To prepare the filling, we finely chopped or cubed savoy cabage (1/2 head), yellow onion (1/2 large), carrot, and a few red potatoes. These were then sautéed in fatty drippings from the corned beef, and seasoned with dill and thyme.
Sautéing vegetables for pie filling.
So that the filling would be moist, we added water and flour to thicken into a roux-like sauce.
Add water flour while sautéing to make a roux-like sauce.
Finally, the filling was seasoned to taste with the additions of ground black pepper, nutmeg, and mustard (e.g., Grey Poupon Country Dijon) and the cubed corned beef added; since the corned beef and its drippings are so salty, there’s definitely no need for added salt!
Preparing the pie crust dough in a food processor.
Now, on to the pie crust… not our area of expertise, but my partner volunteered to do all the work here; she prepared a wonderful flaky, cream cheese pie crust guided by this recipe and some tips from a Betty Crocker cook book.
If you’re not willing to make the pie crust from scratch, I’ve had good luck using Trader Joe’s pie crust, although it is sweeter than this and a bit sweeter than I like for a savory meat pie.
Making the pie shell.
The pie shell was filled and the top piece cut slightly larger than the pie dish, so that it could be folded over the edge of the lower crust piece, and pinched closed.
Completing the pie shell.
Vent slits were cut into the pie top, and we baked it for about 45 minutes at 375° F, painting the top with an egg wash about half way through the cooking, and removing it when the crust was a beautiful golden brown.
Baking the pie.
From the oven, let the pie rest for a bit and enjoy a beer before digging in.
The finished, resting corned beef and cabbage pie.
Thankfully, this meat pie held together quite well and, thus, is the easiest thing in the world to serve… just deliver a piece or two, or three, per person. :)
A slice of corned beef and cabbage pie.
This was a great dinner, and the leftovers look good too… so I’ll have it both for Pi Day and for Saint Patrick’s Day. This would make a fine meal for Saint Patrick’s Day itself or based on the leftovers from that feast.