Tilapia Tostadas


Wow, I see I haven’t posted in 3 weeks!  I bet you were all worried, “Is Dave still eating?”

I offer this hiatus as evidence that I do have a job… actually, I was doing my research work and also had a nice week visit to San Diego for a workshop and to visit old and new friends.

So, lets catch up with some quick-and-dirty foods.

This one is simply a serving suggestion: tilapia tostadas… mashed black beans, shredded napa cabbage, queso fresco, and a tilapia filet (from frozen, defrosted in water and patted dry) lightly pan-fried in oil with oregano, salt, pepper, and a jalapeno hot sauce, and scallion greens, all atop a crisp corn tortilla.

One tip I have for you is to buy corn tortillas and bake them in the oven to crisp them, rather than using those “hard” deep-fried corn tortillas for tostadas.

Chicken Tinga

Chicken Tinga Tostada topped with ripe avocado, scotch bonnet queso fresco, and cilantro leaf.

I’m a huge fan of Mexican and Tex-Mex food; if pressed, I usually say it’s my favorite. As such, I was surprised that, to the best of my recollection, I’d not heard of this fantastic dish.

In preface, I can say that after making this in my kitchen, I’m pretty sure my house has never smelled so good. Perhaps it did on Thanksgiving Day. :-)

My inspiration was: (a) to make something Mexican in honor of Cinco de Mayo – despite the idiocy that sometimes surrounds its “observance” in the U.S., and (b) to use up my chorizo.

Chicken Tinga ingredients.

I started with this impressive recipe: chicken tinga, apparently by a Kiwi chef now living in the Yucatan. One thing that struck me about this recipe is that many ingredients are used twice: to poach the chicken and also to make the sauce.

Here’s are my modifications:

  • I used well over 2 pounds of chicken breasts; perhaps 5, so approximately doubled the onion and spices to poach the chicken.
  • I used dried thyme and oregano rather than fresh.
  • I used one medium to large red onion (rather than white) in the sauce.
  • I used reconstituted dried ancho chilies (~7 small-medium), rather than using chipotle chilies in adobo sauce.
  • I used the water from the rehydrated chilies both to boil the chicken, and as part of the blended portion of the sauce.
  • I used 1 14.5 ounce can of fire roasted diced tomatoes, instead of fresh tomatoes.
  • I used 1/2 white vinegar and 1/2 apple cider vinegar.
  • I used an additional 1 T. brown sugar, to taste, to balance the vinegar.

First, when rehydrating ancho chilies, I do as Rick Bayless suggested, and cover them with a small plate to keep them submerged, for 30-45 minutes.  Remove the stems and the seeds and rinse them before blending them into the sauce.

Rehydrating ancho chiles

I tasted the chicken before combining it with the sauce, and it was quite flavorful on its own.  (I’ve often prepared chicken breasts for pulled or shredded chicken by boiling it in V8 juice; that’s a nice short-cut, but not nearly as good as with these spices.)

Poaching/boiling chicken breasts

Sautéing red onion strips and browning chorizo.

Preparing the sauce: onions, chorizo, and garlic

Sauce with blended tomatoes, ancho chiles, vinegar, sugar, and spice added

My total prep time was about 1 1/4 hours, including a wait for the chicken to cool so that I could pull or shred it rather finely, finishing by stirring it into the sauce to simmer for 5 minutes.

I took the Chicken Tinga to a friend’s house where we served atop both crisp tostadas and warmed corn tortillas along with shredded iceberg lettuce, ripe avocado, cilanto leaves, and crumbled Scotch Bonnet Queso Fresco.

Chicken Tinga tostada

I’m really happy with how this Chicken Tinga turned out, and, if I’m to believe them, so were the 3 friends, including one child, that have tasted it so far!  I can also suggest the substitution of ancho chilies (that are just a bit spicy); their flavor worked really well in the sauce.

Here’s the recipe that I adapted:

On a subsequent morning, I placed a poached egg atop Chicken Tinga for a nice breakfast from the leftovers… a serving suggestion from the video linked above.

Chicken Tinga with poached egg and queso fresco on spiced bread.

There are some complementary mexican recipes and interesting videos here:

Scotch Bonnet Queso Fresco

Scotch Bonnet Queso Fresco

This is my second foray into cheese-making; my first was making paneer, that I made according to this post: Paneer 101.

As far as I know, Mexican queso fresco is pretty much the same thing as paneer, except usually saltier and is made using vinegar to cause the milk to curdle, instead of lemon juice.  It’s a simple, fresh, crumbly, non-melting cheese that is great for Mexican dishes.

If you’ve followed my blog, you might have noticed I’ve been having a love/hate, hmm no, just a relationship with scotch bonnet peppers. I’ve loved habaneros for both their heat and flavor, but most recently bought about 10 scotch bonnets instead, after seeing their similarity and learning they’re related varieties. Unfortunately, I’m not enjoying them as much. To me, the scotch bonnet has just been a ridiculously hot and a less flavorful, red version of the tasty orange habanero. Oh, well, I only have one scotch bonnet left so I’m determined to use it; I thought, “Why not put it in a cheese, to be soothing from its heat and impart some nice color and spice to this typically mild cheese?”

Preparing to make queso fresco.

Ingredients:

  • milk, 1 gallon; I used 2% just because that’s what I had on hand.
    (Higher fat content means higher yield, so one would typically use whole milk.)
  • vinegar, white or other, ~6 T.
  • salt, 2 T., plus more to taste
  • optional: 1-3 scotch bonnet peppers, finely minced and lightly sautéed

Since the scotch bonnet addition was an experiment, I decided to prepare 2/3 of the cheese as plain queso fresco, and 1/3 with the pepper, hence I used only one pepper.

Preparation:

You know what? I’m not going to describe this. It’s written up well in both of these recipes:

Squeezing the whey from the curd in cheese cloth

Scotch Bonnet Queso Fresco before pressing

Using plates to press moisture from the cheese
(I pressed it with the plates held vertically over the sink.)

Drying queso fresco under weight

I will leave you with these tips from my experience, however:

  • The first time, when I made paneer, I didn’t squeeze enough of the moisture from the cheese.  This time, at a friend’s suggestion, I pressed it between plates, and that did the trick.
  • Still concerned that I hadn’t removed enough moisture, I made the mistake of letting it sit in the refrigerator, in cheese cloth after pressing, for 6-8 hours, intending to dehydrate it;  this was a bit too much.  If it’s squeezed properly, 2 hours on the countertop is probably plenty “drying” time.
  • Queso fresco is typically quite salty.  Even though I added 2 T. of salt to the milk, the result wasn’t very salty, so before squeezing it in cheese cloth, I added some more salt (at the same time as the minced hot pepper); in my opinion it still wasn’t enough salt.  Next time I will add even more salt when squeezing it, before pressing it.

Scotch Bonnet Queso Fresco

This was a good Cinco de Mayo project, and I was left with two varieties of queso fresco ready for my forthcoming Chicken Tinga tostadas and tacos!

Chorizo Buffalo Chicken Sandwich

Chorizo Buffalo Chicken Sandwich

If ever you find yourself having to choose a last meal, and it must be a sandwich, you’d be doing yourself a final favor to request this Chorizo Buffalo Chicken Sandwich.

This is a sort of tribute to Katja’s Kitchen, as it is a variation of Katja’s Oven-Baked Buffalo Chicken Sandwich.

I used her recipe pretty much as-is.  However, I started by browning about 2.5 ounces of mexican chorizo in a pan.  I cooked the chorizo slightly less than I would if eating it immediately; after all, it’s going to bake in the oven with the chicken.

Sliced chicken breast and pan-frying chorizo

I sliced a relatively small chicken breast lengthwise, but not all the way through, so I could fold it open to a nice thickness for a sandwich.  (Hmmm, this may be twice as much chicken per sandwich as Katja’s recipe.)

Next, I pressed most of the fat from the chorizo and mixed it with .5 ounces of lightly crushed Special-K breakfast cereal, then coated the chicken breast as she described in her recipe. Be sure to press the coating to the chicken so that it is still adhered when it finally makes its way to your sandwich.

Dredge the chicken breast in flour, coat with egg, and chorizo/cereal mixture.

I similarly baked it in a 350° F oven for 30 minutes.

I served the chicken on lightly toasted sliced cheese bread, from our Farmer’s Market, topped it with hot sauce (Valentina brand Salsa Picante, which is much hotter than Frank’s Red Hot, thus I used it sparingly), ranch dressing, thinly-sliced celery, and a bit of crumbled queso fresco – not that the sandwich needed it, it’s just that I made the fresh cheese yesterday, so “Why not?” It’s my last meal of the, umm, afternoon. :-)

Chorizo Buffalo Chicken Sandwich

Here are the recipes that inspired this sandwich:

Thanks for this and the other recipes, Katja!

A Shrimpy Lobster Roll

The Grilled Shrimp Roll

Shrimp Week’s dramatic conclusion!

If you’ve ever had a Lobster Roll, then you know it’s approximately the best sandwich in the universe…
Certainly, you’ll agree it’s at least the best sandwich in Maine.
Here’s my twist on that classic, prepared with some left-over grilled shrimp.

Shrimp Roll ingredients

Ingredients (per sandwich):

  • cooked shrimp, I used 5 large grilled shrimp cut to bite-sized pieces
  • 2 napa cabbage leaves
  • 1 celery stalk, diced
  • chives, minced
  • ciabatta or other long sandwich roll
  • Thai Peanut-Lime Dipping Sauce

Preparation:
In a bowl, simply mix shrimp, celery, chives, and (sparingly) the coconut milk-based peanut-lime sauce to prepare a sort of shrimp salad.  Since the sauce is quite thin, be sure not to add too much.
Assemble the sandwich by filling the roll with that mix, atop the napa cabbage leaf; this helps prevent the thin sauce from saturating the roll.

Grilled Shrimp Salad / sandwich filling

I served the Shrimp Roll with a bit more sauce for dipping.

Grilled Shrimp Roll with Thai Peanut-Lime Dipping Sauce

As you can see, this sandwich is so tasty that I didn’t manage to get another photo before taking a few bites. :-)

You can find the recipe for the sauce here:

Avocado & Shrimp Quesadilla

Avocado & Shrimp Quesadilla with Coconut Lime-Peanut Sauce

The Shrimp Week posts continue!

With some left-over grilled shrimp and dipping sauce, I made this delicious quesadilla for a quick breakfast.

It is simply hummus, cooked shrimp cut to bite-sized pieces, ripe avocado, and a coconut milk-based Peanut-Lime Dipping Sauce warmed open-faced in a pan over medium heat until the tortilla reaches the desired crispness.
I wait to add the avocado at the end, since I prefer it unwarmed.

As it happens, hummus is commonly eaten for breakfast in its countries of origin.

Avocado & Shrimp Quesadilla with Coconut Peanut-Lime Sauce

Hmm, now that I think of it, since I substituted hummus for cheese, I guess it’s not a proper quesadilla.  How do I get away with this stuff?  Yay for fusion cooking!

I’ve been making quesadillas since I was a child, having been introduced to them by my California cousin.

Here’s a quesadilla-making tip: while I didn’t do it here, when warming the quesadilla in the pan, spread the ingredients, especially the cheese, over the whole tortilla, not just one half.  The cheese melts faster, and the other ingredients warm faster, so you’re less likely to over-brown your tortilla… and the melted cheese acts as an adhesive so you can still fold it over without having the ingredients falling off the “top” half.

Here’s the recipe for the sauce:

Roasted Broccoli & Shrimp

Roasted Shrimp & Broccoli

Happy May Day!

This week is a busy one with my research work, so here’s an easy, delicious meal for you (and me). Actually, this is turning out to be “Shrimp Week” for me; this is just one of 4 posts I had in mind on the subject.

This broccoli & shrimp dish is a great find from The New York Times, c. 2009;  I’ve linked the recipe below.

For four servings, I bought 3 stalks of broccoli, 1 pound of 31-40 ct. raw, deveined shrimp, and 4 limes.

To prepare, cut broccoli into bite-sized florets.  You could use the chopped stem portion too, if you like (roasting them a bit longer than the florets), but I saved those for another recipe.  Toss the florets with olive oil (~2 T.), coriander seed (~1 t.), cumin seed (~1 t.), coarse salt, ground black pepper, and mild paprika.

Broccoli florets tossed with olive oil, coriander seed, cumin seed, salt, pepper, and mild paprika

Peel the raw shrimp and toss them separately with olive oil and the zest of 1 lime, salt and pepper.

Peel 1 pound of 31-40 ct. raw shrimp

Spread the broccoli out on a baking sheet, and roast them, first on their own, in a 425° F oven for 10 minutes.

Broccoli and shrimp arranged for roasting

After the broccoli is partially roasted, similarly arrange the shrimp in one layer on a baking sheet and bake both the broccoli and the shrimp at 425° F for about 10 minutes, just until the shrimp are perfectly done.  You can combine them with the broccoli if the baking sheet is big enough for both in one layer with a bit of space between the shrimp and florets.

Perfectly roasted broccoli and shrimp :-)

When done roasting, drizzle the juice of perhaps 2-3 limes over the broccoli and shrimp (to taste).

I served the broccoli and shrimp atop sticky white rice with a lime wedge on the side.  Give it a try; it’s a perfect combination of flavors!

Roasted Broccoli & Shrimp with Rice

Oh, and don’t skip the coriander seed; it’s important!
I found coriander seed in a bag in the bulk(ier) spice section of my grocery store.  It was less than half the price, and more than twice the quantity, of that sold in a spice rack sort of jar.

Here’s the recipe from The New York Times; I substituted lime for lemon and mild Turkish paprika for chili powder:

Tea-Smoked Catfish

Tea-Smoked Catfish on Cucumber with Honey Tzatziki

Tonight I experimented with a Chinese cooking technique: tea smoking, that you can do indoors in your kitchen… if you want to stink up your house; ha ha, only kidding; my housemate arrived mid-smoke and said it smelled pretty good. :)

I learned about tea smoking on Chef Ming Tsai’s program, Simply Ming, perhaps a month or two ago.

First, tea smoking typically calls for a covered pan with a lid, and a screen or wire grill that can fit inside to suspend the fish or meat above the smoking materials.  I decided to use an old pan that I no longer use, and should have discarded because the non-stick surface is flaking off.  I figured it was perfect for this application since the food doesn’t come in contact with the pan’s surface and it has a tight fitting lid.

I lined the pan with two layers of aluminum foil, and placed the smoking materials in it: some uncooked Calrose rice, Darjeeling tea, brown sugar, and some tarragon leaves.  (The tarragon was once fresh, but that was a long time ago, so I thought cremating it was reasonable.)  I used Darjeeling, an Indian rather than Chinese tea, simply because that was the only leaf tea I had on hand.  I don’t see why you couldn’t use any tea, even ground tea leaves, though.

Ingredients and tea-smoking materials in a pan.

The fish I chose was an unusual kind of catfish, well, unusual to most Americans: it’s sold here by the name “Swai,” and is a typically farm-raised in the Mekong Delta region.  This fish is just a bit lighter and more flaky (less meaty texture) than U.S. catfish. While technically a catfish, it isn’t allowed to be sold by that name here because it competes with the U.S. farm-raised catfish.  If you’d like to know more about this increasingly popular and sometimes controversial fish, you can read more in my recipe for  Moo Shu Catfish.

I prepared the thawed fish filet (3-4 oz., about 1/2″ at its thickest point) by rubbing it with some five spice powder and brown sugar and placing atop napa cabbage leaves in a steamer to be placed in the smoking pan, with another layer of aluminum foil between the steamer and the smoking materials so that they don’t adhere to the steamer as they burn.  (I didn’t have a screen or wire rack, so I improvised by temporarily removing the plastic handles from my rice cooker’s steamer basket.)

Swai fillet atop napa cabbage, ready for smoking.

Next, I set the burner to a medium-high heat, and when it began to smoke a bit, covered the pan with a tight-fitting lid, reduced to medium heat, and cooked for 15 minutes; luckily the lid was just high enough to accommodate the steamer basket.

After those 15 minutes, I removed the pan from the heat and allowed it to sit another 15 minutes, then uncovered it.

The tea-smoked and cooked Swai fillet.

I served the filet on lightly salted, peeled cucumber slices (overlapped, otherwise they can’t be picked up with chopsticks!) and topped it with a simple tzatziki-like sauce of greek yogurt, minced garlic, black pepper, salt, and a touch of honey.  While I used fresh garlic here, I’d suggest using roasted garlic as the sauce’s garlic flavor was a bit harsh for this mild fish.

Tea-Smoked Catfish

So, the verdict? The fish was moist and tender with a significant smoky flavor, but quite unlike that of wood-smoked fish. It’s a tasty option. I do think, however, I would have experienced the smoky flavor more genuinely had I not been essentially standing in or over the smoke for a half hour or more just prior to dinner. :)

I’ll experiment with different rices and teas, and perhaps tea-smoke a brined Cornish game hen before baking it.

Lastly, I see why some tea smoking demonstrations suggest covering everything with foil (including the lid). The smoke mixes with the moisture and can make for a couple extra minutes of scrubbing during clean-up.  It’s super easy to just discard the foil instead.

Here are the recipes I consulted:

Asparagus & Paneer Masala

Asparagus & Paneer Masala with potato and swiss chard, accompanied by Saffron Rice

It being springtime in my hemisphere, asparagus is de rigueur.
This dish is my melding of that favorite, oven roasted, and combined with a new challenge for me: paneer – a fresh, Indian cheese, that I hoped would complement the asparagus.

First, I prepared the paneer. As it happens, I signed up for a cheese-making class this coming weekend and was looking forward to trying my hand at a fresh cheese such as queoso fresco. Coincidentally, Tahmina post Paneer – 101 just in time for me to give it a try.  I prepared the paneer just as she described, using the juice of a bit more than 2 lemons, and similarly pressed it at room temperature under a cast iron skillet for about 3 hours before using it.  Once the paneer was kneaded smooth, I also added toasted cumin seed (1 1/2 t.) and salt (3/4 t.), that I’d crushed a bit with a mortar and pestle, and distributed it evenly throughout the paneer.

Paneer with Toasted Cumin Seed

I prepared the saffron rice, first, by soaking perhaps 10 saffron threads in a few teaspoons water for an hour or two.  Then I prepared rinsed jasmine rice in a rice cooker; when it was done, I separated half of it into a bowl, and thoroughly mixed it with the saffron and the yellow water in which it was soak.  Lastly, I combined the yellow and white rice, and mixed them until approximately evenly distributed.  (Chopsticks are a good choice of tool to mix rice if it is somewhat sticky.)

I prepared the masala roughly according to these two recipes: Squash, Potato, and Chard Curry and Subzi Paneer Masala.  I used a large red onion and 2 cans of diced tomato for the sauce, puréed in a blender with minced garlic and ginger.  I diced multi-colored small potatoes (brown, red, and purple) and partially cooked them in oil (left from frying the paneer) before adding them to the masala. I cut the chard stems into bite sized pieces, and the greens more coarsely, adding them sometime after the potato, since they need less time to cook.  Also, rather than fresh hot pepper, I used a bit of cayenne powder.

While preparing the masala, I roasted the whole asparagus spears under the oven’s broiler on a foil-lined baking pan, with olive oil, being sure to turn them occassionally and not allow them to burn.  (If you were to serve roasted asparagus as a side-dish, you’d likely add, salt, pepper; since I was preparing it to top the masala, I used only the oil this time.)

To serve, rather than mixing the asparagus, cut into bite-sized pieces, and fried paneer into the masala, I simply tossed them together, keeping them warm in the oven, and placed them atop the masala so that their textures and colors were retained.

All in all, I wasn’t completely happy with this dish.  The tomato and yogurt-based sauce didn’t have the smooth consistency nor the bright orange color that I expected and had seen, for instance, in butter paneer masala dishes at restaurants.  I used a low fat greek yogurt, rather than the usual [high fat] greek yogurt that I buy at Trader Joe’s;  that may have been part of the lack of smoothness to the resulting sauce.

Here are a few things that I learned:

  • Making fresh cheese is not difficult, but practice may be necessary to get the desired consistency.  Mine was a bit on the soft side for pan frying;  I should have squeezed just a bit more water from the paneer before pressing it.
  • To present the beautiful colors of vegetables such as various potatoes and rainbow swiss chard, don’t cover them in a tomato-based sauce.  Next time I think I will either use the potato and chard or the blended tomato sauce, but not both. :)
  • I used whole coriander seed, that I toasted lightly with the cumin seed.  In this dish, however, the whole coriander seed was a bit too much of an occassional flavor explosion, so I would grind it next time.  (I have had a shrimp and broccoli dish that is perfect with whole coriander seeds, so it works with some things and not others.)
  • Bright yellow saffron-rice and white rice mixed doesn’t provide quite enough contrast to be as visually dramatic as I wanted.  Some Indian restaurants must use red food coloring as well.

I was quite happy with the paneer, and now I do have plenty masala left-over for meals this week… back to work. :)

Shiitake & Carmelized Onion Soup

Shiitake & Carmelized Onion Soup

This past week was less than spectacular in my humble kitchen.  I created a weird tofu and bean thread noodle dish with a red wine-based sauce; hmm, it was just OK – I’m guessing no one wants purple tofu :-).  My other effort was a repeat: Pepper Steak, but this time I also made beef stock as a side-effect, owing to the fact that I had a lot of left over beef trimmings.

But, it’s a new week, so, today I’m doing something new (to me): a puréed vegetable soup!

My inspiration for this soup was the puréed shiitake mushroom soup at a local restaurant.  However, I didn’t have enough shiitake on hand, so I decided to mix it with onion, carmelized for sweetness to balance the earthy, but often slightly bitter, shiitake.

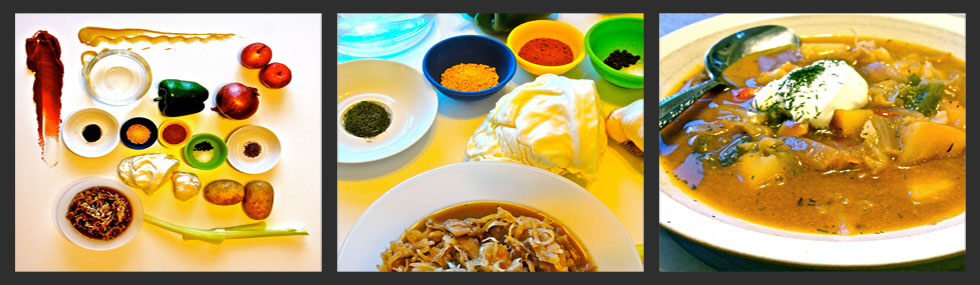
Shiitake & Carmelized Onion Soup Ingredients

Ingredients (yields 6 cups):

  • olive oil (~3 T.)
  • shiitake mushrooms (~2 oz., dried)
  • onion (e.g., yellow or other; I used 2 medium plus 3 small, cut lengthwise in strips)
  • soup stock (4 cups, I used homemade beef stock from trimmings boiled with mushroom stems, bay leaves, oregano, rosemary; fat separated)
  • garlic (4 cloves)
  • fresh ginger (1 thumb, minced, I used half of that shown in the photo)
  • salt (~2 t.)
  • ground pepper (~3/4 t.)

To prepare, first, reconstitute the dried mushrooms in a bowl of warm water.  I placed a small plate over them to keep them submersed; this will take about an hour.

Rehydrating Dried Shiitake Mushroom

Simultaneously, carmelize the sliced onion with 2 T. olive oil in a large pan or pot (8+ cup capacity; I used a 12-inch cast iron skillet) over low to medium-low heat, strirring often, for 45 minutes to an hour.  Be careful not to burn the onions, but rather make them tender and browned slowly, adding a bit more olive oil if it seems they are drying out.

Beginning to carmelize the onions and roast the garlic.

In the same pan, roast the garlic cloves until tender and the ginger a bit.  Since my garlic cloves were already peeled, I wrapped them in foil as well as the minced ginger, so that it could be easily removed when tender.
When carmelized sufficently, the onions should be moist, browned, and very tender; the garlic cloves should be tender as well.  (I removed the garlic from the foil to accelerate the roasting.)

Carmelized Onion and Roasted Garlic

Next, place the rehydrated mushrooms in a colander and press out most of the absorbed water (to avoid excess water in the soup).

Rehydrated and pressed Shiitake Mushroom; save the water!

Coarsely chop the mushrooms and add them, along with the minced roasted garlic, and 2 cups soup stock to the pan with the carmelized onions and bring to a boil, cook for a short time (it seems to me that mushrooms, from dried, should be cooked), then remove from heat.

Carmelized Onion, Chopped Shiitake, Minced Roasted Garlic, and 2 cups stock.

Next, purée the ingredients into a soup, adding the minced ginger, ground pepper, salt, and about 2 cups more soup stock, which you can add progressively to acheive your desired consistency; you can use some of the water used to rehydrate the mushrooms, but be aware that it will impart a bit more bitterness to the flavor.

As with most soups, the right amount of salt is key.  Be sure to be conservative and taste test it as you add the salt.

I puréed the soup, somewhat inconveniently, in a traditional blender by adding some soup ingredients and stock little by little, progressively working up to its “liquify” setting.  Alternatively, you could purée the soup right in the pan or pot by using an immersion blender.

I served the soup topped with sourdough croutons, simply cubed fresh sourdough bread, pan fried in a little salted butter, and some finely sliced green onion, that was luckily growing out the top of one of my yellow onions that had been left in the sunlight on the countertop for too long. :-)

Shiitake & Carmelized Onion Soup

The result: delicious!  It’s got a creamy texture, but without dairy ingredients, and a nice blend of shiitake and sweet onion flavors, and just enough spice to keep you awake, from the ground pepper and ginger.

Alas, the way I prepared it isn’t vegetarian, but it could be done quite easily, of course.  Also, I used less than $2 of dried shiitake and onions as well, so it’s a nice, inexpensive, healthy soup!

Here are some related recipes that I considered: